Sign Up
for Our Blog
& Newsletter.
This article was written by team member Tim Krones
What H5P is (and why you should care)
H5P is a tool that allows course authors to create rich HTML5 content for their courses, including games such as Find the Words and personality quizzes, multimedia apps such as audio recorders and interactive videos, as well as a variety of common and not-so-common question types. It is external to the Open edX platform and integrates with the platform via LTI, which is a protocol that allows Learning Management Systems (LMS) or platforms to integrate remote tools and content in a standard way. This is great because it means that any exercises you create with H5P will be usable both in the Open edX platform and in any other LMS that supports LTI.

How to integrate H5P content into your course
The process of integrating H5P content into your course consists of two steps:
- Authoring content on H5P.com.
- Adding LTI components to your course to reference specific pieces of content.
We’ll cover both of these steps in more detail below.
Authoring content
Before you can get started creating content with H5P, you’ll need to set up an account with them here. (It is also possible to self-host H5P but for the purpose of this article we’ll assume that you are using H5P as a service.)
Once you’re done with that, log in to your H5P account and follow these steps to create a first exercise to embed into your Open edX platform course:
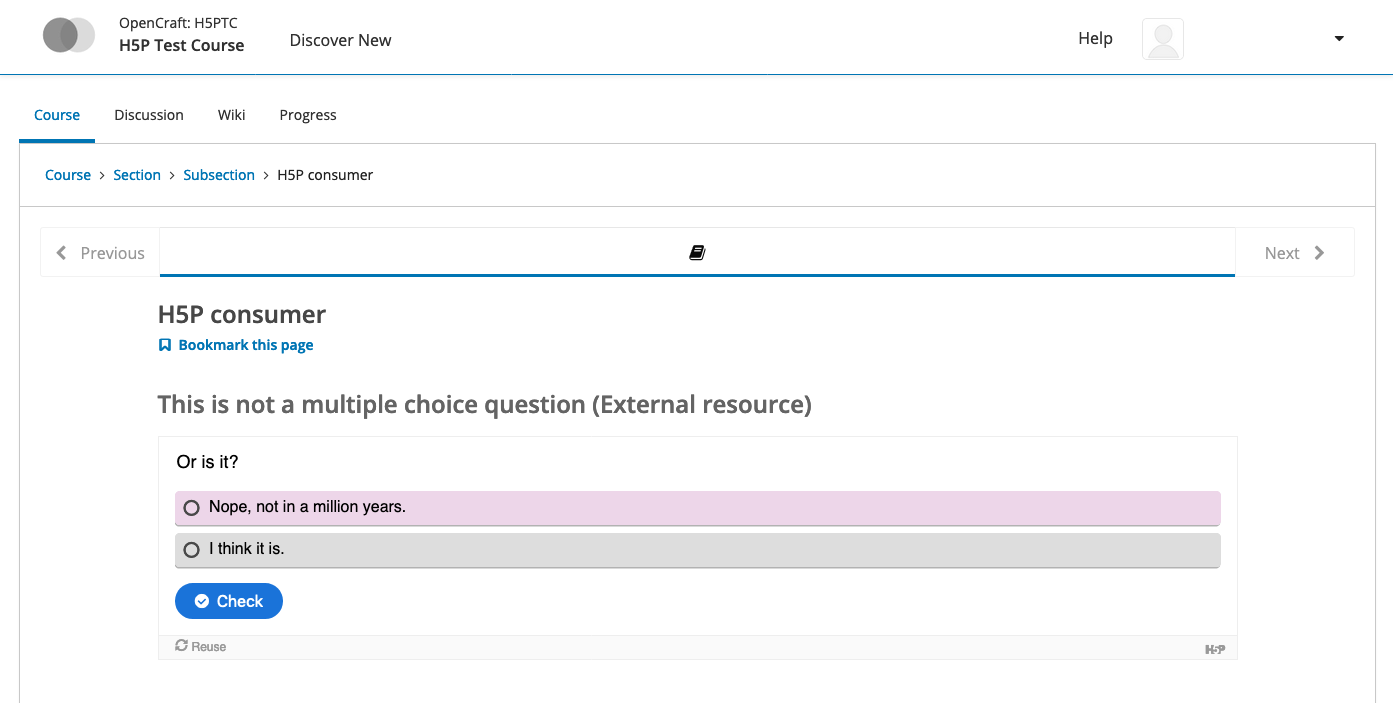
- On the content page (https://<your-domain>.h5p.com/content), click “Add content”, then select “Multiple Choice” from the set of content types.
- In the form that comes up fill in all fields that are mandatory. At the time of this writing, these include Title, Question, Text (for each available option), and feedback for Score Range. For detailed information about individual fields as well as additional configuration options, click the “Tutorial” button above the form.
- Scroll to the bottom of the page and click “Save” when you’re done. To get back to the content page, click the folder icon at the top left of the page.
You can repeat these steps as many times as you like to create additional content items. If you get stuck or need additional information on a given content type, click the “Tutorial” button (if available) or use the “Example” button to bring up an interactive demo of the content type.
Adding content to your course
Initial setup: H5P
To allow your Open edX instance to identify itself when talking to H5P you’ll need to create an LTI consumer representing your Open edX instance in H5P. The process for this is straightforward and only requires a few clicks: Starting from the content page, navigate to “Manage Organization” > “Setup LTI”, enter a label for the new consumer in the form that comes up (such as “Open edX consumer), and click “Create”.
You’ll only need to perform this step once.
Initial setup: on the Open edX platform
To prepare your Open edX platform course for integrating content via LTI you’ll first need to create an LTI passport and add it to your course configuration in Studio. LTI passports look like this:
<lti_id>:<client_key>:<client_secret>
- <lti_id> can be anything as long as it’s easy to remember and only contains alphanumeric characters and underscores. For H5P you could simply set it to h5p, for example.
- <client_key> and <client_secret> are provided by H5P. Starting from the content page on H5P you can obtain them by navigating to “Manage Organization” > “Setup LTI” and copying the “Key” and “Secret” listed for the LTI consumer that you created earlier.
Once you’ve put together the key, go to “Settings” > “Advanced Settings” > “LTI Passports” and add it there. The result should look like this:

Secondly, you’ll need to add “lti_consumer” to the list of advanced modules for your course. Go to “Settings” > “Advanced Settings” > “Advanced Module List” and edit the field to look something like this:

You’ll only need to perform these steps once for a course. So when you’re done with them you can go back to focusing on creating and integrating content into your Open edX platform course.
Adding LTI components
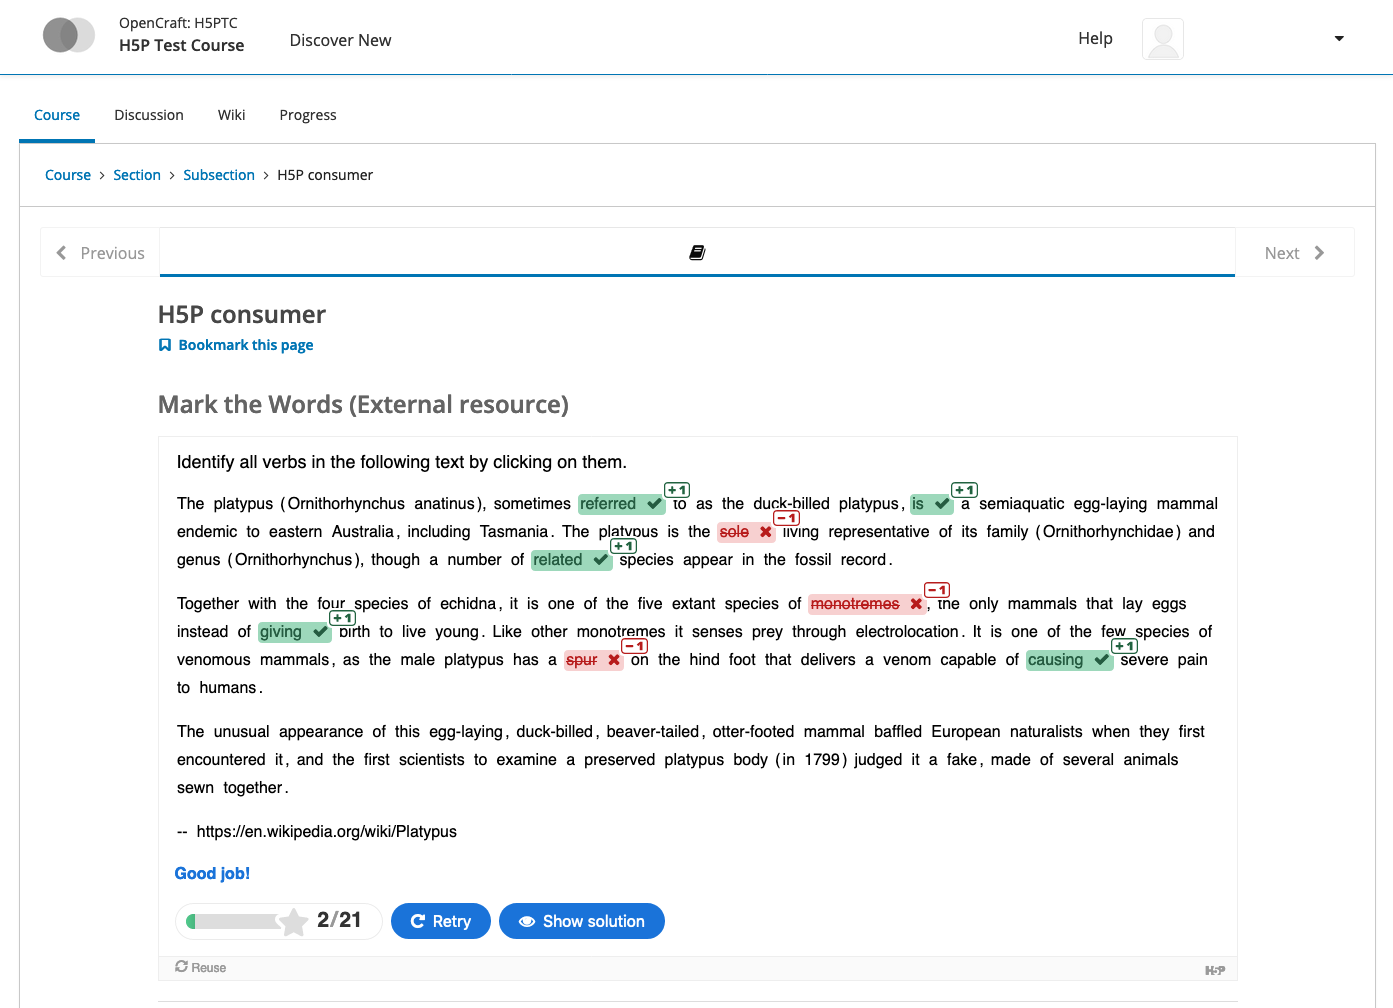
To integrate the H5P content that you created earlier into a unit of your Open edX platform course, follow these steps:
- Navigate to the unit you would like to modify and add an LTI component by clicking “Advanced” > “LTI Consumer”.
- Bring up the dialog for configuring the newly added LTI component by clicking “EDIT”. For testing purposes you can leave most of the fields at the default values. The only fields that you will need to customize are:
- LTI ID: Should match the <lti_id> of the LTI passport that you added to your course configuration earlier.
- LTI URL: The URL pointing to the H5P content item that you would like to embed. You can obtain this URL by right-clicking the content item on the content page and copying the corresponding link. (Alternatively, you can click on the content item to view it and copy its URL from the address bar of your browser.)
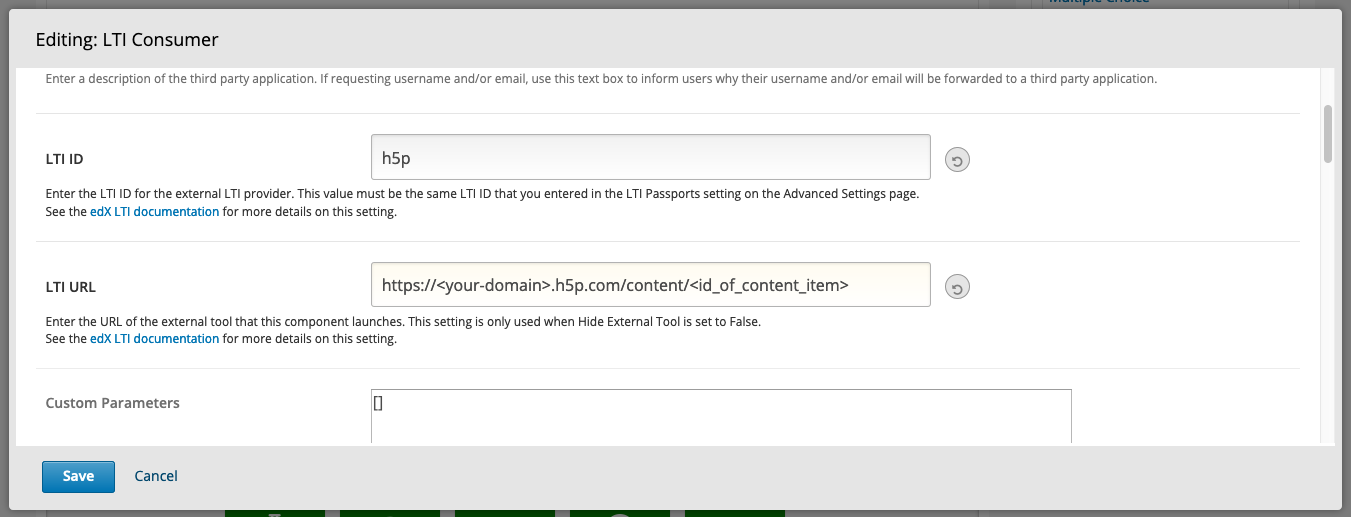
- Click “Save” when you’re done and “Publish” the unit to make the H5P content show up for your learners in the LMS.
If you created more than one content item on H5P.com earlier, you can repeat the steps above to integrate those into your course as well.
Celebrate ?
Congratulations! You now know how to integrate H5P content into your Open edX platform courses, which means you’ve unlocked a plethora of additional options for designing learner experiences for your courses.
I’m too busy to do the setup myself. Where can I test it?
Today’s your lucky day 🙂 OpenCraft is hosting an Open edX instance for testing H5P from a learner’s perspective. All you need to do is create an account and enroll in the H5P Test Course. If you’d like to test the authoring experience as well and don’t have an Open edX instance that you can use for this purpose, we suggest that you sign up for OpenCraft’s free 30-day hosting trial. This will give you your very own Open edX instance to create courses on and test built-in features of the Open edX platform as well as external tools such as H5P.
Onward and upward: A note on additional features
H5P provides support for both basic LTI and Deep Linking. The latter is a new-ish addition to the LTI standard and makes it possible for course authors to create and select content from within the LMS that is embedding the content. This means that with Deep Linking, there is no longer a need to switch to a separate platform (such as H5P.com) to author LTI content. At the time of this writing, the Open edX platform does not yet support Deep Linking, so course authors can’t benefit from in-situ content creation when using H5P with the Open edX platform.
OpenCraft would love to help improve support for new LTI features such as Deep Linking in the Open edX platform. If this sounds interesting to you as well, don’t hesitate to let us know! You’re welcome to reach out via contact@opencraft.com, or (better yet) join the community on edXchange or the official Open edX forum and post your ideas and/or questions there.
Further reading
- H5P documentation, including a guide on Getting started with H5P and a dedicated guide for course authors
- Full list of content types and applications that H5P provides
- Configuring Open edX as an LTI consumer and adding LTI components
Thanks:
We'd like to thank the fine folks at H5P for their help and for providing a test account : )