When you search Google images for “UX design process” you’ll probably see something a little like this:
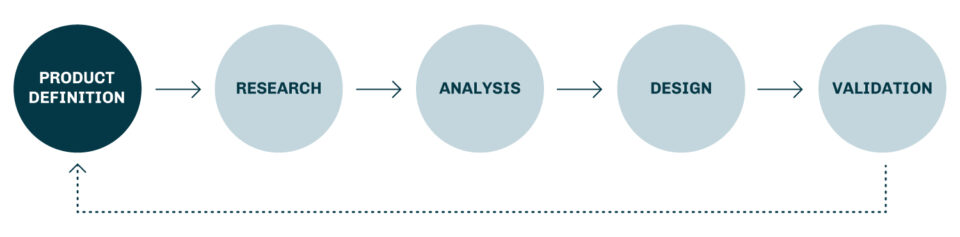
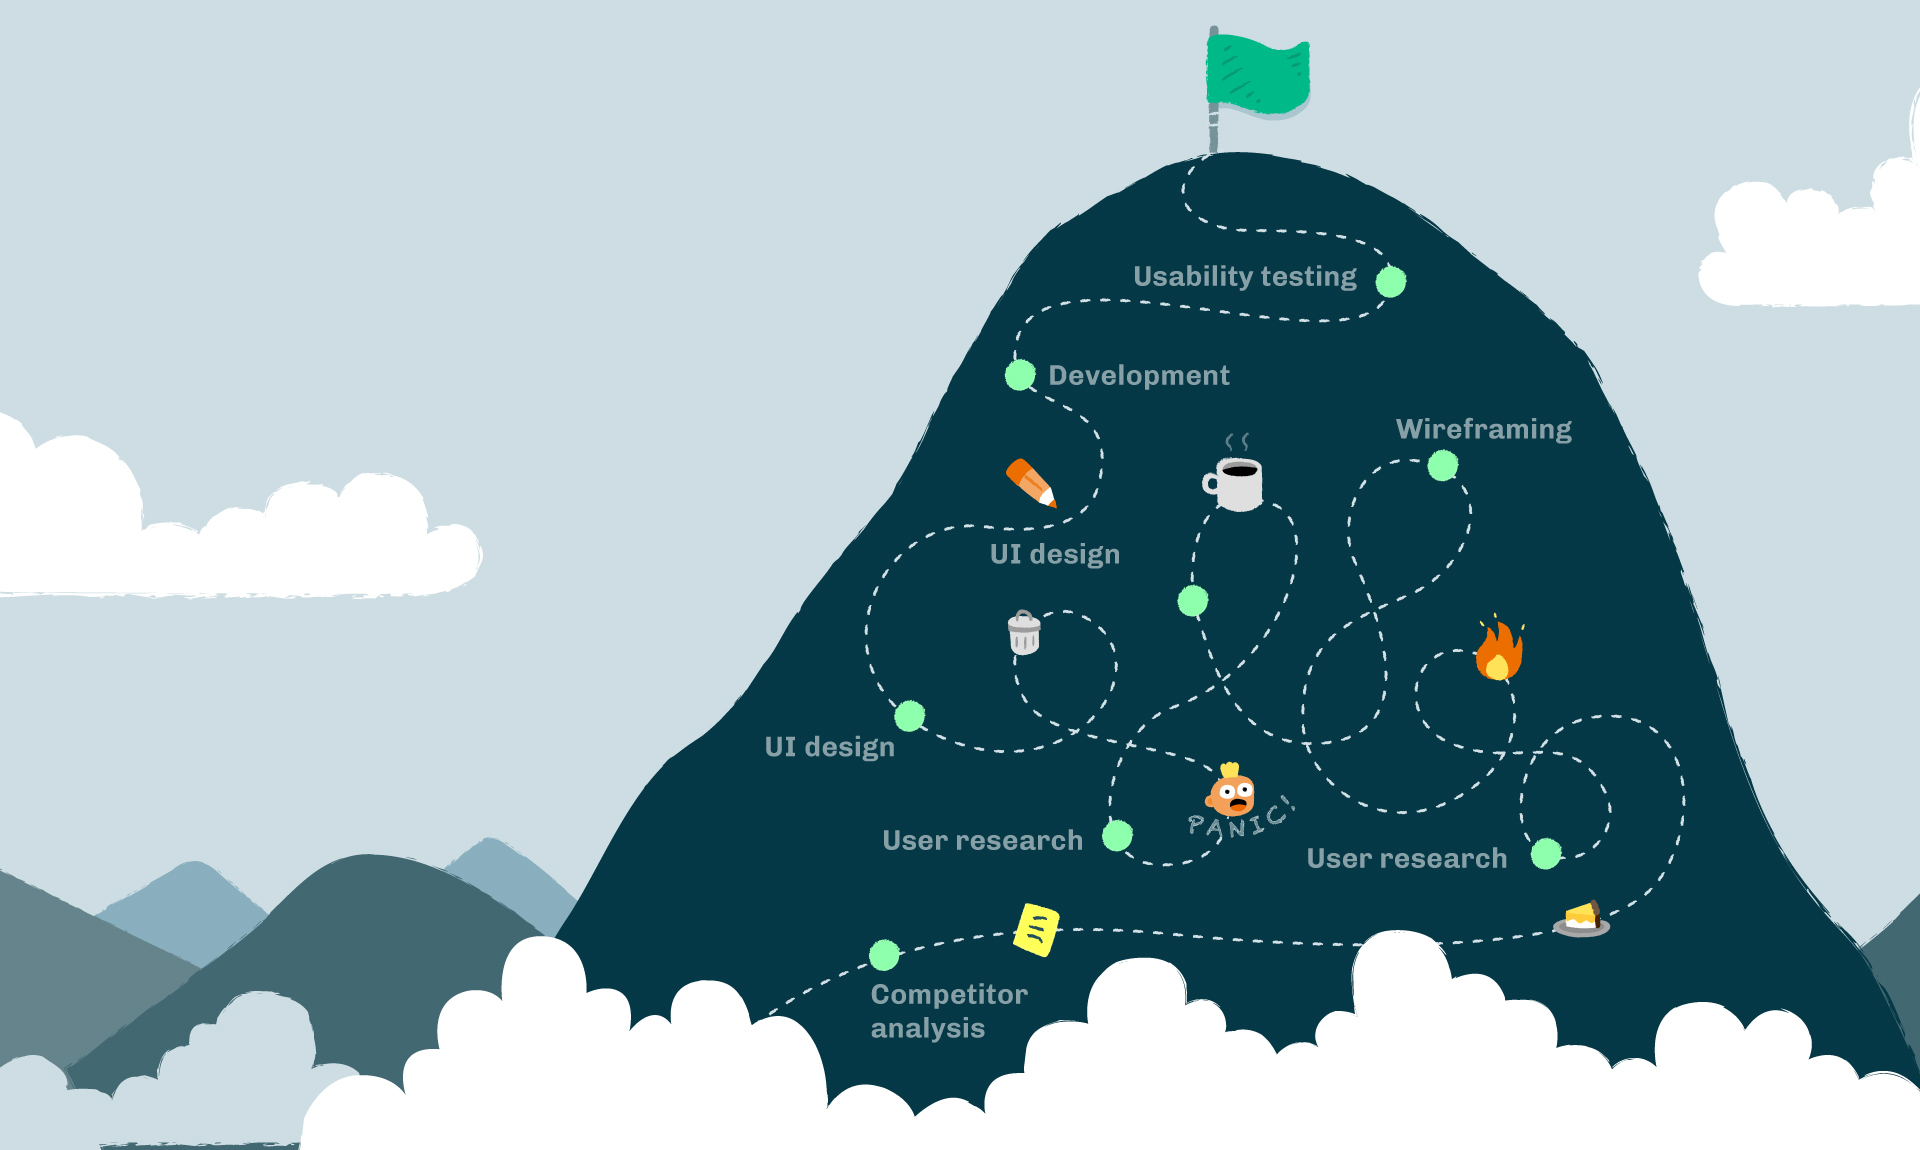
I wish the UX design process was that simple. In my experience it looks more like this:

Yup, that’s right! It’s a mess. Just the sight of it makes the control freak in me break out into a sweat! But that’s what user experience is - a messy road full of infinite twists and turns.
In this article, I’m going to tell you about a project with a process that has been, what my mother might say, "messier than a bowl of spaghetti." At OpenCraft we’re in the process of building a theme that we hope will live up to the Open edX promise of “delivering inspiring learning experiences.” We want the experience to delight course creators and learners alike. To do that, we’ve had to discover what these users really want and need. In the end, we hope this theme is not only beautiful to look at, but also removes barriers, and creates a delightful learning experience.
So let’s dive in and see just how messy the process has been so far.
To kick off the project, my team and I undertook a little UX espionage. Granted, I’m no James Bond; there are no tuxes, gadgets, or martinis; well, at least not until lunch time 😉. My spycraft normally involves a comfy chair, coffee, and a fast internet connection. My mission: evaluate the competition. This is a great way to see what can be emulated and what should be avoided. After all, we don’t want to make the same mistakes that other services have made, nor do we want to miss out on the insight we can gain from their UX victories! In other words “Don’t reinvent the wheel; redesign it!”
There is certainly no shortage of inspiration out there. We were particularly inspired by the edX, Coursera, Udemy, and HubSpot’s UX strategies. Here’s why…
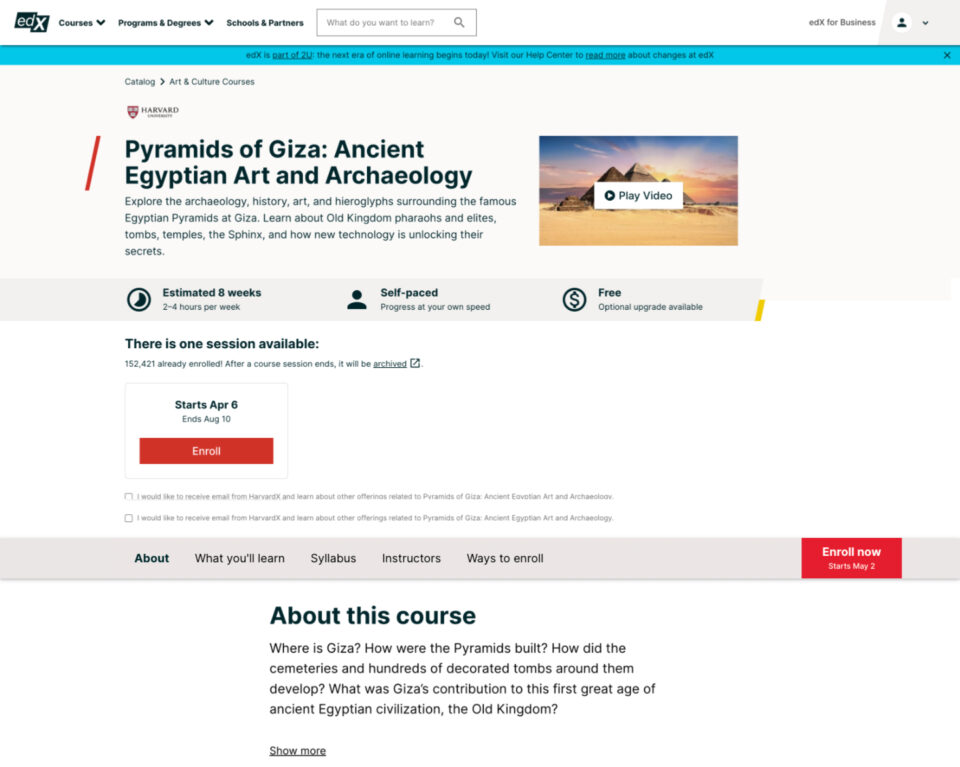
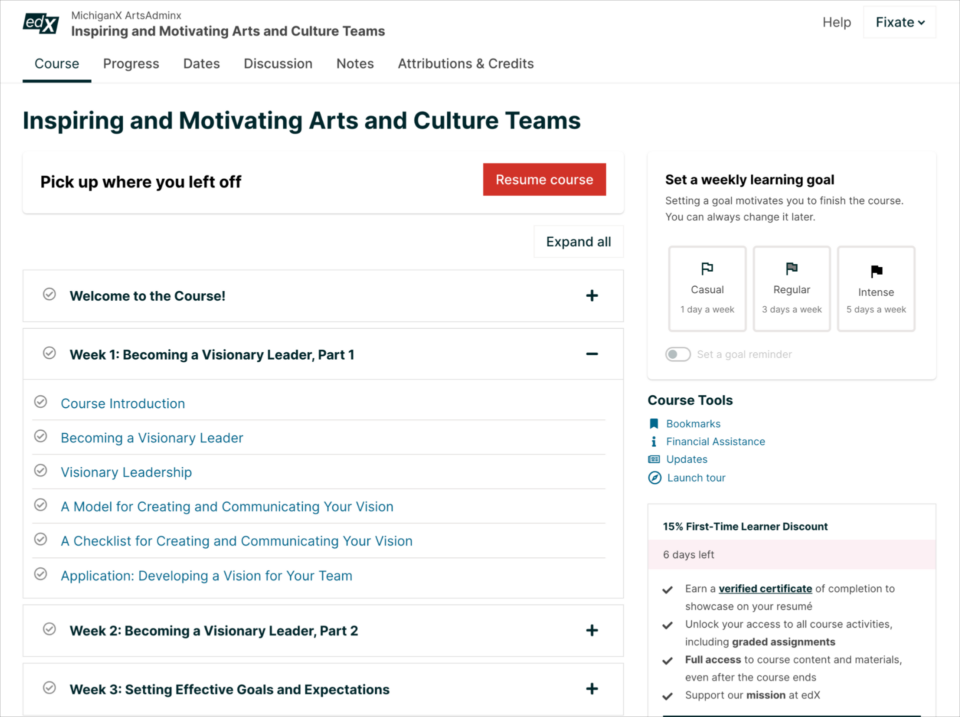
Why we liked the edX Course Overview page:
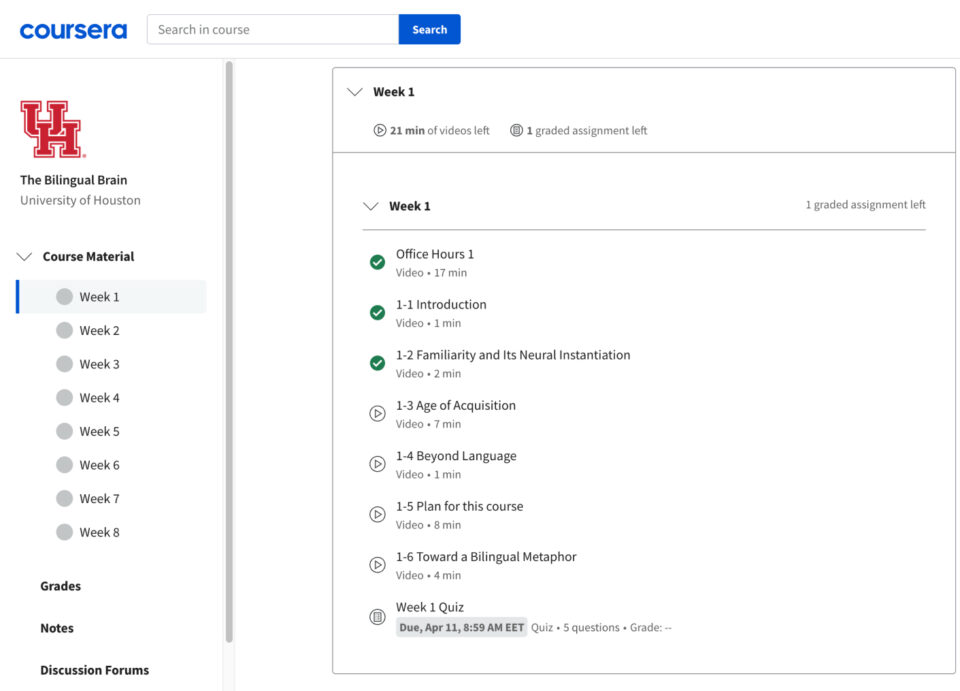
Why we liked Coursera’s learning area:
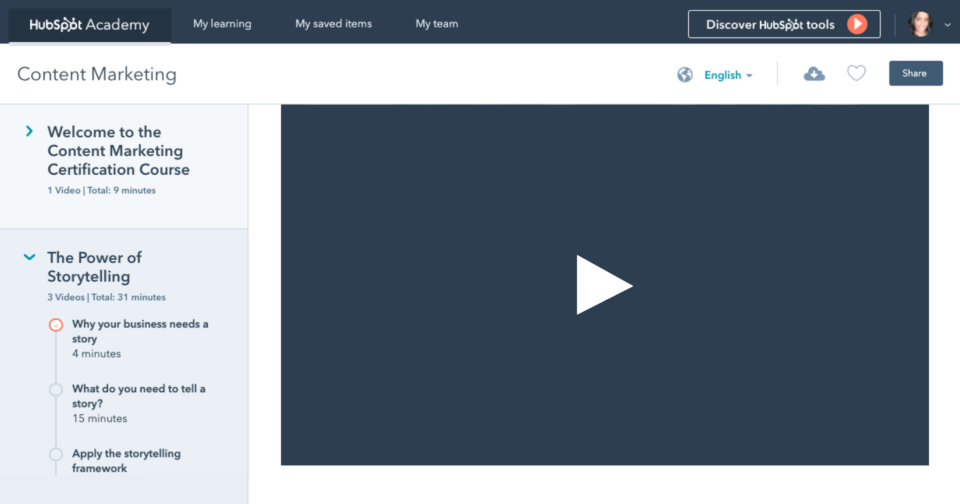
Why we liked Hubspot’s course navigation:

Why we liked Udemy’s learning area:
The intel gathered when scoping out the competition is a nifty way to get your creative juices flowing ahead of the design phase. But before starting the design, it’s important to check in with your target users. That intel can be pure gold.
If we don’t speak to our users, we’re just guessing what they need, what they want, and how they’ll interact with a product. User research is key to building successful products. It can feel like a massive undertaking, but it doesn’t need to be. With just a little effort you can gain valuable insights. In the case of this project, we turned to the Open edX community. I posted a thread on the Open edX forum hoping to get some input.
The feedback we received was eye-opening and incredibly useful. Here are some of the major points that came up:
A picture was starting to form in our minds, summarized nicely by what one user said, “The interface should get out of my way so I can focus on learning.” The design shouldn’t distract learners from their learning goal; it should help them achieve that goal. Users are there to learn, not to be wowed by interesting design or distracted by fancy animations.
At this point in the process we needed to take everything we’d learned and start designing.
I’ve found that the best way for me to process user research is to start with wireframes. It’s a great way to throw all your thoughts on a page so you can start aligning concepts according to user feedback.
We started with the most important part of the interface first: the learning experience.
You might be familiar with the edX interface below; this was the major source of inspiration for our first attempt.
We kept edX’s basic layout but simplified it. This is the resulting wireframe:
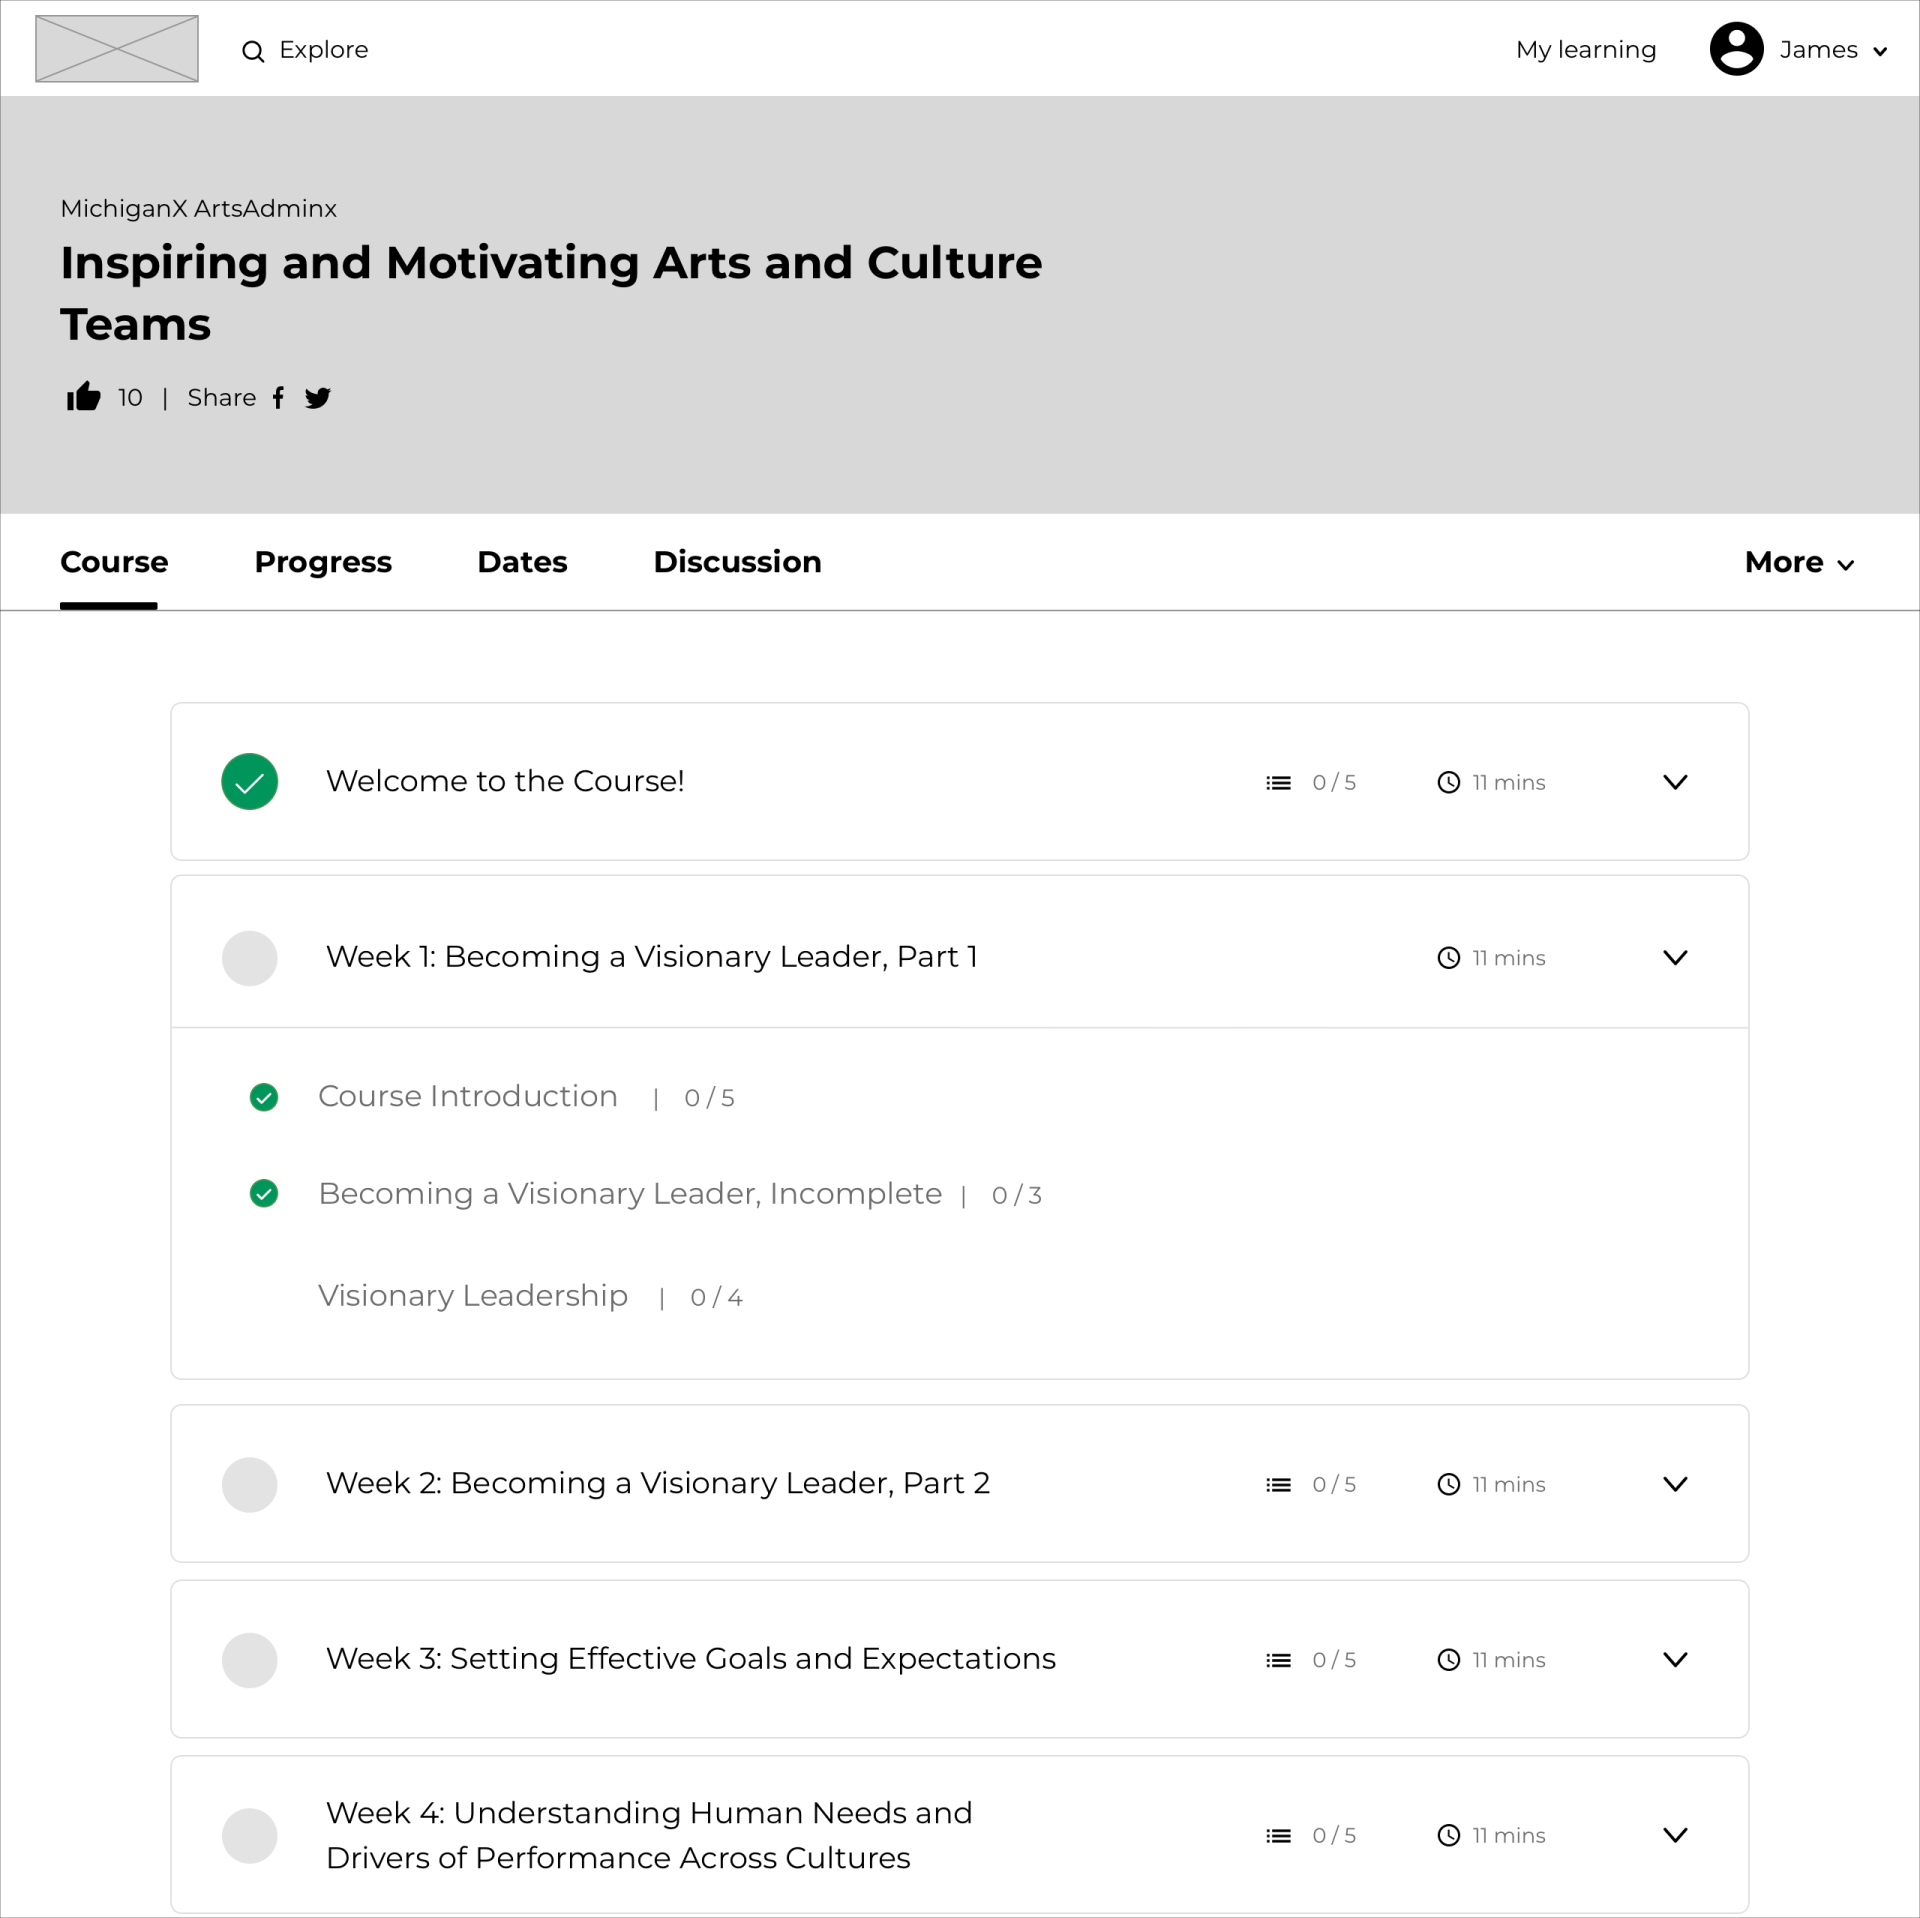
Here’s what we did:
Overall, this attempt felt clean and distraction free. But now we had to decide what would happen if a user selects a section, like Visionary Leadership, for example. This is what we came up with:
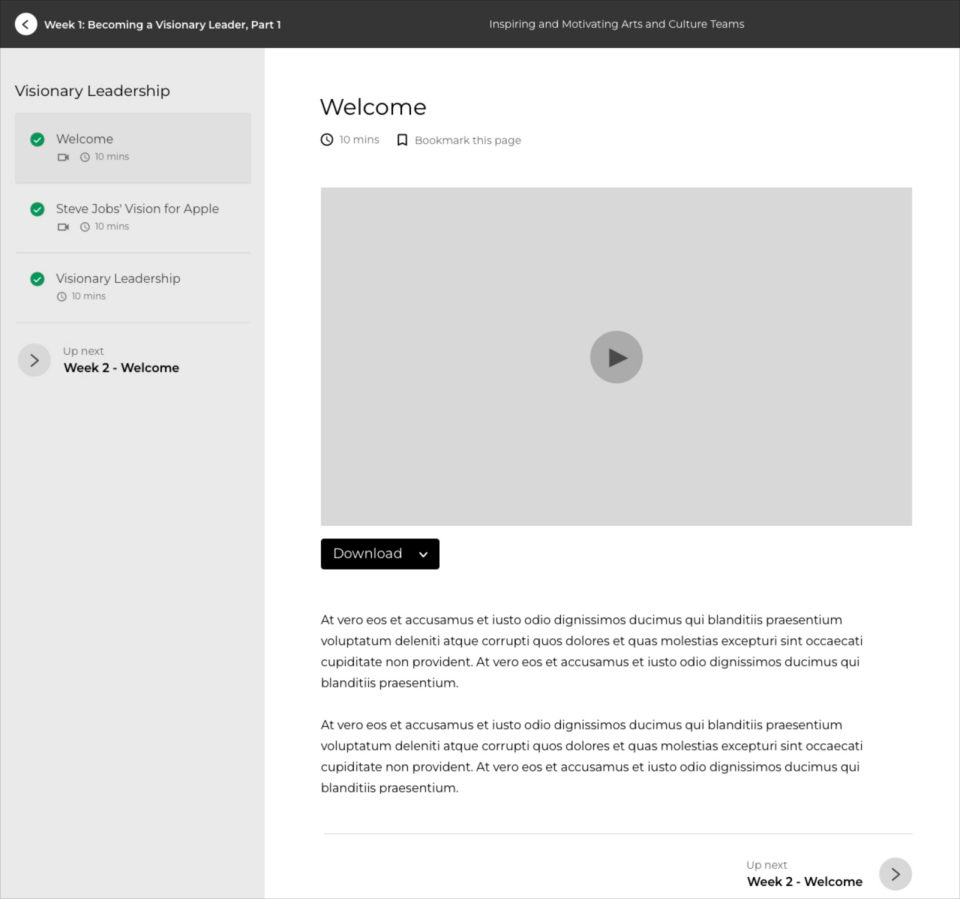
As you can see a full-page drawer appears over the Course Outline page with a sidebar that clearly labels the contents of the section. And to minimize distraction, we’ve removed items that aren’t essential. So the site’s main navigation is replaced by the course title and section title.
The next step was to explore how the designs would translate to mobile:
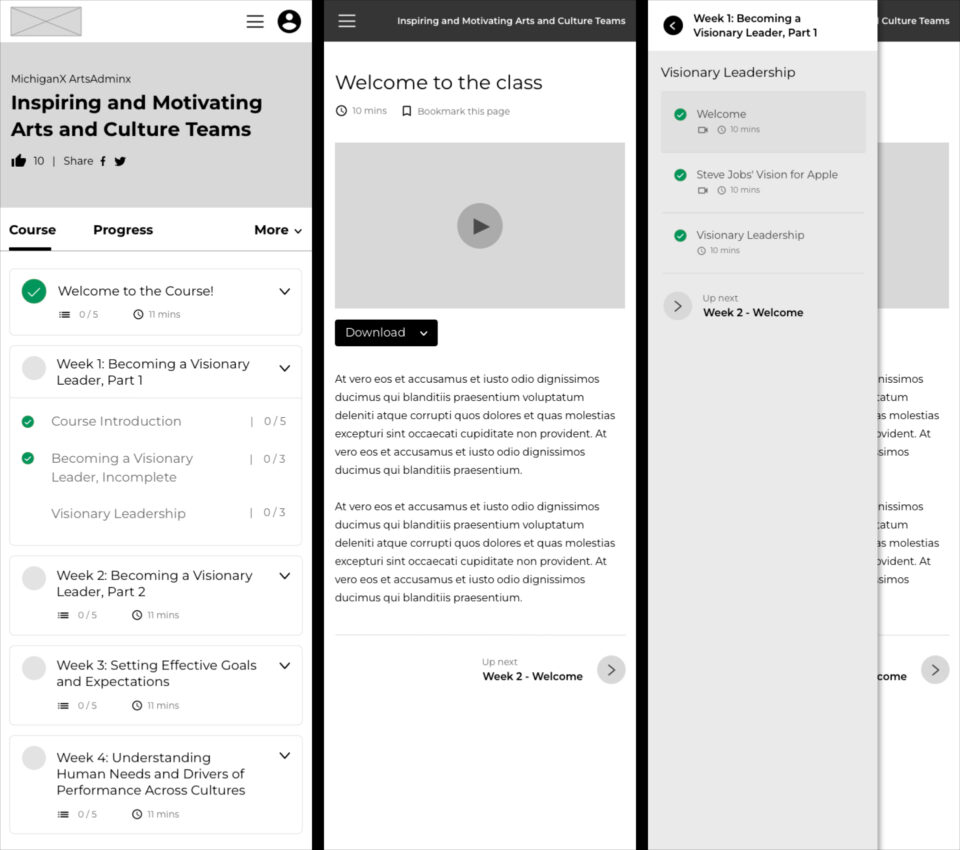
As you can see:
Overall, we really liked this attempt, but we felt we could do even better. After countless iterations, we came up with the latest version of the wireframes. Here’s what they look like:
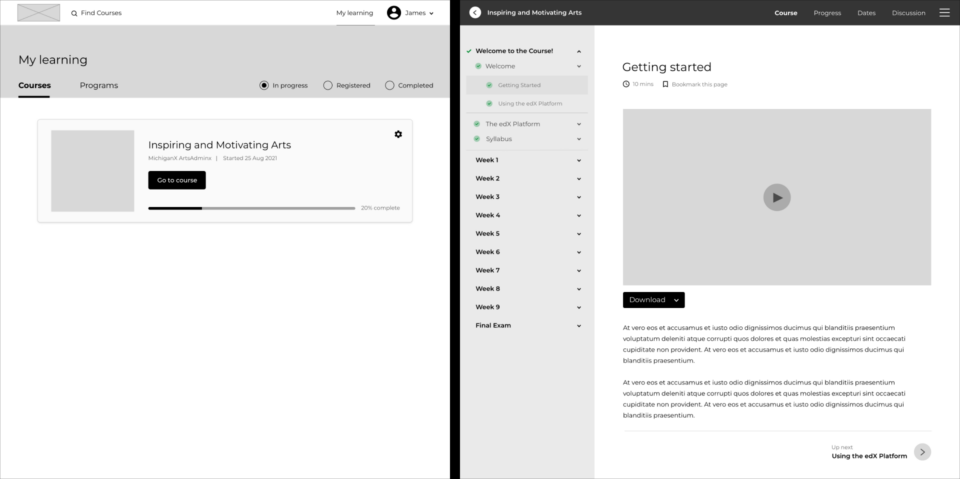
Once a user has selected a course from the My learning page, they are navigated to a distraction-free course page, where everything relates to the learning material. The main navigation is gone, and in its place we have a simple course navigation. If the user wants to exit the learning experience, they can easily do so by selecting the back arrow, located at the top left of the page.
Let’s take a closer look…
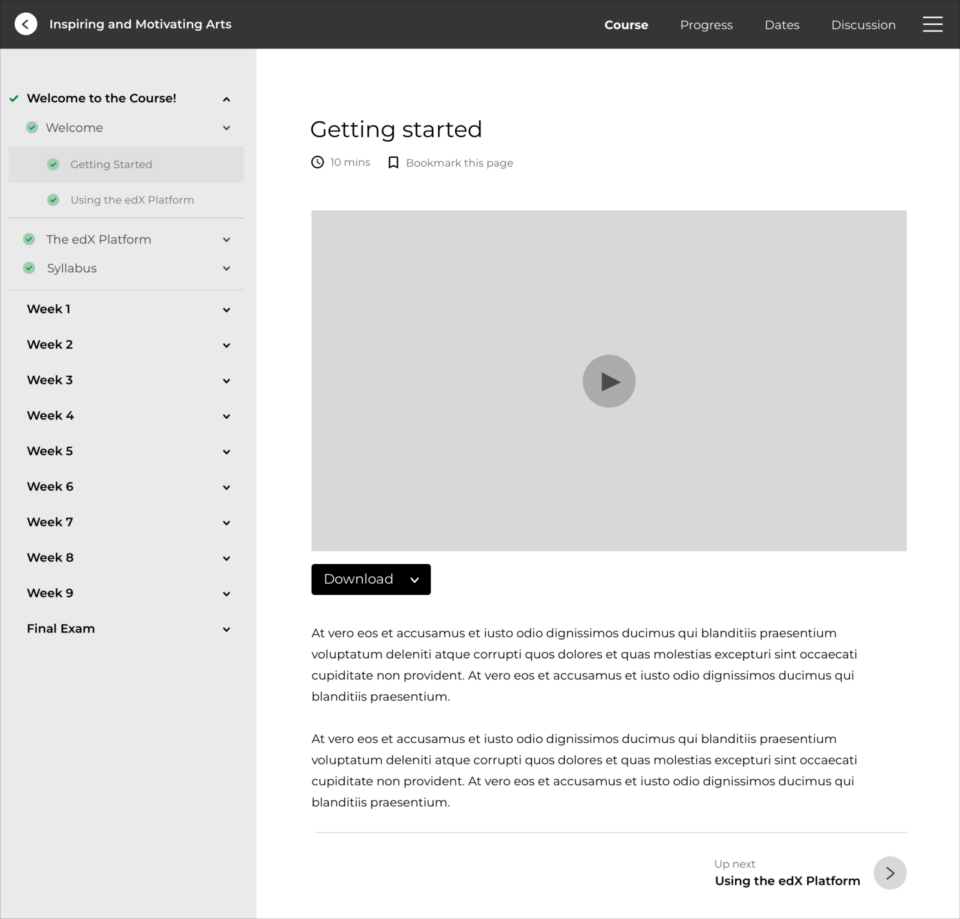
This wireframe aligns nicely to the user research we initially gathered, because:
The design was a clear winner! The next step was to see how it would translate to mobile:
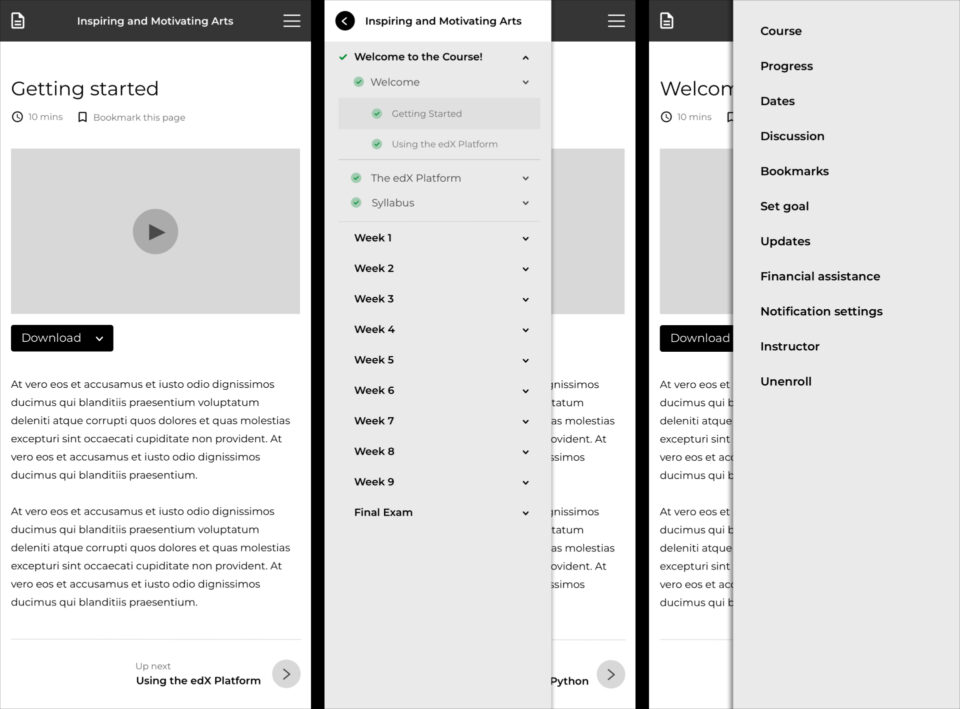
Mobile feels clean and uncluttered. We have one page with two icons in the main navigation. One links to the Course Outline, and the other, the Course Menu.
With a basic idea of how the learning experience would work, we moved on to some of the other key pages.
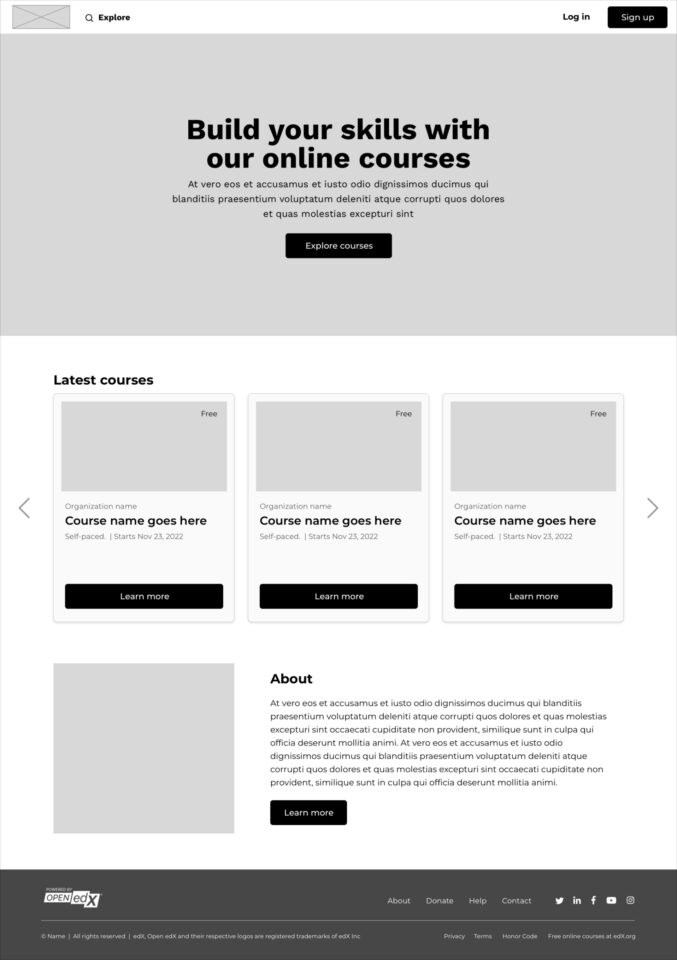
The theme Home page is the perfect place for course creators to market their courses. It sets the tone for the learning experience.
We took this:
And gave it a bit of a user experience facelift:
From there, we worked on the Course’s About page which provides learners with information about a course. Some of you might be familiar with the current Lilac Release of the Course About page:

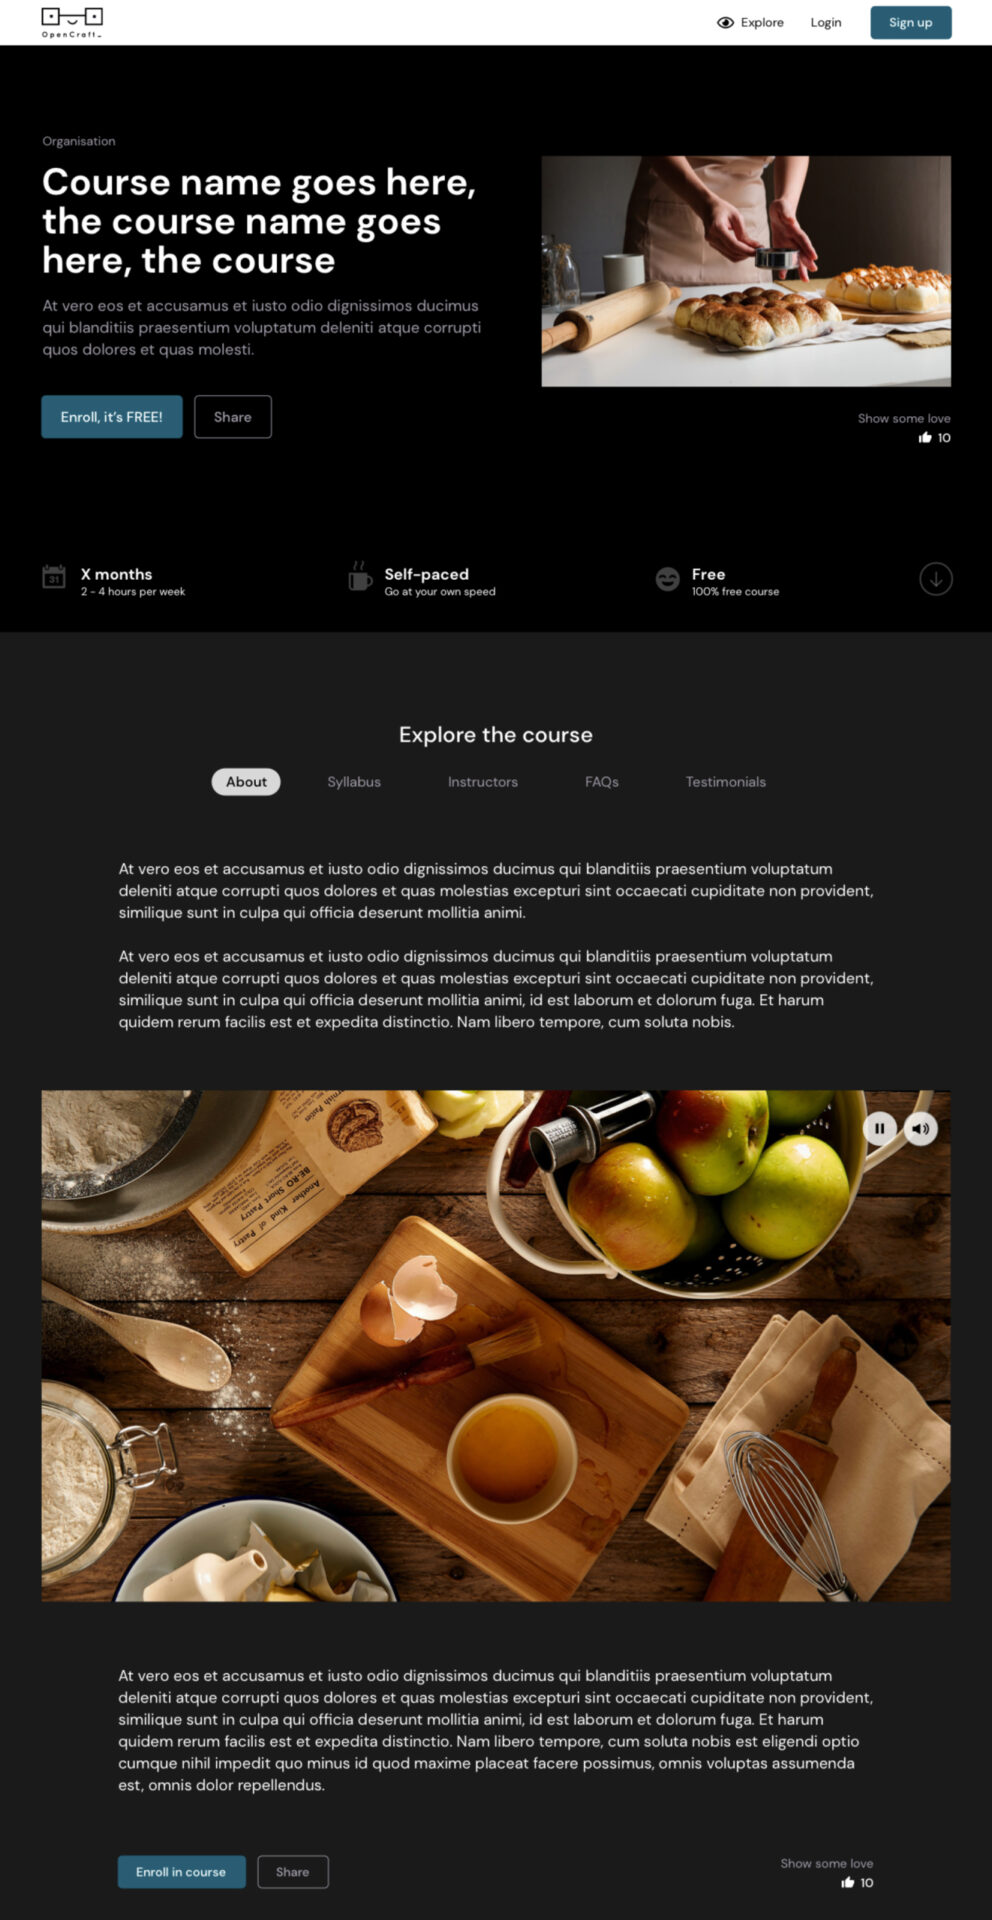
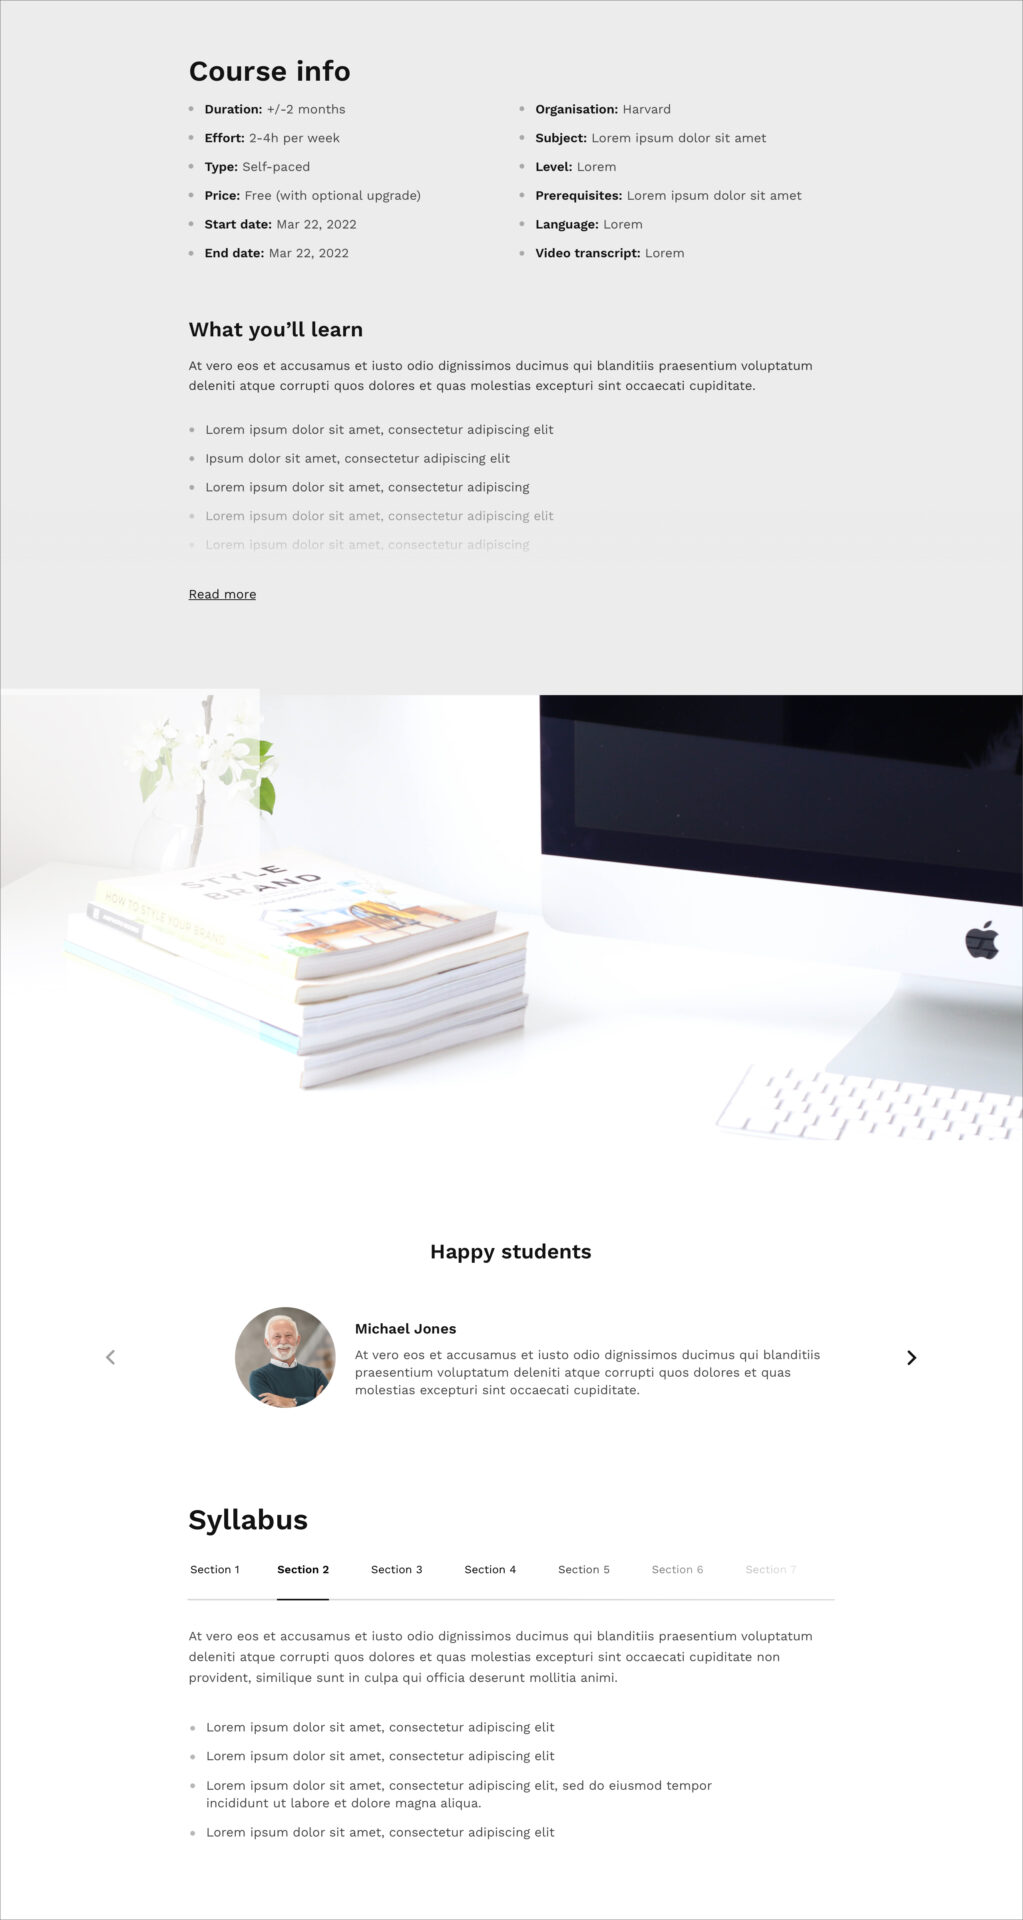
Our theme’s version of the page will look something like this:
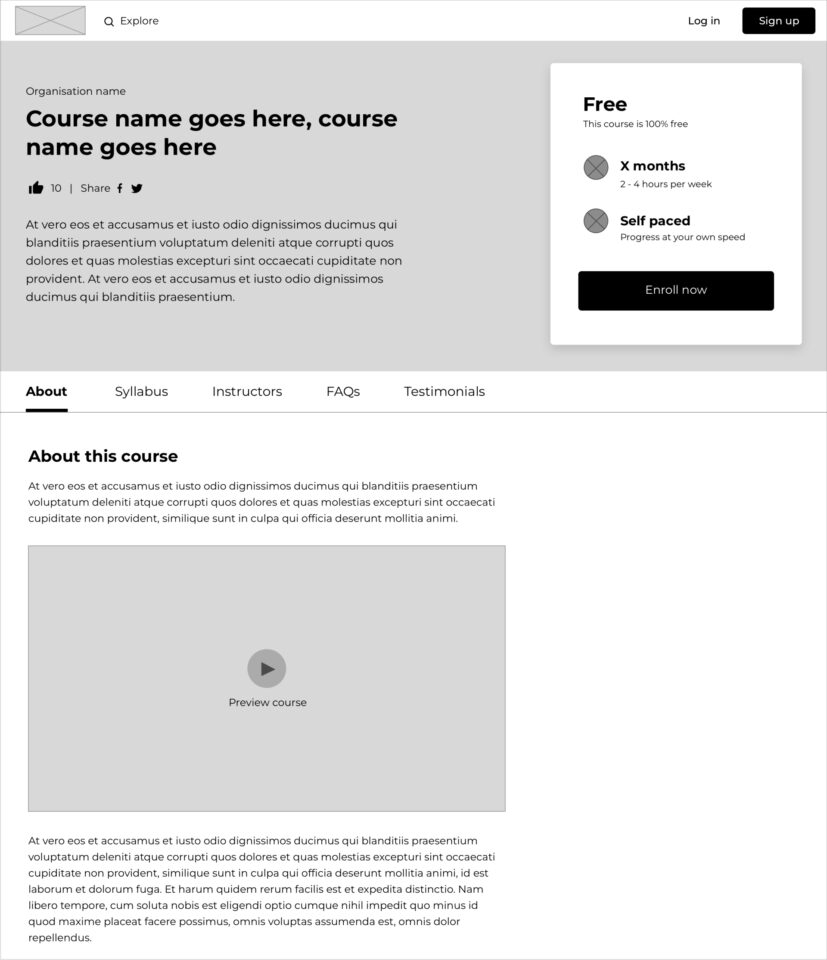
The design feels clean and simple, and highlights all the key course information right at the top of the page.
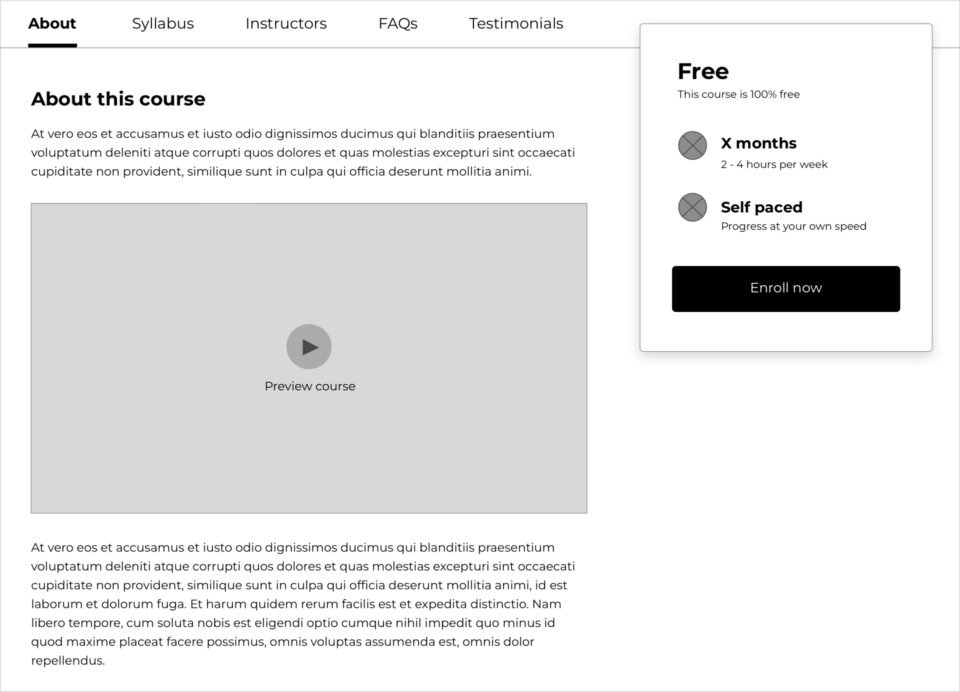
When users scroll down, the sub-navigation sticks to the top. This makes it easier for people to navigate through the course information no matter where they are on the page. To make it even easier, we decided the course price and length should stick to the top too; that way, this info is always visible and the user can enrol at any time.
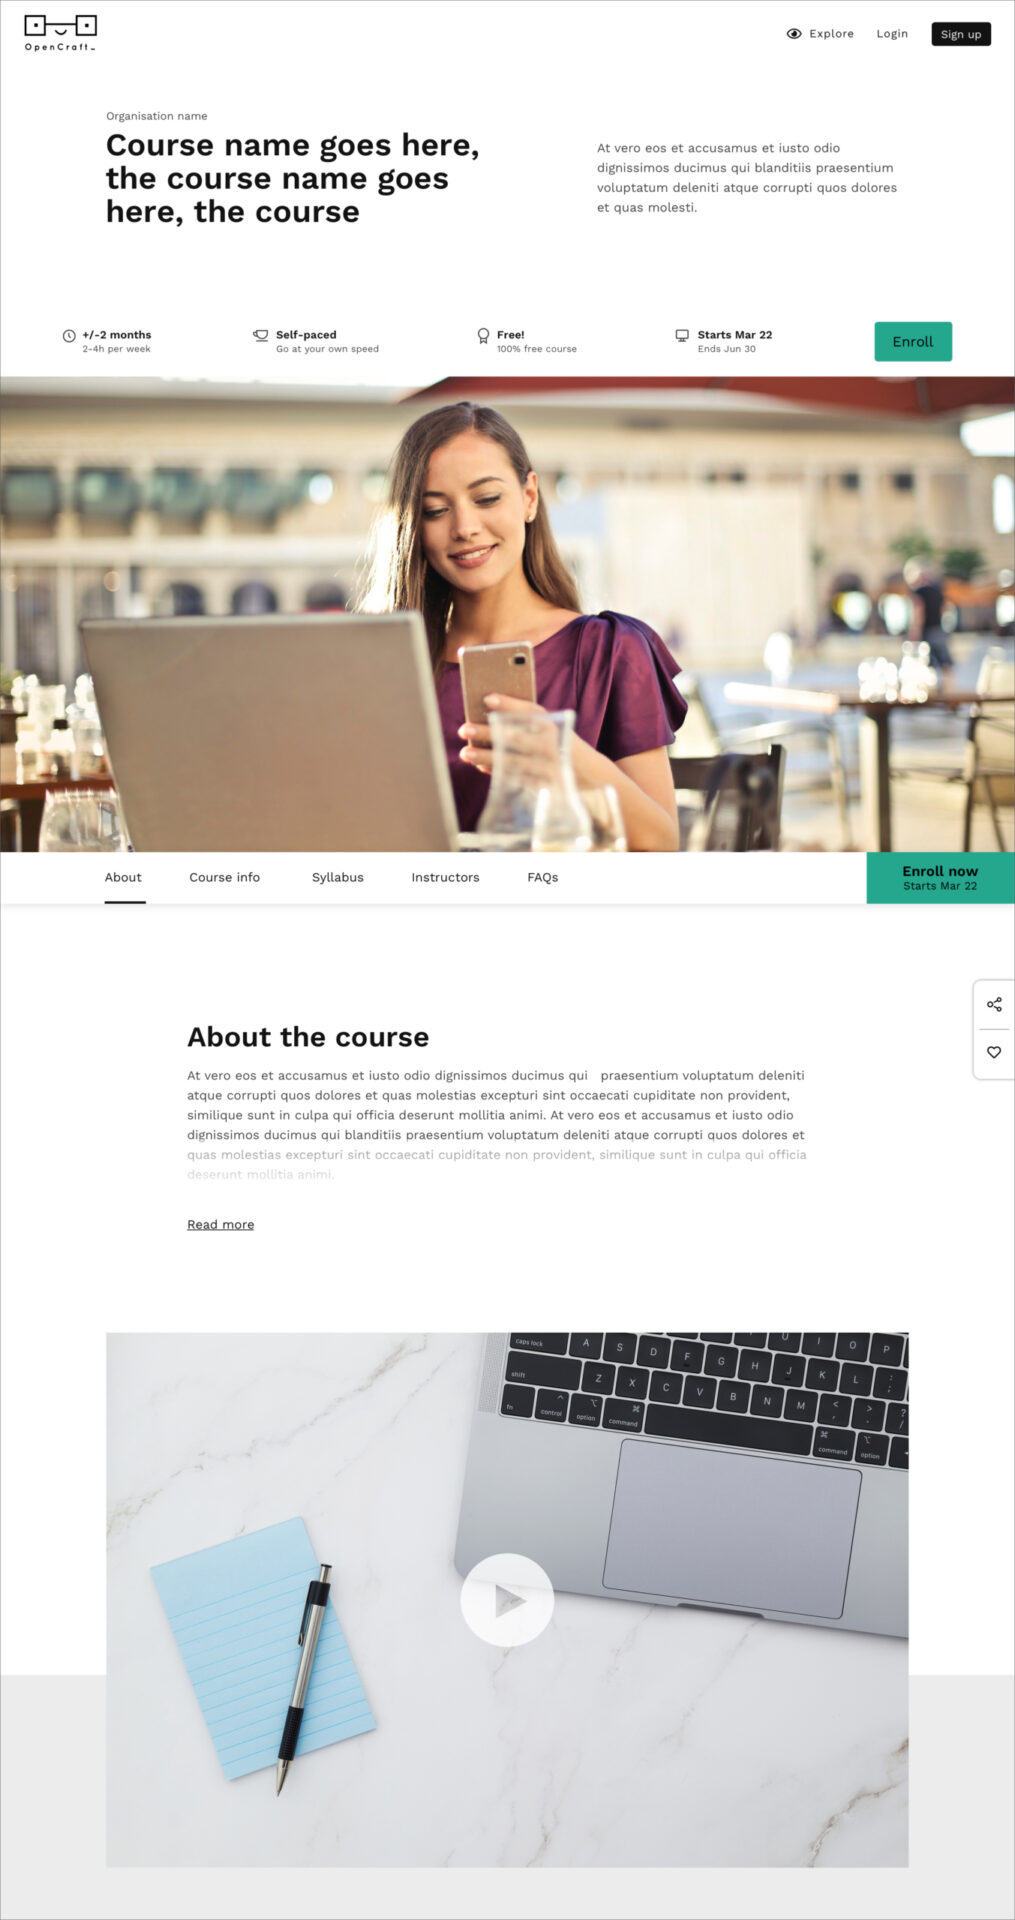
With some key areas of the theme wireframed, it was high time to check in with our target users. Taking baby steps, we decided to dress up the theme Home page and Course About page to see how users responded. This was the first look-and-feel of the Course About page:
Nothing too groundbreaking! We quickly went back to the drawing board to see if we could push our design limits a bit more.
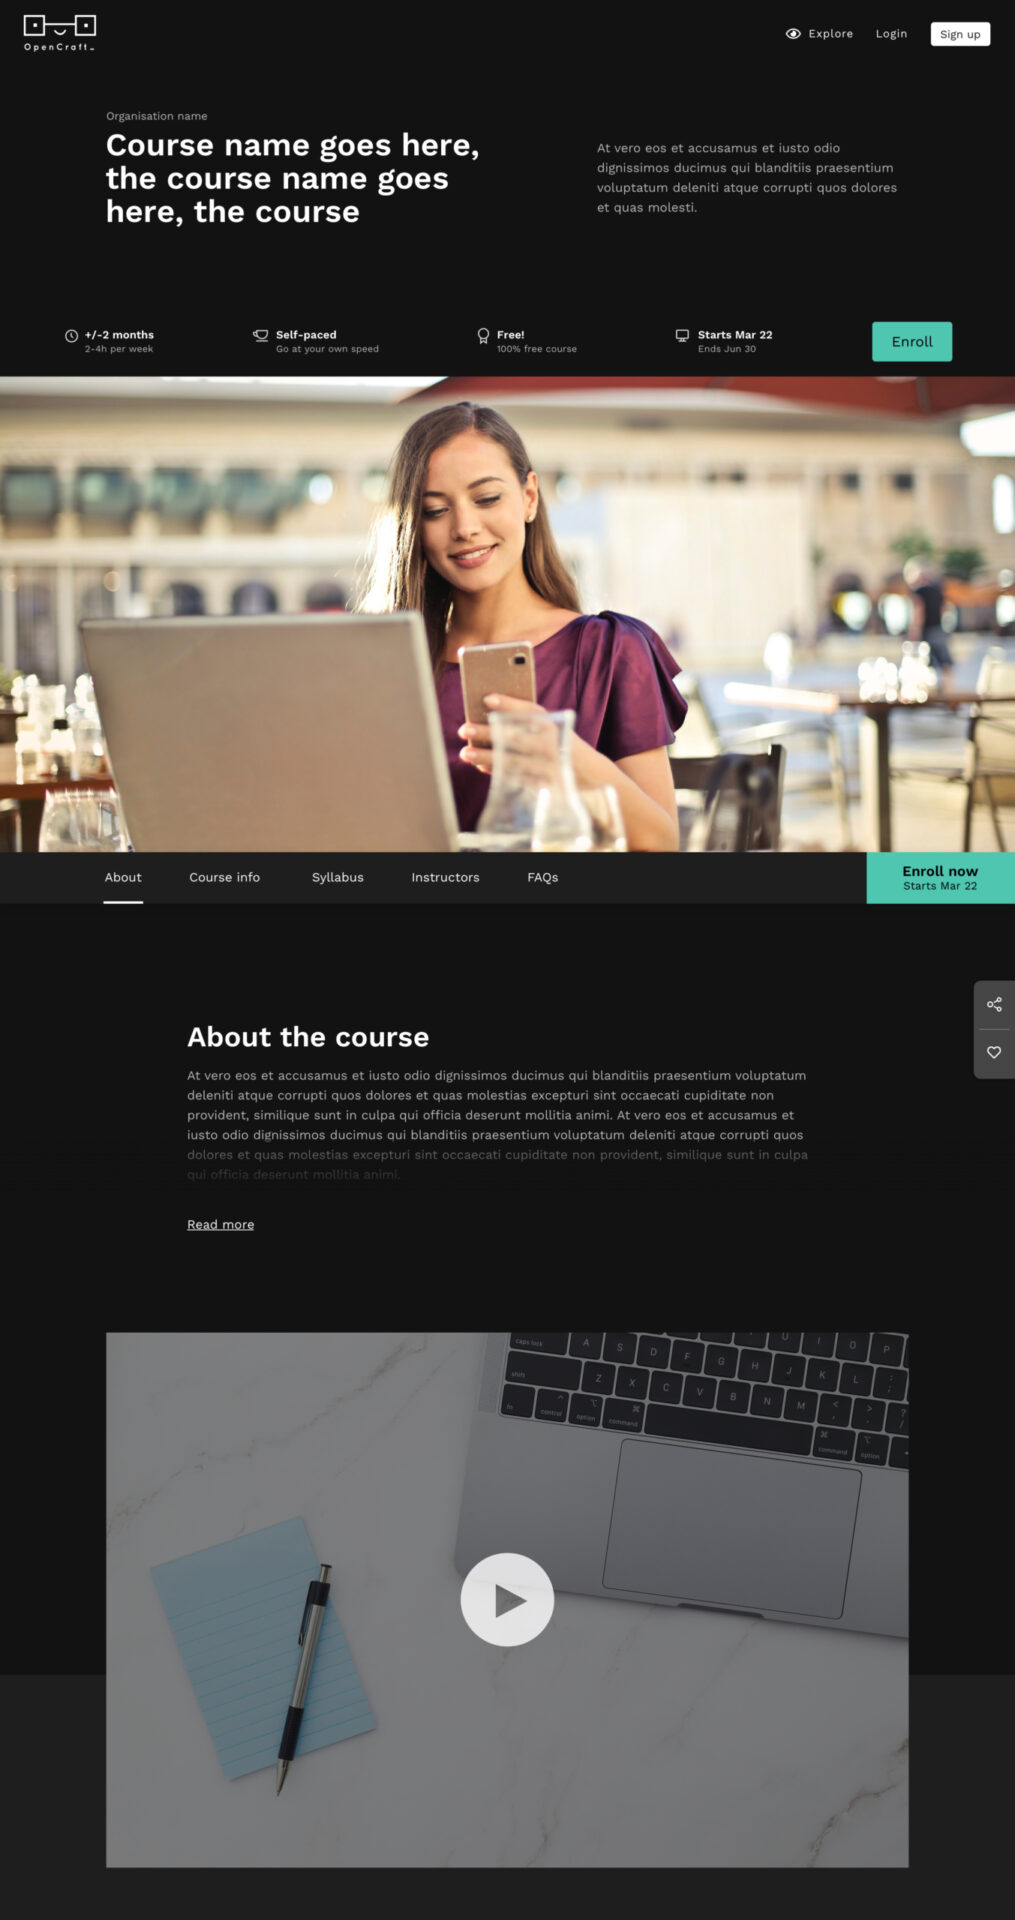
In our next attempt we envisioned a theme with two color options which users could modify if they wanted to:
It was time to test the waters - we wanted to know how people felt about this design direction. This is some of the feedback we received:
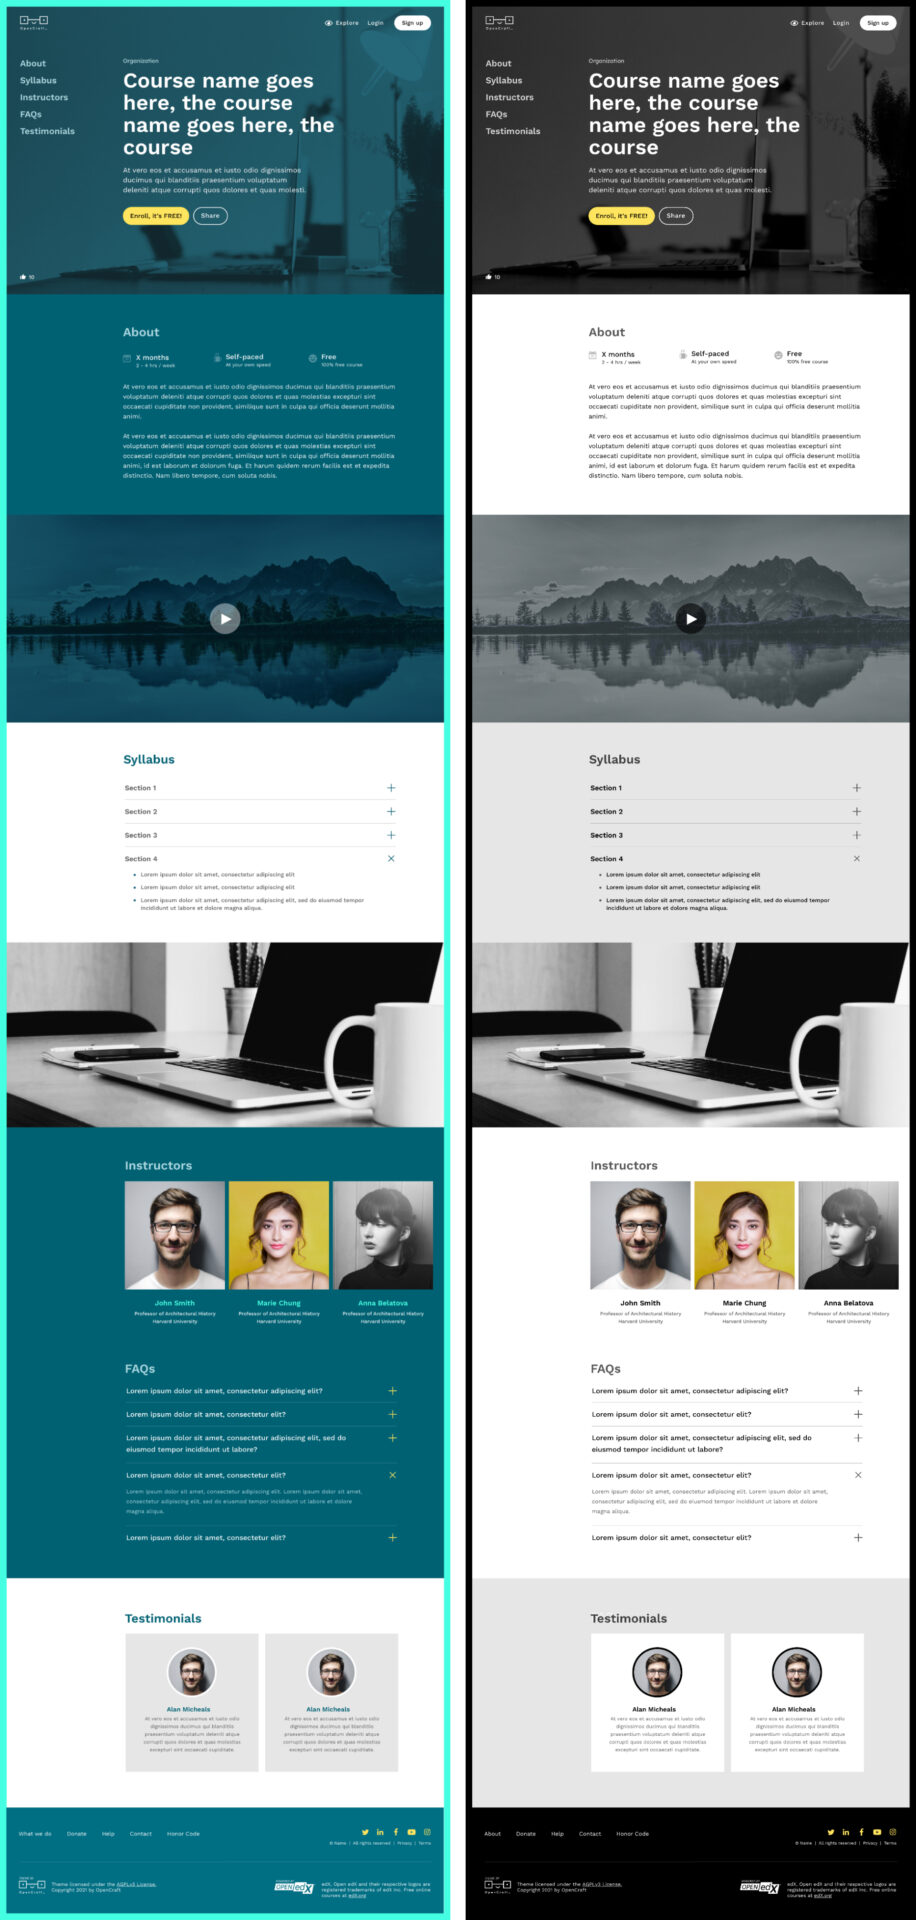
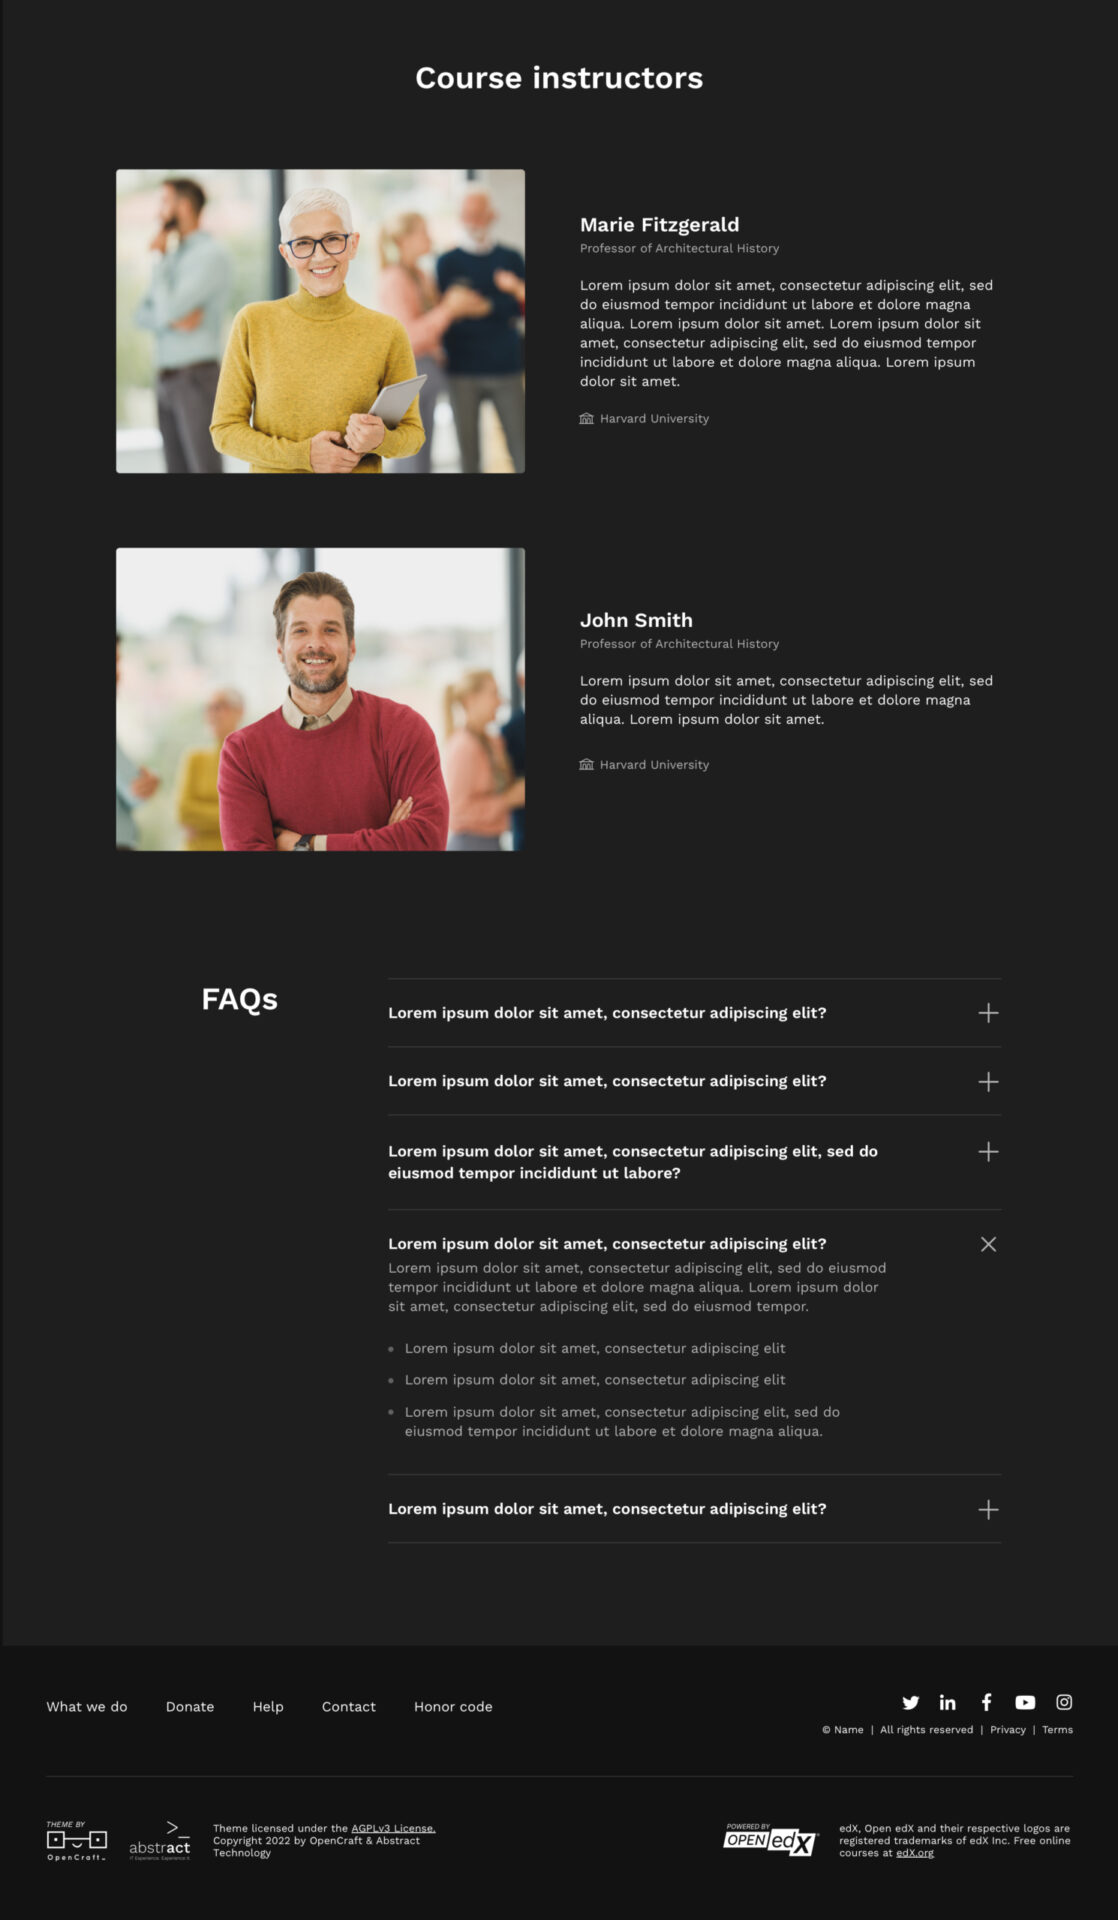
This was great feedback! So we wiped the slate clean, yet again 😂, and created a "light” and “dark” version of the theme. This will give users the choice of two neutral bases to work with.
Here's the top section of the "light" version of the theme:
Here's the top section of the "dark" version of the theme:
Here's another section of the "light" version of the theme:
Here's the same section in the "dark" version of the theme:
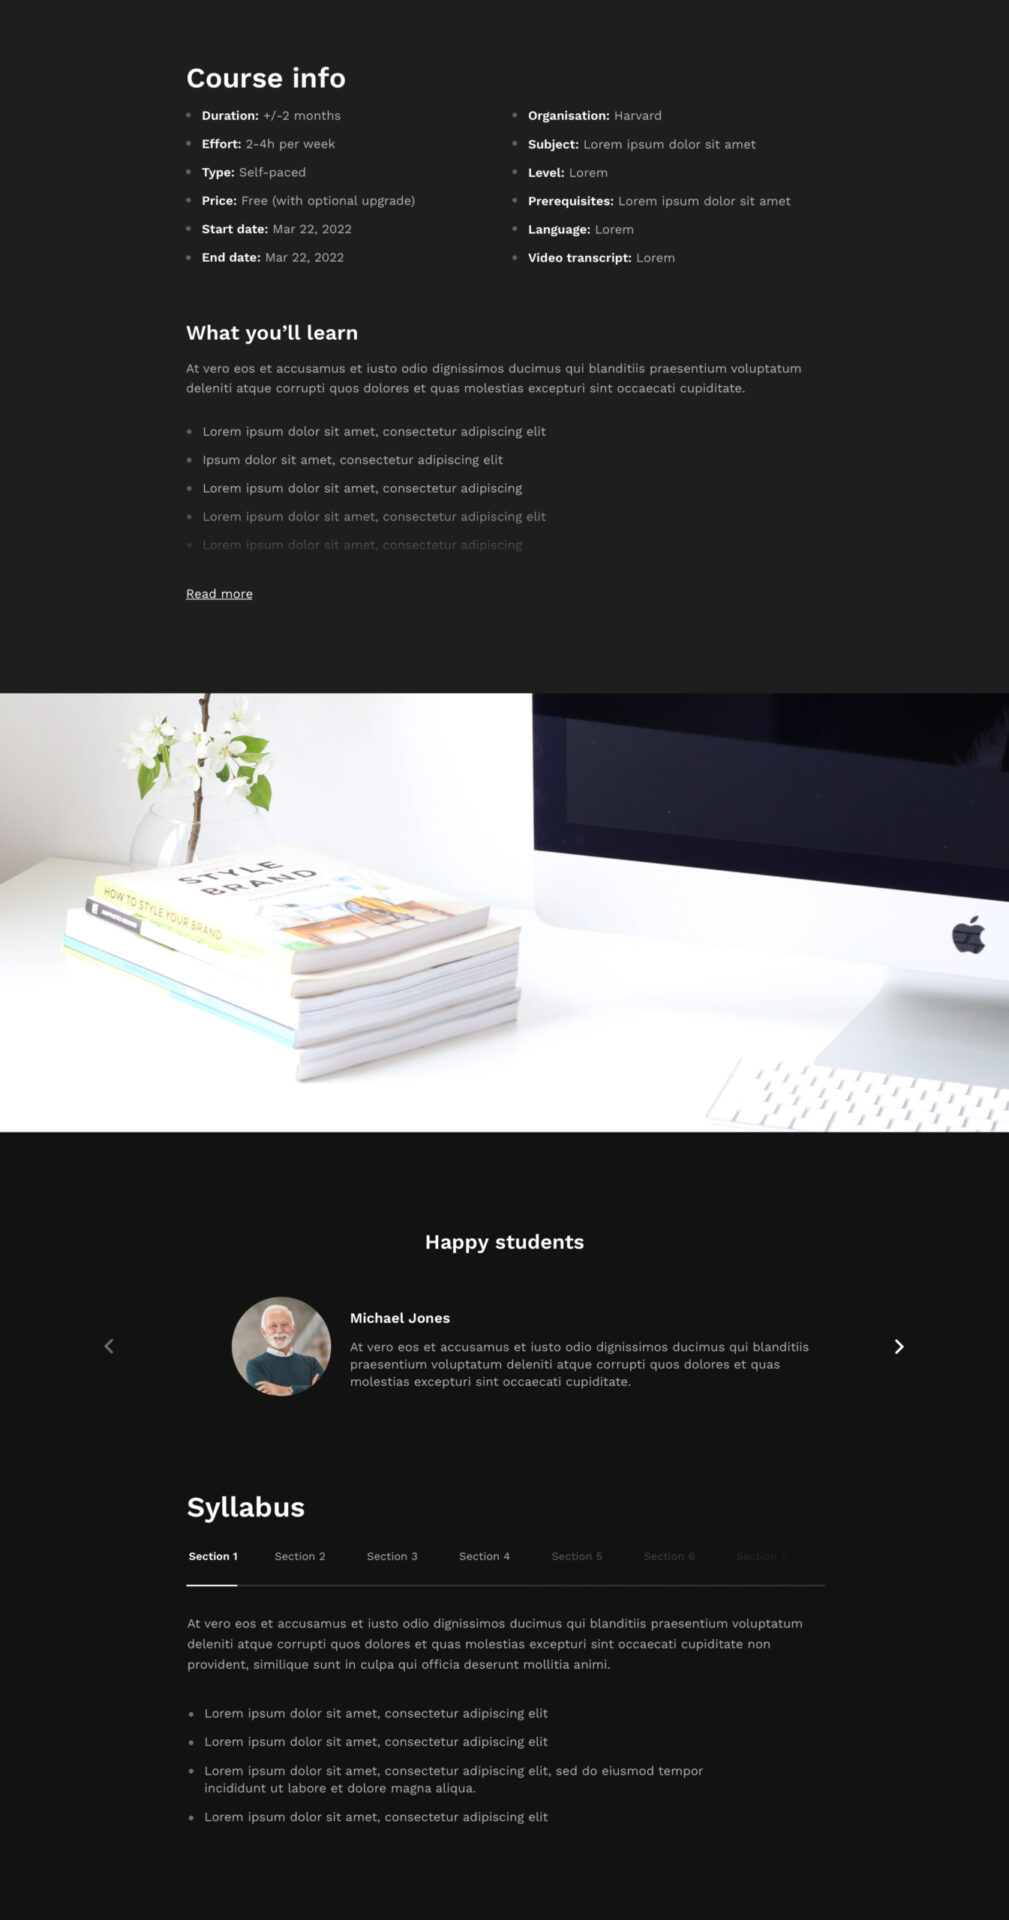
Here's the bottom section of the "light" version of the theme:

Here's the bottom section of the "dark" version of the theme:
Here’s what’s changed:
Generally, we’ve received positive feedback on this new aesthetic. Here’s how this look-and-feel has been applied to the theme Home page:
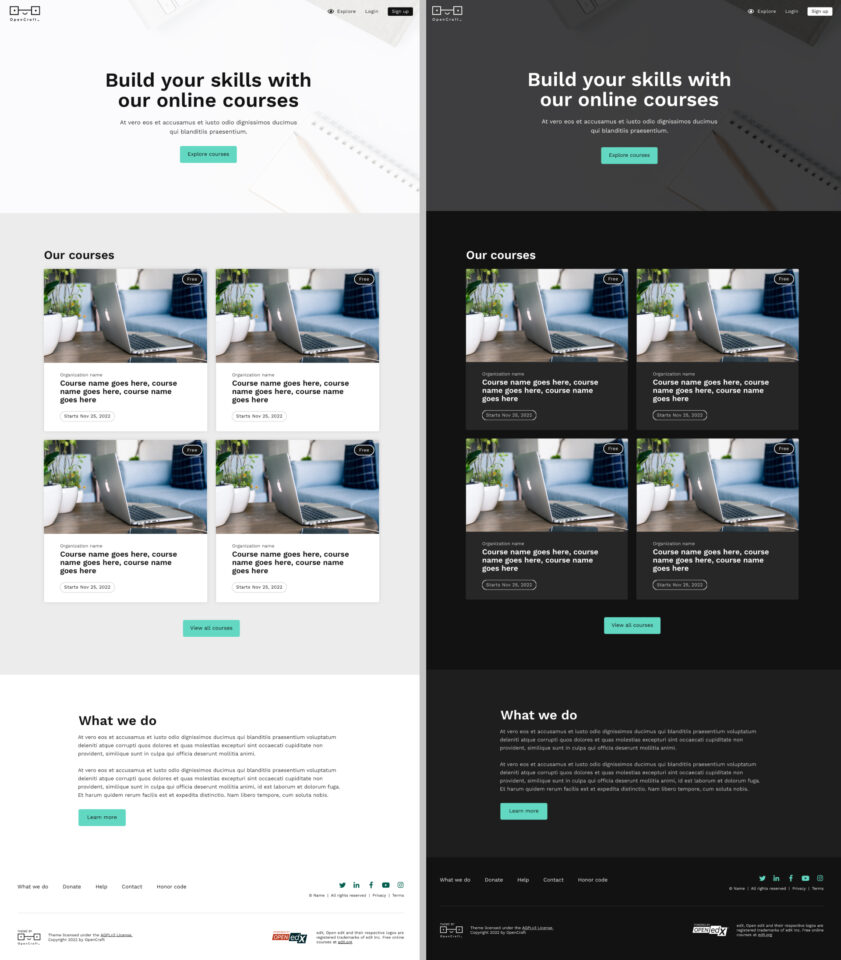
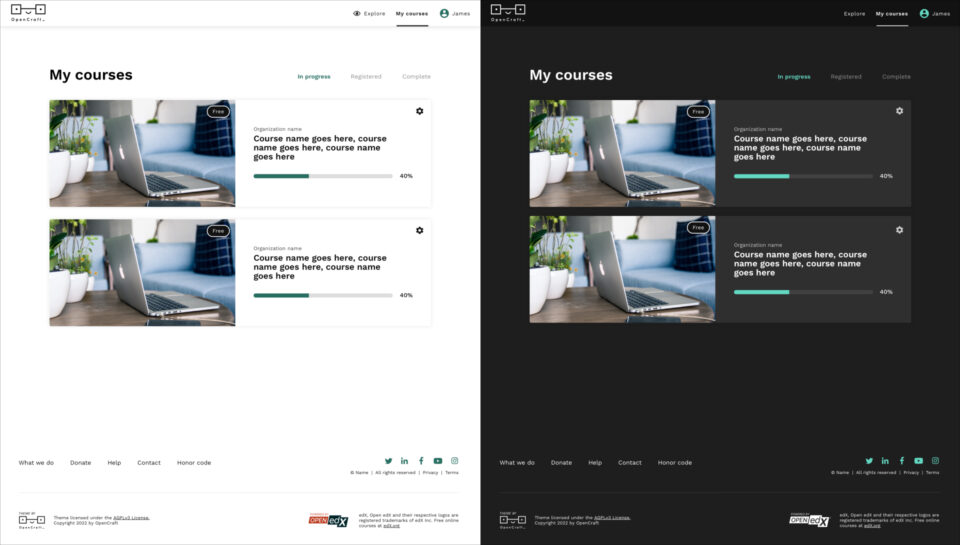
And here’s the design applied to the My Courses page, where users manage their courses:
Now that we have a solid design direction in place, we plan to make some good headway on development. This will allow us to have a clickable interface to test with our users. While the developers are hard at work, our design team will flesh out the rest of the theme.
We still have a fair way to travel on our epic mountain journey. Although the climbs will become less steep, and the rocks less icy, the UX process is never truly over. I hope by sharing our messy process, you are reassured that things don’t always have to go as originally planned. You can veer from the path as long as you follow the continuous process of testing, tweaking, retesting, and improving.
Here’s to designing better user experiences for all edX learners!
There are some great resources for building extensions to the Open edX platform. The XBlock SDK is excellent, and MFEs offer a great way to build a custom frontend for your Open edX LMS. However, sometimes you need a fully independent application which can communicate to the LMS on behalf of your users. So, today we're going to learn how to Use the Open edX LMS for Authentication.
For this tutorial we'll be using the traditional Devstack, though it will likely work with a Tutor-based devstack with only minimal modification. We'll be doing the absolute minimum to get the end-to-end experience working, as there are a lot of options on how to customize the larger approach. Note: Everything we'll be doing is OAuth2, not OAuth1, which has been deprecated for quite some time.
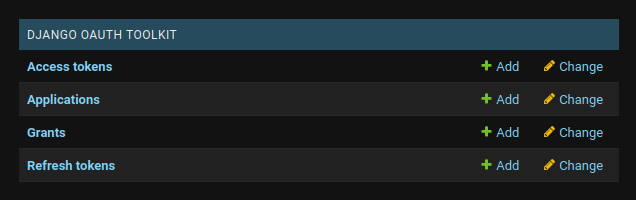
We begin by registering a new application within the LMS. Log into LMS admin panel as the administrator. The default email and password for the admin on the devstack is edx@example.com and edx. From here, find the section with the header 'Django Oauth Toolkit.' Click 'Add' next to 'Applications':
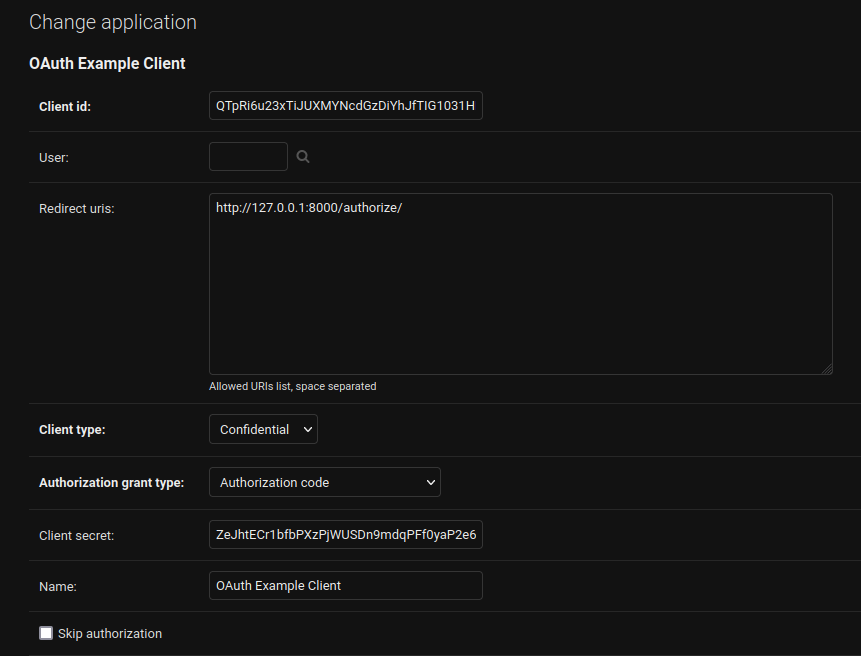
Every tool that needs to log into the LMS and perform actions on behalf of the user using OAuth has to be registered as an application. The form will initially populate with a unique client id and client secret. Save these and put them aside-- we'll need them later!
Leave 'User' blank, and set the Redirect URIs as below-- this will be the address we'll make in our custom tool. Then, set the client type as 'Confidential' and the authorization grant type as 'Authorization Code'. These options are best suited for the kind of application we're creating today-- an independently deployed application that uses the Open edX LMS as an OAuth provider.
Save your changes, and get ready! It's time to make a brand new application.
We'll be creating our new application in Django. We'll also be using Authlib, a library for authenticating with OAuth providers. We selected Authlib because the amount of code needed to wrap your head around things is quite low. This should be especially helpful if you're trying to learn the principles involved and don't necessarily want to use Django. However, in a real Django-based application, you may want to use something more robust like Python Social Auth instead.
To begin, we install our dependencies and run the startproject django command to create a new Django project:
pip install 'django>=4.1,<4.2' 'authlib>=1.1.0,<1.2.0' 'requests>=2.28.1,<=2.29.0'
django startproject identifier
Once we have the newly created project, we change directories into it and then create a new Django application, named 'profiles':
cd identifier
./manage.py startapp profiles
Once created, we'll enter the file at identifier/settings.py and add 'profiles' to our list of installed Django apps.
INSTALLED_APPS = [
    'django.contrib.admin',
    'django.contrib.auth',
    'django.contrib.contenttypes',
    'django.contrib.sessions',
    'django.contrib.messages',
    'django.contrib.staticfiles',
    'profiles',
]
Further down, at the end of the settings file, we'll add some settings that we'll later import for our OAuth client:
AUTHLIB_OAUTH_CLIENTS = {
    'lms': {
        # Set your own client_id and secret from earlier.
        'client_id': 'client-id-goes-here',
        'client_secret': 'client-secret-goes-here',
        # This is where your application will fetch access tokens from.
        'access_token_url': 'http://localhost:18000/oauth2/access_token',
        'access_token_params': None,
        # This is where your application will redirect the user to
        # authenticate and authorize your application.
        'authorize_url': 'http://localhost:18000/oauth2/authorize/',
        'authorize_params': None,
        # Authlib creates a client object that does a lot of the
        # heavy HTTP request work for you.
        # You specify the root of the API here. Since there are
        # a lot of different API paths in the LMS, we just pick
        # the root of the LMS as the URL.
        'api_base_url': 'http://localhost:18000/',
        # The client can be given some additional customization.
        # One thing we need to specify is the 'scopes' our client
        # will need access to. Here are a few of them. The full
        # list of available scopes can be found in the
        # edx-platform source-code, in lms/envs/common.py
        # within the OAUTH2_PROVIDER setting dictionary.
        'client_kwargs': {
            'scope': 'email profile read',
            # These next two settings specify how the token should
            # be sent in the HTTP requests to authenticate with
            # the LMS.
            'token_endpoint_auth_method': 'client_secret_basic',
            'token_placement': 'header',
        },
    }
}
Now that we have our settings written up, we'll create a file in the profiles directory named oauth, in which we'll set up the OAuth client object.
from authlib.integrations.django_client import OAuth
from django.conf import settings

oauth = OAuth()

for key, value in settings.AUTHLIB_OAUTH_CLIENTS.items():
    # This will register the LMS as a client for Authlib.
    # If you added any other providers to the AUTHLIB_OAUTH_CLIENTS
    # settings dictionary, they'll be added, too.
    oauth.register(key, **value)
With that in place, we'll now create some views in profiles/views.py:
from django.shortcuts import render

from profiles.oauth import oauth


def login(request):
    # build a full authorize callback uri
    redirect_uri = request.build_absolute_uri('/authorize/')
    return oauth.lms.authorize_redirect(request, redirect_uri)


def authorize(request):
    # This will create a http request client that points to the LMS.
    lms = oauth.create_client('lms')
    # Here, we authenticate the client with the token we got from the LMS. In a real-world
    # application, we'd save this token somehow for subsequent requests.
    token = lms.authorize_access_token(request)
    # And then, we use this token to fetch the user's info.
    resp = lms.get('/api/user/v1/me', token=token)
    resp.raise_for_status()
    profile = resp.json()
    # Now that we have the user's info, we can render a page with the relevant info.
    return render(request, 'authorize.html', {'profile': profile})
You'll notice we refer to a file named authorize.html. That's our template file we'll need to create. In the profiles directory, create a new directory named templates, and in that directory, create a file named authorize.html with these contents:
<!DOCTYPE html>
<html lang="en">
<head>
    <title>Authorization Page</title>
</head>
<body>
  <pre>{{profile}}</pre>
</body>
</html>
You'll notice that this will be a pretty simple page-- it will display the value of profile for you, and that's about it! Now, we need to add the URL routes so Django knows how to access the new views. Replace the contents of profiles/urls.py with:
from django.urls import path

from profiles import views

urlpatterns = [
    path('', views.login, name='index'),
    path('authorize/', views.authorize),
]
And then replace the contents of identifier/urls.py so that it defers to the profile URLs:
from django.contrib import admin
from django.urls import path, include
import profiles.urls

urlpatterns = [
    path('admin/', admin.site.urls),
    path('', include(profiles.urls))
]
OK! Now we have all the code in place, ready for us to run. Now, we just have to initialize our database and run our application:
./manage.py migrate
./manage.py runserver
The local development webserver should run and display a message like this:
                                                                                                                                 Watching for file changes with StatReloader
Performing system checks...

System check identified no issues (0 silenced).
October 14, 2022 - 19:39:50
Django version 4.1.2, using settings 'identifier.settings'
Starting development server at http://127.0.0.1:8000/
Quit the server with CONTROL-C.
We'll now view that URL-- http://127.0.0.1:8000/, in our web browser. You should be redirected to the LMS. If you're not already logged in, you'll be given a login prompt. Then, you'll get an OAuth authorization screen:
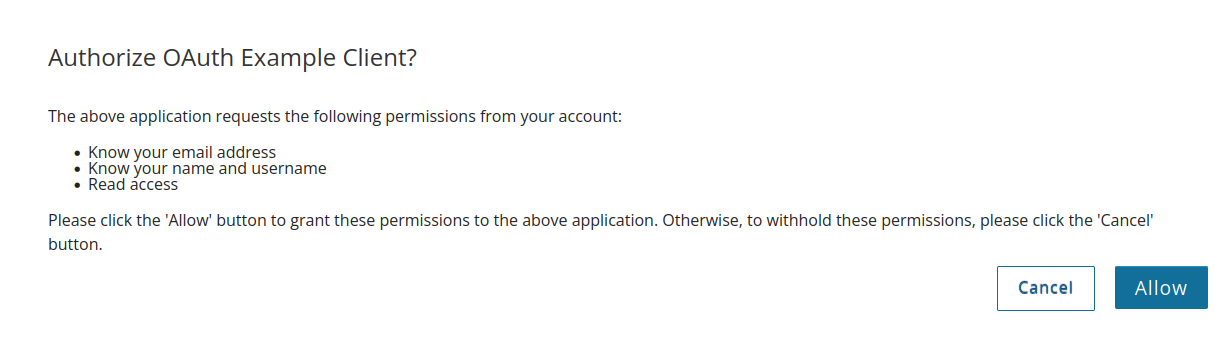
Note that the permissions granted map to the scopes we set in the settings earlier. Go ahead and click 'Allow'. You'll then be redirected to the application:
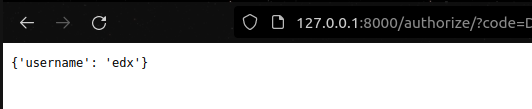
Success!
Now that you've built a very basic application using OAuth, you might want to learn how to use Python Social Auth to make a more robust one. You can also take a look at some of the API endpoints available to you. The only limit is your imagination!
By the way, you can grab the full code for this example here, and if you're looking for more help with the Open edX platform, come give us a look!
User Retirement in an Open edX platform is the very last stage of the user account’s lifecycle, which begins with registration of a new user. That is, it is the thing that happens when a user clicks on the “Delete My Account” button on the Account Settings page.
However, it is not a single step, but a series of steps resulting in deactivation of the user account, removal of the user’s Personally Identifiable Information (PII) from all services making up the Open edX platform, and culminating in permanently disabling the username and email address from being reused ever again.
In this blog, we will explore how the user retirement workflow is designed, the steps involved in user retirement, different ways of triggering user retirement, and how to enable reuse of a retired username and email address.
The Open edX platform is not a single application, but a collection of services and IDAs — each handling a specific part of the user experience, such as course-discovery, discussion forum, eCommerce, etc. Each of these services maintains relevant user data to correctly handle users’ requests.
This makes the process of deleting a user from the platform complicated. Merely deactivating the user account and removing their credentials is not sufficient. User data also needs to be deleted from each of these services for the platform to be compliant with regulatory frameworks such as GDPR.
To make things more complicated, running some of these services on the platform is completely optional, with the possibility of installing custom services as well. Therefore, the retirement process needs to be configurable so that it attempts to delete user data only from services which are actually being used in the platform instance.
To address all this, the retirement workflow is designed as a linear pipeline, where the user deletion request moves through a series of fully configurable States.
When a user retirement is initiated, an entry is created in the UserRetirementStatus model, with the state set to PENDING. This is the very first state of the Retirement Pipeline.
In this step, hash values of the username and email address respectively are generated and stored in the UserRetirementStatus model along with the original username and email address. The email address in the User model is replaced with its hash value and the password is reset. This prevents the user from logging into the user account.
At this PENDING state, it is possible for the site administrator to cancel the retirement workflow if so requested by the user. This can be done either by using the cancel_user_retirement_request management command or by clicking on the ‘Cancel’ action button in Django admin. This restores the email address in the User model and deletes the entry from UserRetirementStatus. Cancellation of retirement workflow is not possible in any other retirement state.
The user then moves through a series of unique pairs of retirement states, each indicating that a stage or action of the retirement workflow is either underway or has been completed.
RETIRING_FORUM and FORUM_COMPLETE is one such retirement state pair. Here the RETIRING_FORUM state indicates that the forum retirement API has been triggered and deletion of user data from discussion forum service is underway and the FORUM_COMPLETE state indicates that the API has been successfully executed.
Any number of such pairs of retirement states can be configured and in any order, however each RETIRING_SERVICE state should always be succeeded by the corresponding SERVICE_COMPLETE state.
The COMPLETED, ERRORED, and ABORTED are the dead end states. That means the retirement workflow cannot proceed any further from any of these states. The dead end states, along with the PENDING state need to be mandatorily configured with all other states being optional.
The COMPLETED state is the very last state of the retirement workflow, indicating that all configured stages of the retirement process have been successfully completed.
At this state, the username is replaced in the User model with the hash values generated previously. However, the entry in the UserRetirementStatus model still contains a mapping between the hashed username/email address and the actual username/email address of the user. The retirement_cleanup API can be used to delete this entry, thereby completely removing the user’s original username/email from the platform.
The retirement workflow moves to the ERRORED state for one of two reasons — either there is an execution error during one of the retirement stages, or there is a discrepancy in the retirement states (such as the user moving from one state to a previous state).
A site admin can look into the cause of the error, fix it, and then manually move the user to a correct state, which would enable the resumption of the retirement process.
The default list of the retirement states is defined in lms/env/common.py
This list can be configured by setting the RETIREMENT_STATES variable in /edx/etc/lms.yml
The active Retirement States are maintained using the RetirementState model.
Each state has an Execution Order Number, which determines the order of the states in the workflow. Any violation of this order of execution during the retirement process will lead to an error with the user moved to the ERRORED state.
The populate_retirement_states management command can be used to populate the RetirementState model or override the states which are already configured.
There is currently no out-of-the-box mechanism in Open edX to drive this retirement workflow.
Therefore this needs to be driven from an external service, or the tubular scripts can be used to either trigger the workflow execution manually or set up as a cron job to execute workflow at regular intervals.
There are a number of ways in which user retirement can be initiated:
As mentioned previously, the generated hash value of the username and email address, is used to replace the corresponding original credentials in the User model at different stages of the User Retirement Workflow.
As part of the validation process during user registration, the hash value of the new username and email address is calculated and queried against the User model to check if those hash values are already present. If so, the validation fails and the user is requested to choose a different username and email address. This is how the platform ensures that a retired username and/or email address is never reused.
There may be certain use cases, however, where the reuse of the retired user credentials would be desirable or even necessary. We here at OpenCraft encountered one such use case for one of our clients. This client used a third party external service for user management. That means, the client’s users would register, manage and deactivate/delete their accounts in a third party UI, and that service would use the correct APIs of the Open edX platform in turn to register and/or retire the user accounts in the platform. Now, using the third party service, it was possible for the client’s users to delete an account and then create another account using the same credentials. However, the user registration API in the Open edX platform would throw an error when using the retired credentials. This was a big problem for our client.
We looked for an existing solution to this problem and, not having found anything, we set out to design a solution for this problem ourselves.
There were a few considerations during the design of the solution:
This led us to create the enable_retired_username_email django app.
This app is designed to be installed along with the Open edX installation using pip:
pip install -e git+https://github.com/open-craft/enable-retired-username-email.git@v1.0#egg=enable-retired-username-email
Or by setting the EDXAPP_PRIVATE_REQUIREMENTS variable while installing the Open edX platform using ansible.
This app receives the post_save signal from the UserRetirementStatus model, and does one of two things:
COMPLETE state, a hash of the string <email_id>+<current_timestamp> is calculated. This email address in the corresponding User model, which now contains the hash of the original email address, is replaced with this new hash value. The entry in the UserRetirementStatus model is deleted, thereby removing all traces of the original credentials and its corresponding hash values.Voilà! We hope this is useful, and let us know via comments below or at contact [@] opencraft.com if you have any comments or questions!
Photo by Tandem X Visuals on Unsplash
We at OpenCraft, while maintaining Open edX instances for our clients, often run into unique problems that have quite interesting solutions. Sometimes the journey leading to these solutions ends up teaching us a lot about software engineering itself. Through this blog, we want to share the experience of one such journey that we undertook when one of our clients told us, ”It is taking too much time to load a course”. To get to the bottom of the problem, we asked some questions, which led us to the core issue of the Course Outline page taking too much time to load.
The first thing to do in situations like these is to find out what exactly is taking so much time and where exactly the execution flow is stuck — and then figure out a solution for it. We needed a profiler for the code to figure out exactly which part of the system needs our attention. We used django-silk, a handy profiling and inspection tool for the Django framework.
While profiling the endpoint we noticed that the code responsible for fetching and transforming the course blocks was taking the largest amount of time. We figured this out while walking through the call graph that we generated while profiling the code.

Once we figured out that this operation being done on the course block was the culprit, we got into looking for a solution to reduce the time taken to load the course. The first solution we tried was to decrease the depth of the course block so that parsing and transforming the course blocks would take less time.
Having changed the nav_depth from 3 to 2, we saw a considerable drop in the load time of the request. However, this turned out to be a false positive since the first request to load the course was still taking a lot more time than subsequent requests.
This tickled our spider senses. We figured we were still unable to see the whole picture. After fiddling and tracing out the Open edX codebase we found that once the course blocks are generated for the first time they are cached, and hence the first request takes so much more time than subsequent ones. Now, the puzzle was unraveling itself one piece at a time. We figured out that each time a course was visited, there was a request to generate the course blocks. The platform first checks the cache, and if it's a “miss”, it goes on to generate the course blocks and populate the cache.
This cache is stored in the Memcache cluster and has a validation period of 24 hours. Upon further investigation,we found out that there were actually multiple courses for which the cache was being evicted. Now the two possible reasons for Memcache to evict a cache are:
Hence, our immediate reaction was to first disable the cache Timeout and second to vertically scale our Memcache cluster. Even though these steps did indeed help preserve the cache for the smaller courses, there was a particularly large course for which the course block was still getting generated on every request.
As it turns out, although our solution above theoretically looks amazing, we didn't take into account the way Memcache internally stores data. Memcache uses slabs of 1MB to store data and any data exceeding this size limit gets evicted by default.
This left us baffled and racking our brains to find a solution. We were simultaneously discussing this problem on discourse. We found out that doing the above-mentioned arrangements does give an illusion of permanent storage but doesn’t really solve the problem; it might even create bigger ones when a site starts getting more traffic.
Open edX has various strategies already built-in to handle such scenarios, we just need to find a way to leverage them to our advantage. Dave pointed out that we can use EDXAPP_BLOCK_STRUCTURE_SETTING to optimize the load time and have a permanent solution in place. This setting introduces a tiering solution, with the generated course block being stored permanently in an S3 bucket. Now when a user requests for a course, the platform first checks Memcache for course block and,in case of a miss, it checks the S3 bucket and fetches the course block from there.
This cache is refreshed/regenerated when a course is edited or when the admin command given below is executed.
We are using S3 bucket as the storage strategy.
BLOCK_STRUCTURES_SETTINGS:
COURSE_PUBLISH_TASK_DELAY: 30
TASK_DEFAULT_RETRY_DELAY: 30
TASK_MAX_RETRIES: 5
STORAGE_CLASS: 'storages.backends.s3boto.S3BotoStorage'
STORAGE_KWARGS:
AWS_ACCESS_KEY_ID: '<placeholder>'
AWS_SECRET_ACCESS_KEY: '<secretkey>'
AWS_STORAGE_BUCKET_NAME: 'bucket-name'
DIRECTORY_PREFIX: "/directory-name/"
PRUNING_ACTIVE: true
After introducing the above set we had to regenerate the cache by running the following command:
./manage.py lms generate_course_blocks --all_courses --with_storage
There are a few switches we need to activate:
block_structure.storage_backing_for_cache
block_structure.raise_error_when_not_found
block_structure.invalidate_cache_on_publish
Then we introduced a BlockStructureConfiguration with version 1 and cache expiration set to None.
This arrangement helped us to improve the load time of the page and saved us a lot of processing power.
The above configuration helped us optimize the request time. We ran load testing on a few of the servers and it had indeed improved the performance of the platform. The request that previously took ~10 seconds to load was reduced to only ~3 seconds.
This article was co-written by OpenCraft team member Adolfo Brandes and Daniel Seaton, Sr. Learning Systems Designer at MIT.
In this article, we'll describe how problems, videos, and pages from Open edX courses can be reused on the Canvas LMS via a new LTI implementation in Libraries v2, a feature recently developed by OpenCraft for MIT Open Learning. This project builds upon a wider effort commissioned by edX to enhance LTI compliance (1,2) and build more flexible and robust content libraries (1) for the Open edX platform.
Before getting into the details, let's dive a little on why this was done in the first place.
If you've ever authored courseware, you know how difficult it is to produce quality content. And if you spend a lot of time doing it, chances are you'll end up with an extensive library on a particular platform, such as Open edX courseware. What happens, though, when you want to reuse that content elsewhere? Few people would relish rewriting everything from scratch!
There are different ways a platform can allow content to be reused. The most common is by letting data be exported. This has been possible in Open edX since its inception: one can export courseware using the Open Learning XML format. But while it's straightforward to import the resulting tarball into a separate Open edX instance, bringing this content into another platform altogether presents a series of challenges:
Luckily, an organization called the IMS Global Learning Consortium came up with LTI, which aims to solve the issues above. LTI is short for "Learning Tools Interoperability": as long as both platforms support it, you can simply point the target platform to the source, and voilà! The learner will be able to interact with your painstakingly created content transparently, no import necessary. Best of all, if you make changes to the original content, those changes will be reflected anywhere you have reused it.
Open edX has been able to act as an LTI provider for a long time, and Canvas has correspondingly been able to consume from Open edX courses on a block-by-block basis. What else was needed, then?
Here's the thing. Reusing content originally written as part of a regular course is clunky at best. There are difficulties with content structured in this manner, particularly when it comes to Open edX:
It is for these and other reasons that Content Libraries development began in 2019. (OpenCraft CTO Braden MacDonald gives a great overview of the motivation behind this push, which includes the Blockstore backend, in this video.) With better search features and making grouping of related content much easier, they’re designed to support content reuse within Open edX courses.
The catch? As of early 2020, Open edX Content Libraries did not yet support any kind of LTI integration. While it was possible to reuse library content from within an Open edX instance, you couldn’t do so externally.
MIT, by any measure, is a heavy user of Open edX, maintaining an instance solely for on-campus teaching and learning. The instance has hosted over 200 unique courses for MIT students, leading to more than 35,000 unique problems, 15,000 unique videos, and 23,000 pages. The on-campus instance of Open edX is not the primary LMS at MIT, but exists as an optional system for creating enhanced, blended learning experiences.
In Fall 2021, the Canvas LMS was introduced at MIT to replace a homegrown, legacy system that did not offer the features of a modern LMS. Given the extensive library of rich content on MIT’s on-campus Open edX instance, the introduction of Canvas created new opportunities to think strategically about content integrations between the two platforms. MIT approached OpenCraft about their recent work on Content Libraries with Blockstore and began formulating a starting point to address broader ambitions related to content interoperability.
In short: MIT needed LTI for Content Libraries. So, over a few months at the end of 2021, OpenCraft built not only a way for Canvas to use LTI to integrate Content Libraries, but a way for authors to import content from preexisting courses into Content Libraries. The current implementation allows single xblocks (e.g., a problem, video, or page) to be reused via LTI.
Instead of just describing the new features, let’s show you how to actually use them with the Open edX and Canvas development environments. (The steps below require you to set up a local Open edX devstack and a local Canvas development environment.)
To start, set up your Open edX devstack with the Libraries v2 frontend and Blockstore backend, as outlined in Library Authoring project README. Then proceed to set up a Canvas development environment using the automated setup described in its Quick Start guide. We won’t walk through individual steps in setting these environments up, as that would be beyond the scope of this post. Worry not, though! The corresponding setup procedures are well documented in each project.
From this point on we’ll assume you were able to set them up successfully, including being able to access:
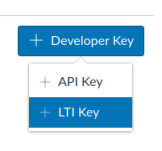
Continue by logging into your local development instance of Canvas as an administrator, and creating a Developer Key. You can do so from the Admin > Account panel, as shown below:
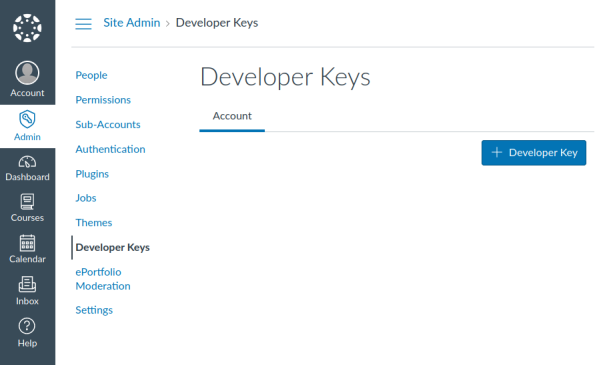
To start creating the key, click on + Developer Key, then + LTI Key, like so:
On the "method" drop-down, select "Paste JSON", and copy/paste the following into the text box (you could fill fields individually, but this makes it easier!):
{
    "title": "edX Content Library",
    "scopes": [],
    "extensions": [
        {
            "platform": "canvas.instructure.com",
            "settings": {
                "platform": "canvas.instructure.com",
                "placements": [
                    {
                        "placement": "assignment_selection",
                        "message_type": "LtiDeepLinkingRequest"
                    }
                ]
            },
            "privacy_level": "anonymous"
        }
    ],
    "public_jwk": {},
    "description": "edX Content Library",
    "custom_fields": {},
    "public_jwk_url": "http://127.0.0.1:18010/api/libraries/v2/lti/1.3/pub/jwk/",
    "target_link_uri": "http://127.0.0.1:18010/api/libraries/v2/lti/1.3/launch/",
    "oidc_initiation_url": "http://127.0.0.1:18010/api/libraries/v2/lti/1.3/login/"
}
Note: the last three URLs point to Studio on your local Open edX devstack.
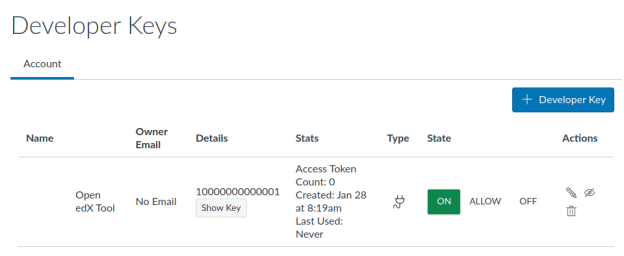
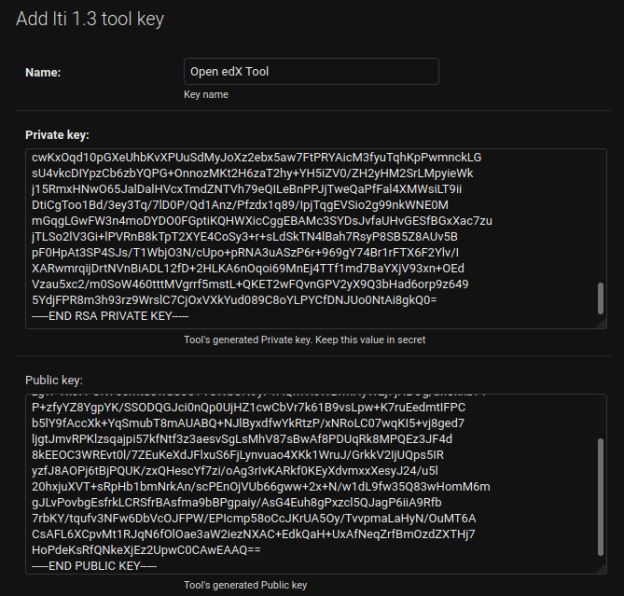
Give the key a name, such as “Open edX Tool”, and save it. Then immediately enable it by clicking on its ON button as shown below, and copy the client ID (“10000000000001”, here) to your clipboard.
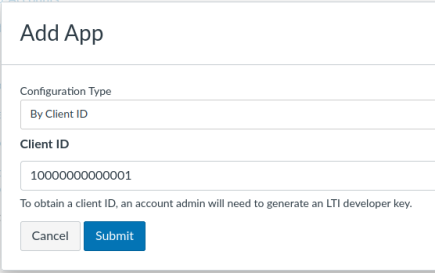
Now we’ll add an “App”. Go to Site Admin > Settings, and on the Apps tab, click on the + App button. Choose the “By Client ID” configuration type, and paste the client ID from the key you created above:
After clicking Submit, confirm you want to install the app by clicking on Install. You should now see an “edX Content Library” app in the list of external apps.
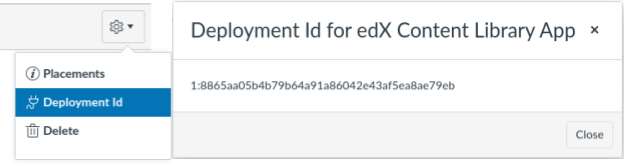
Click on the app’s configuration icon, then on Deployment Id. You’ll need the identifier (here, “1:8865aa05b4b79b64a91a86042e43af5ea8ae79eb”) when setting up Open edX, so copy it to the clipboard.
Start by enabling the content libraries LTI tool for Studio. You’ll need to edit the Features setting from the Studio container itself:
cd devstack
make studio-shell
vim /edx/etc/studio.yml
...
FEATURES:
ENABLE_CONTENT_LIBRARIES_LTI_TOOL: true
Save the file, exit, and restart Studio via:
make studio-restart
Next, you’ll need to pre-generate a JSON Web Token keypair as a means for Open edX and Canvas to trust each other. An easy way to do it from the command line using SSH and openssl is:
ssh-keygen -t rsa -b 4096 -m PEM -f jwt.key
openssl rsa -in jwt.key -pubout -outform PEM -out jwt.key.pub
cat jwt.key
cat jwt.key.pub
Note the contents of each file, as you’ll need them shortly.
Now log into Studio as an administrator, then proceed to the Django admin interface at the following address:
http://localhost:18010/admin/lti1p3_tool_config/
Click + Add on the “Lti 1.3 tool keys” entry, give it an arbitrary name, and paste the corresponding keys you created above. In other words, under “Private key”, paste the contents of jwt.key, and under “Public key”, paste jwt.key.pub, like so:
Once the key is saved, go to the list of LTI tools at:
http://127.0.0.1:18010/admin/lti1p3_tool_config/ltitool/
Click on ADD LTI 1.3 TOOL on the top right, and fill the fields with the corresponding information:
That’s it! When you click save, Open edX Content Libraries and Canvas will be set up to communicate with each other via LTI.
What’s left to do is to actually create a content library with some content in Open edX, and to finally consume it in the Canvas instance.
Start at the Open edX library authoring frontend, which in the devstack setup is located at:
http://localhost:3001
Click on New Library, filling the fields out as you see fit: the library details are arbitrary. Just make a note of them for later! For instance:
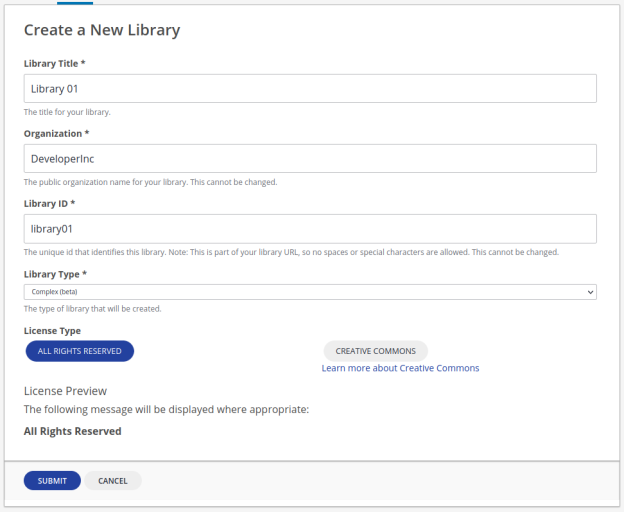
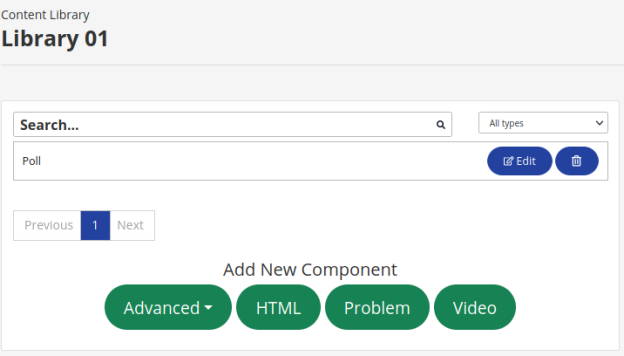
After submitting, add a “Poll” block by clicking on the Advanced button, then on Poll. (For the purposes of testing LTI integration, you don’t need to customize it, but feel free to do so by clicking on the block’s Edit button.) The block should be visible in the library you created, like so:
Next, you'll need to explicitly allow this library to be shared via LTI. For now, the only way to do so is via Studio’s admin interface, at:
http://127.0.0.1:18010/admin/content_libraries/contentlibrary/
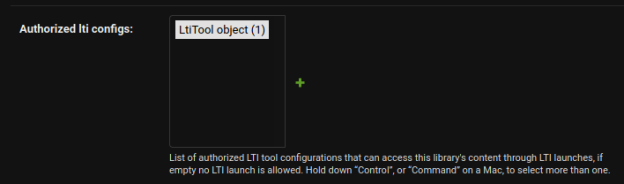
Click on the library's ID (in this case, "library01") to edit its metadata. Under "Authorized LTI configs", simply click on the first "LtiTool object" (which refers to the LTI configuration that points to Canvas you created earlier) so that it remains selected:
Click Save, then go back to the library authoring frontend and the library you created (here, http://127.0.0.1:3001/library/lib:DeveloperInc:library01), and refresh the page. You should now see a "Copy LTI URL" button alongside the poll block you just created.

The presence of the Copy LTI URL button is confirmation that this library is accessible via LTI. Click on it: doing this will copy this block's LTI integration URL to your clipboard.
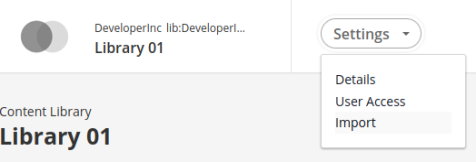
Instead of creating blocks from scratch, you can also import them from a preexisting course into a library. To do so, go to the library’s Settings menu, and click on import:
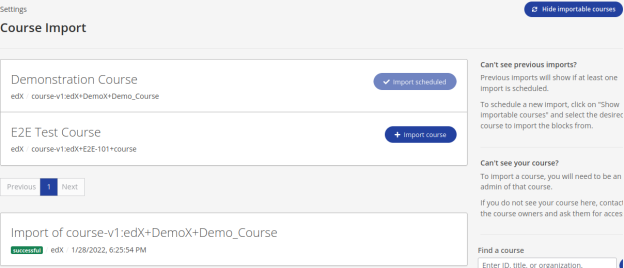
Next, click on Show Importable Courses, then import the Demonstration Course by clicking on its Import Course button. After a few seconds, the import should be completed:
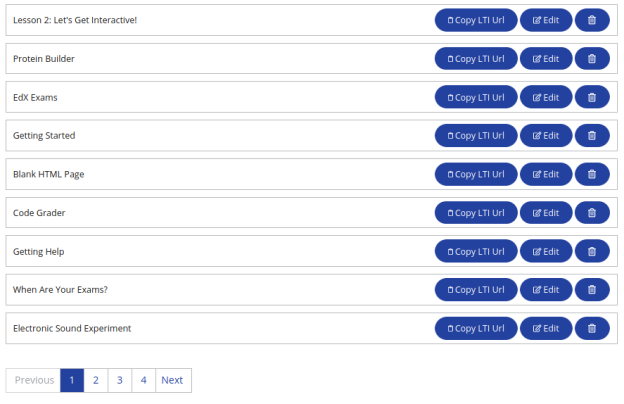
If you then go back to the library page, you should see a list of all the imported blocks, all of which could also be used via LTI:
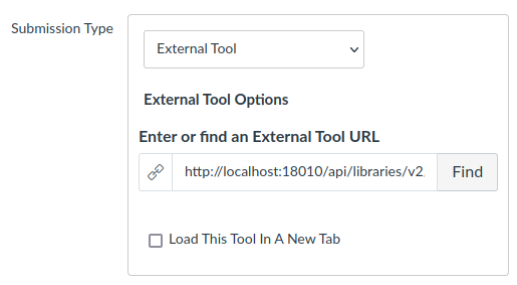
Now, go back to the Canvas Dashboard and click on Start New Course. Give the course any name you like, then from its home page click on Assignments, then + Assignment to create a new (you guessed it!) assignment. Its name is also arbitrary (we're calling ours "Open edX Poll"), but under "Submission Type", choose "External Tool". And for External Tool URL, paste the LTI URL that's on your clipboard. In our case, it looks like this:
http://127.0.0.1:18010/api/libraries/v2/lti/1.3/launch/?id=lb:DeveloperInc:library01:poll:c3fe9810-3811-4794-878f-da08ca07ff00
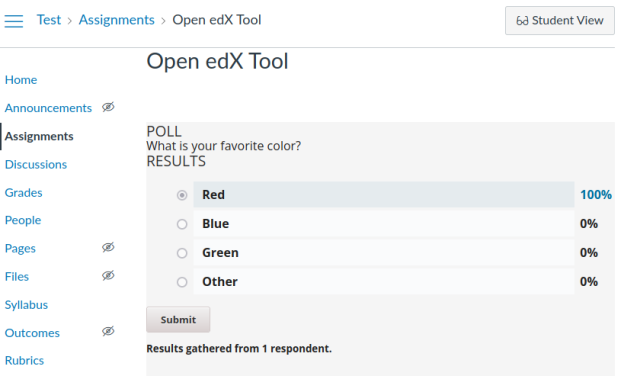
Click on save, and… That's it! Your Canvas learners should now be able to interact with the poll block from within a Canvas course, just as if they were using it inside Open edX. And yes, this includes grading!
Note: LTI urls can also be used in an <iframe> in any Canvas Page, which is great for embedding videos, pages, and other non-graded content. An easy way to try this is by including an LTI url, for a video or page, within the content editor for an assignment. You can include an <iframe> with an LTI url anywhere you can access the Rich Content Editor in Canvas.
It's still early days for Open edX Content Libraries, but the fact that Library items can now be used via LTI integration opens up a realm of possibilities. Because libraries are unbound from the traditional courseware structure, they allow more effective content reuse. And because their content can be accessed programmatically, it can be used in all kinds of interesting ways, for instance, for adaptive learning. In addition, Libraries offer an easier entry point to the vast array of Open edX problem types. Allowing instructors to start their authoring journey from a Library might make for an easier introduction to the power of the Open edX platform.
If you’d like to know more, let us know!
Header image: "Canvas Skies" by Nichole Renee is licensed under CC BY 2.0
This article was written by team members Shimul Chowdhury and Guruprasad Lakshmi Narayanan.
An Open edX "site" presents a catalog of courses and course content in an individual way. A vanilla Open edX instance features a main, single site by default, but — did you know the platform could support multiple sites, all hosted on the same instance? All sites can be configured independently of each other: for example, you can assign a different visual theme to each site, along with a unique homepage URL, and a specific course catalog.
Deploying multiple sites requires a little work. The official documentation is a great start, but things get complicated fast if your platform uses additional services such as eCommerce and Course-Discovery. Additional services require additional configuration to be able to work in the context of a custom site.
We'll start by listing the steps needed to configure a site manually. Then we will recommend an easier way to achieve the same via Sites Generator, a neat automation tool that we built at OpenCraft.
The following configuration should be added to the LMS:
If we want to create a separate site for each organization offering courses on the instance, we need to create that organization at - <LMS_ROOT>/admin/organizations/organization
Then we can set up a site using the Django sites framework by adding a new site here - <LMS_ROOT>/admin/sites/site/
With the SiteConfiguration model, we can tailor different aspects of each site according to our needs. We can add/update SiteConfiguration values for a site from <LMS_ROOT>/admin/site_configuration/siteconfiguration/
The Open edX documentation has a pretty comprehensive list of available parameters that we can tweak using the SiteConfiguration model. We need to make sure we set up the following configurations for the custom site to work correctly -
course_org_filter - only show courses from one or more specific organizations on a particular site.SITE_NAME & LMS_BASE - LMS domain name.LMS_ROOT_URL - LMS URL.PREVIEW_LMS_BASE - LMS preview site domain.ECOMMERCE_PUBLIC_URL_ROOT - e-commerce site URL.COURSE_CATALOG_API_URL - Discovery service API URL.To have eCommerce work independently for each site under its custom sub-domain, we need to add an OAuth2 redirect URL from - <LMS_ROOT>/admin/oauth2_provider/application/
<ECOMMERCE_PUBLIC_URL_ROOT>/complete/edx-oauth2/ to Redirect URIs field. This ECOMMERCE_PUBLIC_URL_ROOT has to be the new eCommerce site that we will be creating in a moment.
The default ‘ecommerce-sso’ application gets overwritten every time we deploy our instance via Ansible. So, we have to apply the above changes after every redeployment. To avoid this, we can create a separate OAuth2 application for setting up the SSO for custom eCommerce sites.
The site-generator application does this automatically.
We have to configure the following models to allow using a custom discovery site corresponding to each LMS site.
For each custom site in LMS (with course_org_filter applied), we need a separate Discovery Site. Add a new Site from - <DISCOVERY_ROOT>/admin/sites/site/. The domain name should be the same domain as COURSE_CATALOG_API_URL in LMS SiteConfiguration for our custom site.
Create a Partner for each custom site from - <DISCOVERY_ROOT>/admin/core/partner/
<LMS_CUSTOM_SITE>/api/courses/v1/<LMS_CUSTOM_SITE>/api/organizations/v0/<ECOMMERCE_PUBLIC_URL_ROOT>/api/v2/We have to add the following configuration in eCommerce for each custom LMS site.
We can create a new site from - <ecommerce_domain>/admin/sites/site/add/
The domain name of the created site should be the same as the value of ECOMMERCE_PUBLIC_URL_ROOT specified in the SiteConfiguration instance of the corresponding custom LMS site.
We can create a partner for the custom site from - <ecommerce>/admin/partner/partner/add/ and select the site we created above.
We can set up the site configuration for the custom ecommerce site created above from - <ecommerce>/admin/core/siteconfiguration/add/
We have to properly configure the OAuth settings here so that the eCommerce login works correctly.
As we can see, setting up a custom site requires many careful steps. So, imagine setting up 10 or 20 sites manually. No, thank you! Not to mention the risk of forgetting to update a configuration somewhere during edits or updates.
To tackle this problem, we at OpenCraft have created the Sites Generator open source application. It is a set of scripts that automates setting up custom sites in an Open edX installation across the LMS and other Independently Deployed Applications (IDA) like course-discovery and ecommerce. It allows you to use a single configuration file rather than manually maintaining all the relevant configurations in all those services. This single file will be used to generate and update all the required configurations.
Let’s say we have an Open edX instance, and we want to create two sites: ExampleEdu1 and ExampleEdu2. We can create a config like the following -
main_domain: "exampleedu.com"
site_for_each_organization: true
oauth:
  ecommerce_sso_client: custom-sites-ecommerce-sso
organizations:
  exampleedu1:
    name: "Example Edu 1"
  exampleedu2:
    name: "Example Edu 2"
microsites:
  $:
    context_overrides: {}
    overrides:
      ecommerce:
        ecommerce.core.models.SiteConfiguration:
          oauth_settings:
            SOCIAL_AUTH_EDX_OAUTH2_KEY: <ecommerce-sso client id>
            SOCIAL_AUTH_EDX_OAUTH2_SECRET: <ecommerce-sso client> secret
            BACKEND_SERVICE_EDX_OAUTH2_KEY: <ecommerce-backend-service client id>
            BACKEND_SERVICE_EDX_OAUTH2_SECRET: <ecommerce-backend-service client secret>
          payment_processors: paypal,cybersource
  exampleedu1:
    overrides:
      lms:
        openedx.core.djangoapps.site_configuration.models.SiteConfiguration:
          site_values:
            PLATFORM_NAME: Something Special!
Now, let’s break it down -
main_domain - This domain will be used for generating domains for different services for those two sites -
site_for_each_organization - It is possible in the platform to have multiple organizations in a single site or in multiple sites. If this configuration is true, the generator assumes we want a separate site for each organization. This will simplify the workflow, and we found this to be the most common use case.oauth - As mentioned before, the ecommerce OAuth2 Application will get overwritten every time we redeploy. The script uses a different application instead of the default one. We can, optionally, override the name of that application here.organizations - We list the organizations to be created under this key.microsites - Here we define the custom sites. If ‘site_for_each_organization’ is true, we don’t need to specify each site here. The generator will generate one for each organization, and we can override the configuration for any specific site.
To know more about overrides, please check the repository.
Once we create the configuration, we can then run the script in an appserver using the ‘make run’ command.
Setting sites can be tricky business, and we believe that the Sites-Generator application is an excellent tool to effortlessly manage multiple sites in an Open edX installation. It prevents a lot of manual work that would have been needed otherwise. If you find this script useful, feel free to use and contribute to it! If you encounter any issues, please let us know on Github, comment on this post, or email us at contact [at] opencraft.com : )
Cover photo by Omar Flores on Unsplash
This blog post was written by our team member Aayush Agrawal
At OpenCraft, we do a lot of feature development for our clients. While the Open edX platform is great and feature-packed out of the box, the best part is its extensibility. And we take full advantage of that when we need to develop a new feature.
When developing a new feature, we believe the following two considerations are the most important of all:
So, usually, in addition to internal reviews, our code is reviewed by edX. To ease this process, our instance manager monitors repositories and automatically creates sandboxes, allowing testing of the feature without installing the platform locally.
It’s worth mentioning that we are members of edX's prestigious Core Committers program, which means we are involved in the process of designing, implementing, and reviewing new features for the global platform roadmap.
We aim to help our clients with the design process: We talk with them so that we can understand their needs, and then we envision how to fill the gap with a new feature.
At OpenCraft, developing a new feature starts with a technical discovery. This is where we create a document that lays down the scope of the work to be done, a description of our approach as to how to do it, a list of tasks, and how much time it will take. We then send this document to our clients to review and approve, and we’re off!
As already mentioned, we put a lot of effort into designing new features in a way that they can be included in the Open edX codebase. This allows us to keep sources open and guarantees the best possible quality, because edX keeps standards high and reviews contributions rigorously. That’s why discussions with edX and other members in the community are an important part of our work. For example, we participate in Open edX releases preparation, are active on community forums and in Slack, and maintain some popular Open edX extensions.
After having signed off on the scope of the work, it’s a simple task of getting to it!
A good practice in this step is getting all code covered with tests, and reviewed by another developer before merging. We make a lot of use of our open source instance manager and create testing sandboxes for everything. Only after ensuring that everything works as expected, we deploy changes using blue / green strategy, so we can easily roll back in case of unexpected issues.
At OpenCraft, we believe in Open Source. Depending on the work done here, we might be creating new modules like XBlocks and Django Apps in which case we’d upstream them by uploading them to our public GitHub or GitLab accounts for everybody to use and improve.
But some changes require changes to the Open edX platform itself. In this case, after a ticket has been through our thorough internal quality control, we’ll submit it to Open edX Core Committers for review. Core Committers are trusted, long-standing members of the Open edX community who have been granted permission to review and merge code into the Open edX codebase. OpenCraft has multiple Core Committers within its team, which is a great token of trust from edX!
Finally, delivery! Once the work is done, approved, and merged into the platform if needed, we are ready to deliver the finished product. This might mean installing a new XBlock or App that was created, or it might be as simple as redeploying the client’s Open edX instance to include the latest changes.
While the roadmap above is the standard process, it’s not always a straight line. Sometimes we work with features that are interconnected, or maybe we have multiple review passes, or requirements change down the line etc. But no matter what happens, we are always committed to the two pillars of OpenCraft’s success: Quality Code and Open Source.
If you’re interested in having a feature developed for your OpenEdX deployment, feel free to drop us a note! You can contact OpenCraft at this link.
Photo by Yancy Min on Unsplash
This article was written by team member Aayush Agrawal
This blog post shows how to enable encryption at rest for Amazon S3 Object Storage used by your Open edX instance. When you use server-side encryption, Amazon S3 encrypts an object before saving it to a disk, and decrypts it when you download it again.
The first question is Why would you want to do this? The most important reason is privacy, as data uploaded to S3 buckets can contain personally identifiable information, such as the learner's email address in grade reports. Also keep in mind that you might be required to do this by GDPR and other privacy-focused laws.
The first step is to set up an encrypted AWS S3 bucket for your Open edX instance. For the sake of simplicity, I’d recommend using SSE-S3 encryption, as AWS will manage the encryption key for you. It will use a single key for all objects, which is encrypted itself with a master key that is frequently rotated for increased security. You’ll have two choices here:
If you are just starting or testing this setup, you can create an encrypted bucket and switch your instance configuration to use this bucket.
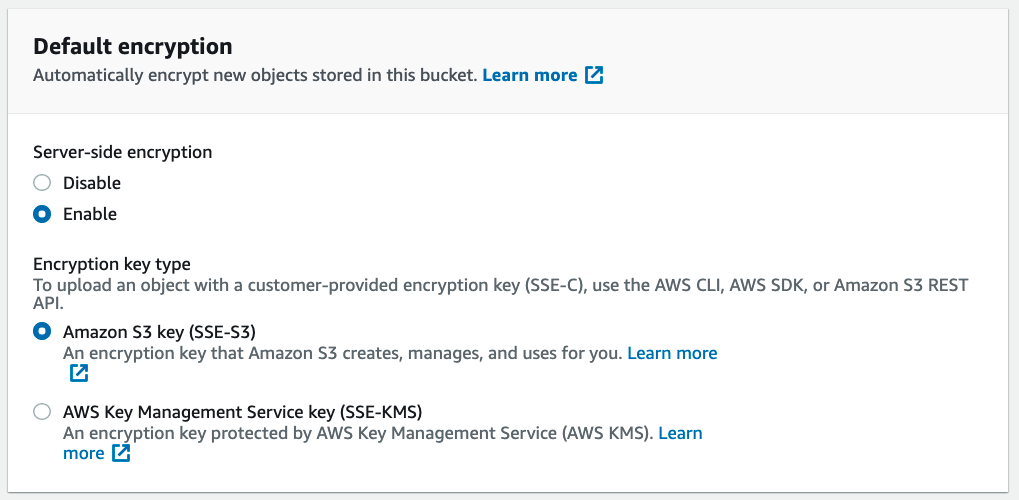
Simply navigate to https://s3.console.aws.amazon.com/s3/bucket/create to create a new bucket. Make sure to enable Server-side encryption.
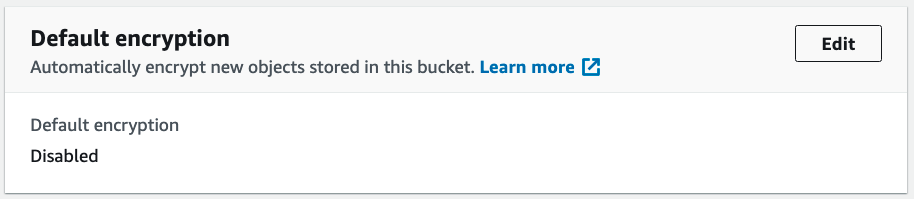
If you already have a running instance with an existing bucket, all you need to do is enable encryption for the bucket.
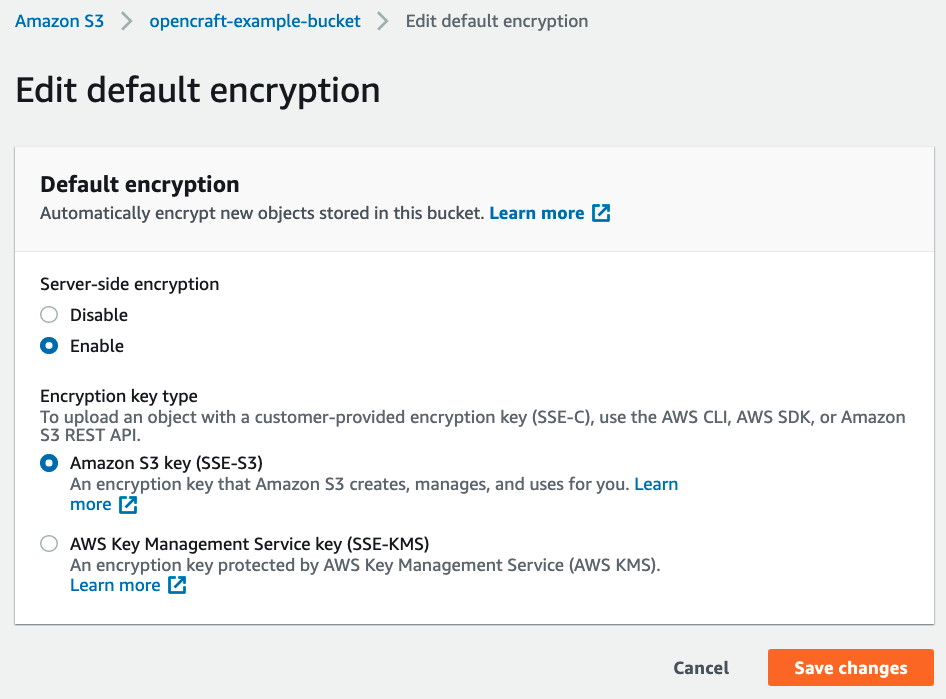
Just navigate to https://s3.console.aws.amazon.com/s3/buckets/ where you’ll be able to find the bucket you want to modify. Click on the bucket link and navigate to the “Properties” tab, where you’ll find encryption settings. Here, you just need to click the “Edit” button and select “Enable”.
Now that the bucket encryption is enabled, we must make sure Open edX can properly use it. Under the hood, your instance will be using Boto3 to communicate with AWS S3.
You need to modify your settings to enable S3 encryption. You’ll have to change both your /edx/etc/lms.yml and /edx/etc/studio.yml to use the following settings.
AWS_S3_ENCRYPTION: true
AWS_S3_REGION_NAME: 'us-east-1'
AWS_S3_SIGNATURE_VERSION: 's3v4'
DEFAULT_FILE_STORAGE: 'storages.backends.s3boto3.S3Boto3Storage'
While REGION_NAME and SIGNATURE_VERSION aren’t strictly required, they are big sources of issues when running this setup. If you encounter permission issues, make sure these are correct in your settings.
Next, ensure your bucket name is correct. If you decide to use a different bucket for course exports, make sure to enable encryption on AWS for this as well.
IMPORT_EXPORT_BUCKET: 'opencraft-example-bucket'
Again, these settings need to be applied to both lms.yml and studio.yml.
   GRADES_DOWNLOAD:
     BUCKET: 'opencraft-example-bucket'
     ROOT_PATH: 'reports/grade'
     STORAGE_CLASS: 'storages.backends.s3boto3.S3Boto3Storage'
     STORAGE_KWARGS:
       default_acl: 'public-read'
       location: 'grades-download'
STORAGE_TYPE: 's3' If you get the above error message after migrating from the local filesystem storage, you’ll have to modify the location to remove the leading slash, for example:
   VIDEO_TRANSCRIPTS_SETTINGS:
     DIRECTORY_PREFIX: video-transcripts/
     STORAGE_KWARGS:
       base_url: /media/
location: media/ # Was /media/ beforeAfter the setup is complete, you’ll have to test the settings to ensure that it works correctly. Obvious tests are course exports, grade report downloads, checking video transcripts, etc.
I would recommend that you use Opencraft’s Instance Test Checklist to make sure no functionalities are broken.
This checklist was developed to ensure our instances are fully operational after release upgrades, large configuration changes, and others.
I hope this helps you get peace of mind, knowing your users’ personally identifiable information is now safely encrypted in Amazon servers.
If you’re serious about your Open edX instance’s security and would like an extra pair of eyes, you can reach out to us at OpenCraft to help maintain and/or secure your Open edX instance!
Photo by Alex MotocHire on Unsplash
This article was written by team member Aayush Agrawal.
Every industry has its best practices, and we follow them for a simple reason: to walk the path already forged and successfully tested by others. In this blog post, I will describe some of the practices we employ to reduce maintenance and ensure maximum reliability in our hosting of Open edX instances.
Closely following Open edX named releases, which have release cycles of about six months, is an excellent goal. These named releases also receive upgrades in the form of point releases, which have a simpler upgrade path due to fewer radical changes.
The reason these releases are a good target is that they are fully supported by Open edX. The features and security of the latest named release is always improving, while older versions are not supported, don’t receive bug fixes, and develop vulnerability patches. This is why operators that don’t want to upgrade their instances always have to backport code from newer releases.
One difficulty that might arise when upgrading an Open edX instance is merging conflicts. Any developer trying to merge a large number of changes knows how unwieldy this can be, as the number of changes increases. This, therefore, is a good reason to get rid of code drift.
Closely following the upstream code and minimizing code drift makes the upgrade path much easier when a new named release or point release lands. However, if introducing code drift is unavoidable, it’s better to contribute to it further upstream and get it as part of a new release. We also think one of the best reasons is to give back to the community built around the platform.
At OpenCraft, we closely monitor Open edX releases and upgrade our clients’ instances as soon as possible, with plans starting as soon as the new version is announced This is not possible without getting rid of code drift. This is why we aim to upstream all our code changes to Open edX.
Not only does this procedure benefit the community, but it also directly benefits our company, by reducing the upgrade burden, and our clients, by offering them faster and more affordable upgrades.
Nothing is as frustrating as going through your online course just to stumble into an issue in your LMS.
Yet, maybe more frustrating is being an Open edX provider and getting a message from one of your learners trying to describe an issue. The easiest way to prevent this situation is finding issues before your learners. Here are three strategies for that.
We strongly recommend deploying a staging environment, which is a safe place to test changes and let them break. A staging instance representative of production is a good place to catch issues that might have been missed during development.
One gotcha here is having a “reduced” representation of the Production environment. For example, you might not set up SSO, or MongoDB failover on the staging instance. This can be dangerous, as you might be deploying a breaking change into production fully believing everything will work as intended. We therefore recommend having a staging environment that is as close to Production as possible.
After deploying changes to the platform, ensure that you test the whole instance. While we might think we can test only parts of the platform touched by a code change, correctly finding out what is touched by the change is actually very hard in a platform with the size of the Open edX LMS. To help with testing, OpenCraft developed a Manual Instance Checklist.
Monitoring is an automated way to identify issues. Strategies for this abound, and many services can be used: hardware monitoring, VM monitoring, process monitoring, performance monitoring, endpoint monitoring, etc. This topic will be more deeply investigated in a future blog post; stay tuned!
One gotcha is having “too much noise” in your monitoring. A monitoring plan that’s too strict and with frequent alerts can lead to desensitization to alerts. This can be dangerous, and can, in turn, create issues that are not checked, and if an alert doesn’t get checked, it’s a waste of time and effort.
Anything can fail without warning on the Internet, including servers managed by others. One important way of making your Open edX instance more resilient is increasing its redundancy by ensuring that critical system components have another identical component with the same data that can take over in case of failure.
I won’t get into the details of MySQL and MongoDB replicas and failover as you’ll find some great writing on the subject. For example, check this article.
Here, I specifically want to bring attention to the importance of getting rid of single points of failure: single database server, single load balancer, single application server, etc.
This is also interesting from a performance perspective, being used for horizontal scalability.
You can have all the patches in the world, but without encryption, an attack on your infrastructure can reveal everything anyway. This is why encryption is necessary if you are hosting anything, especially the Open edX platform, as it stores Personally Identifiable Information.
You can find more information on encrypting your Amazon S3 Object Storage, for example, in our previous blog post.
Besides encryption, following Web applications security practices is very important to prevent headaches in the future. This is another topic that is vast and has been already explored in articles around the internet, and each environment will have its own requirements.
What you should look for here is reducing your data and application servers’ exposure to a minimum, while hardening the servers that are required to be exposed, such as bastion hosts and load balancers.
At OpenCraft we host and maintain OpenEdX instances for many organizations including Harvard University, Arizona State University (ASU), Cloudera, and many more. If you’d like to avoid the headache and have your instance professionally managed, reach out to us at https://opencraft.com/contact-us/
Cover Photo by Markus Spiske on Unsplash
The Open edX platform is constantly growing in every aspect, something that’s desirable for every Open Source Software that proves to be useful and true to the name. In that sense, the ways of setting up the platform keep evolving, too. Unless you’re knowledgeable with the tools used for working with the platform in a local environment, there is no “simple” way to get started with an instance without help. That’s where we come in.

Setting up any production-ready website requires some configuring, let alone an education platform with so many services, such as E-Commerce, forums, platform-wide annotations, analytics, and more.
Using the OpenCraft Instance Manager (OCIM) allows you to focus on what’s important: creating high-quality courses and increasing the possibilities of online education, based on one of the largest and most scalable Learning Management Systems (LMS).
However, we do have a specific way of setting up the platform for our clients, and like everything related to this massive project, it’s constantly changing for the better. The way we do deployments allows us to offer an easily-manageable installation for anyone who wants to try out what the Open edX platform has to offer. Like any other, our method has both advantages and drawbacks, but we’re constantly evaluating ways to improve it and keep contributing the ideas we come up with to the whole community.
There are two main ways for a developer to deploy the platform:
When we say “various platform services” we’re referring to the various services that are actively supported within Open edX. Nowadays, a DevStack has no trouble setting them up; it will boot containers for each one and keep each environment isolated, making only the necessary connections.
Ideally, scalable software services should be deployed apart from each other to ensure availability, recovery from failures, and ease of escalation and maintenance, among other things. So, the best way to have the Open edX platform running is a distributed native installation— to not put everything into a single machine, but rather set up a server for the database, another for the LMS, another for Insights, and so on.
Distributing a system is costly and requires constant supervision and technical support, and while OpenCraft offers this as part of our hosting plans, it’s necessary to have an option that brings together the security, ease of development, and scalability of having isolated environments like in the DevStack, while providing a production-viable instance of the platform. This is the main purpose of OCIM.
OCIM sets up virtual machines (VMs) that encapsulate a native installation of supported versions of the platform. We do this by using Ansible Playbooks, adapted from those that the Open edX community has worked on, to facilitate our native deployments, and also our own playbooks for monitoring, protecting and managing our client’s instances.
This allows us to offer cost-effective and easy-to-maintain instances, fully isolated from each other, adding an attractive degree of flexibility and security. Additionally, this lets users and administrators customize their instances, leaving upgrades and updates for us to handle, something that’s always recommended if using this platform in a production setting.
Having said that, using VMs does have some limitations worth considering:
While these aren’t game-changing issues for simply testing the plans we offer, we want to reduce the wait time as much as possible for all deployments, so our clients can get faster to the work that matters. For this, we’re considering different ways of provisioning the databases and other assets that are limited by some of our hardware, among other upgrades.
Also, we’re already working on newer OCIM features that will help platform administrators know the status of their instance and easily customize it to the greatest extent, all in one place.
Regardless of your subscription tier, we want to provide you with the most effective tools and the highest level of quality, so you can expand your opportunities in providing the best online education possible. Stay tuned for our upcoming updates! ?
The parts of the Open edx platform are numerous and can be confusing. Newcomers lose themselves in the project's size. Getting your bearings can be a challenge, as we covered in our article on the DevStack. However, a quick overview can go a long way in understanding the Open edX platform's Components. We shall see how they work to bring together the full learning experience.
Not all components are used on every installation of the Open edX platform, and there are some less common components that are not listed here. However, this should be more than enough to orient you.
If you like, you can also watch this community meetup video where Ned from edX explains the difference between edX and Open edX and I walk through several components of the platform:
The Learning Management System is the Open edX Component that everyone knows and most thinks of when thinking of the platform. It’s the site where learners go to learn. It also keeps track of users, grades, course progress and tools for instructors to manage their students.
Special among all the other Open edX Components, it handles authentication across other services and also contains the most code. If you’re working on the Open edX platform, you will work with the LMS in some fashion.
Many other entries in this list are actually part of the LMS’s codebase, but are so noteworthy as to require their own entries.
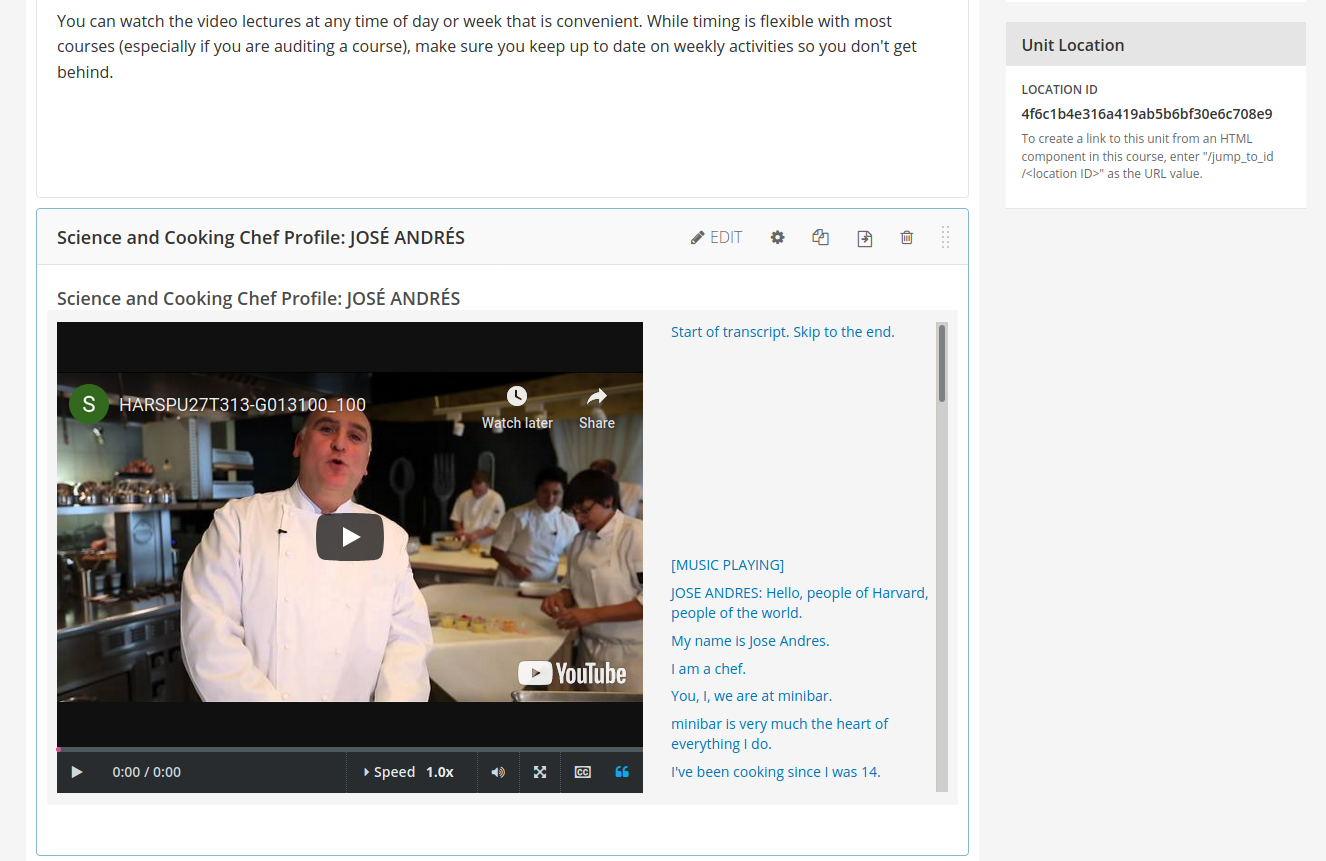
The course creation tool, commonly called the ‘Studio’, is the platform's course authoring tool. It allows you to build courses for learners and customize the settings for them. You can upload handouts, create libraries of content for reuse, and work with XBlocks to compose your ideal online course.
The course construction tool is a CMS. You can see all of the sections and units of your course at a glance, drill into every piece of information your learners need, and update them with ease. You can publish updated versions of your course at any time, and even specify when your courses will run.
As a bonus, you can even set up a ‘new run’ of a course, allowing you to use the courses you’ve built again and again for new students.
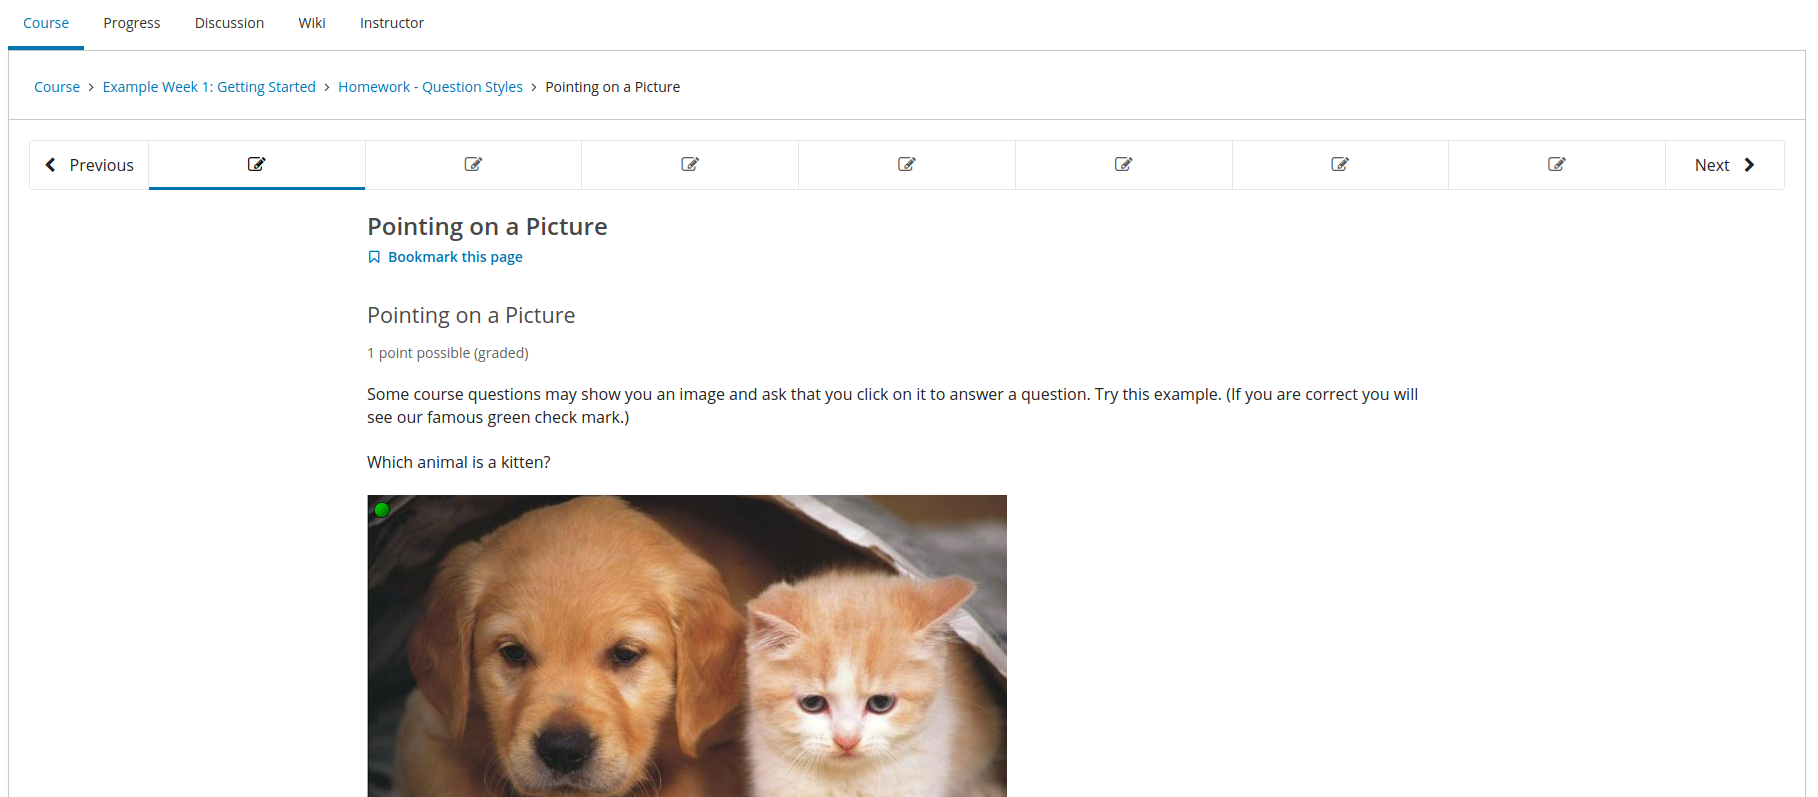
XBlocks are the ‘killer app’ of the Open edX platform. They are the small pieces of content-- videos, text, or special interactive tools course authors build with. They’re easy to use, easy to plug in, and friendly for developers. In fact, you can create your own XBlock and test it without setting up a full copy of the Open edX software. The library of XBlocks continues to grow and covers a wider set of use cases than anyone anticipated.
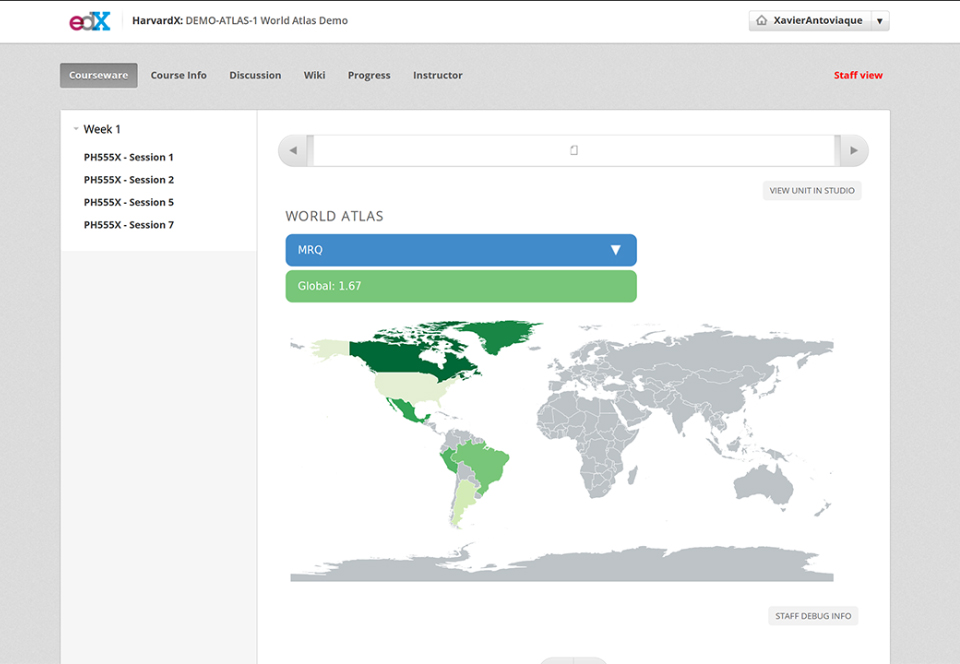
In fact, some cool blocks include a block to poll students, a block to create an automated chat bot, a block to show survey results from learners on a world map, For nearly every case you can think of, there’s a block. And if there isn’t, the XBlock development tutorial can help you make one to your needs!
Authors build courses out of XBlocks, so you’ll want to know them well. There are a few different implementations of the XBlock runtime– one in the Studio, one in the LMS, one in the SDK, and a couple in different Micro FrontEnds (MFEs).
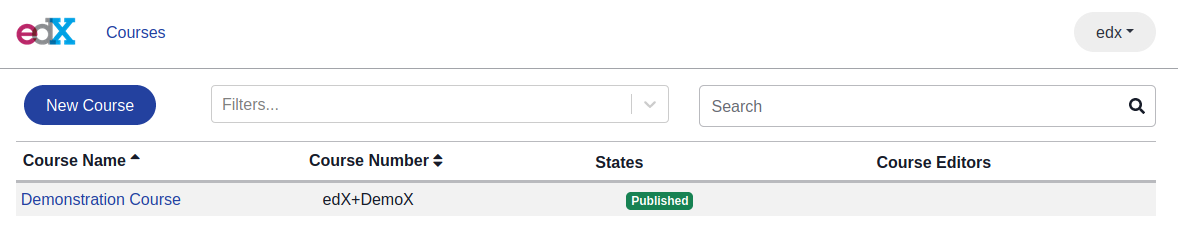
Course Discovery is an ‘Independently Deployed Application’. We'll cover a few in this article. Independently Deployable Applications are applications that run alongside the LMS, and usually interoperate with it using APIs. They usually use the LMS to authenticate users as needed.
Course Discovery doesn’t have pretty front-end, but it indexes information about courses to help make searching them easier. Discovery works with other tools for cataloging and fetching information about courses.
For example, the Publisher tool is used to approve and annotate courses for the Discovery service. Large organizations use publisher to review courses provided by client authors. It makes the workflow of reviewing and approving these courses easy by providing a streamlined workflow.
Search tools use the information provided by Publisher. There’s not an official search tool that uses this information and other information from Course Discovery yet, but we’re working on one which may help.
In fact, we recently published a full article on Publisher--go and read it!
XQueue takes information from problems submitted to it, and either sends it to other services (pushing) or lets those services retrieve problems as needed (pulling). This flexibility is key for some of the most advanced problems the platform supports.
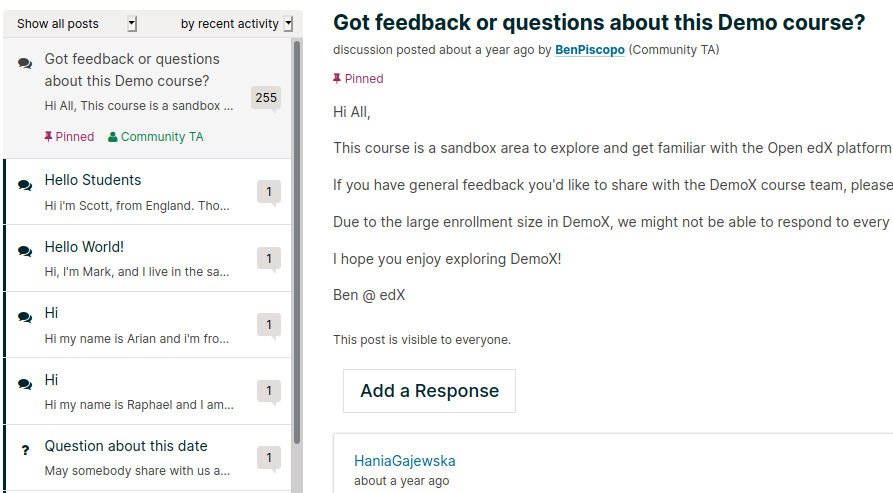
Each course has its own forum, and learners are able to communicate through it. This is a great way to keep them engaged. Did you know that most of the code for the forums is actually its own project? Well, it is, and it’s another one of those Independently Deployed Applications we mentioned earlier. The LMS communicates with the comments service via API, and renders the results on screen.
You may have heard of Blockstore, the new technology that’s driving the newest Open edX’s Components. Launching LabXChange required the development of Blockstore. Blockstore simplifies storage for reusable learning content. Eventually, all new courses will be built on it.
Most Open edX installations don't use Blockstore, but as time goes on, most will.
While many courses on edX.org are free, you can pay to get a certificate on most of them. The code that drives the checkout experience is the Open edX E-commerce project. The Open edX community developed it to take a wide range of payment providers. Among them are Apple Pay, Paypal, Stripe, and Cybersource. It’s another Independently Deployable Application, and if your institution wants to take payment for courses or certificates, it’s worth checking out!
With a powerful online learning platform like the Open edX platform, you need metrics. The standard tools available in the instructor dashboard can give you basic information about your students, but you may need more. With knowledge of how your students interact with your course, where they get stuck, when they drop off, you can improve the learning experience.
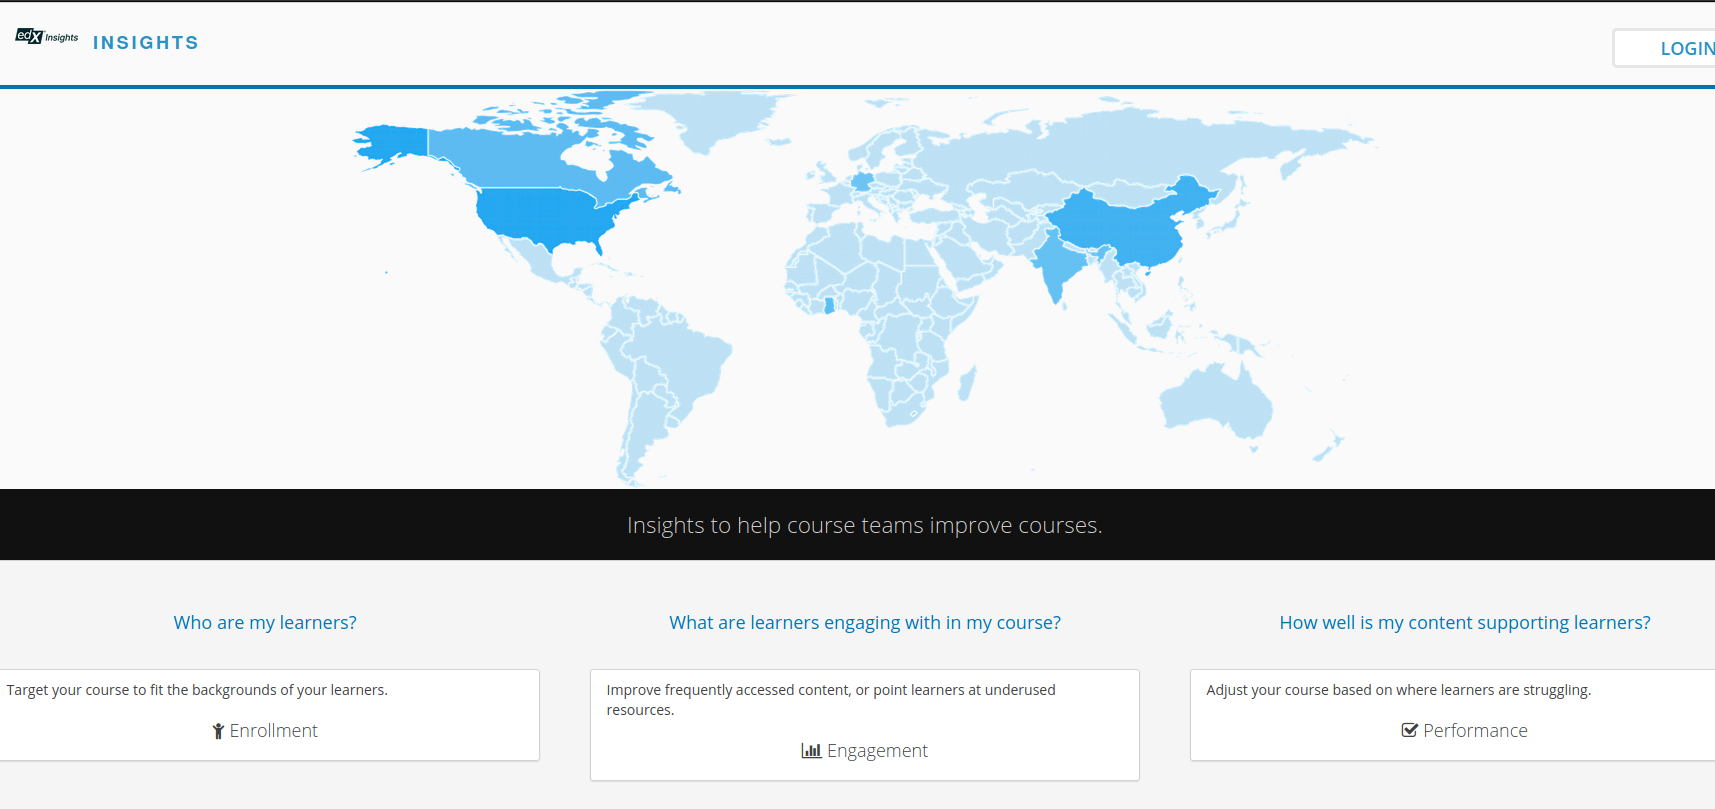
Thankfully, the platform provides a solution custom-built for understanding the behavior of learners. The Analytics Dashboard will break the data down for you, and give you some pretty graphs for it, too! You need special knowledge to install the dashboard, and the platform does not include it by default. However once it’s running, it can pay for itself by teaching you how your courses are actually used.
We’ve gone over several Independently Deployable Applications, some Micro Frontends, and some little-known parts of the Open edX Platform. There are more pieces to the Open edX architcture than we've shown here, and we have the expertise to deploy any of them. If you’re looking to get your Open edX installation set up with the best tools, drop us a line!
If you’ve had the opportunity to take a course on edx.org, you might wonder how you can contribute to the Open edX platform. The Open edX project is massive – involving many interdependent pieces working together. Deploying the Open edX platform takes a great deal of expertise. However, you can run your own copy for development easily with the “DevStack.” The DevStack sets up all the major components of an Open edX installation and gives you the tools to make your own contributions to Open edX.
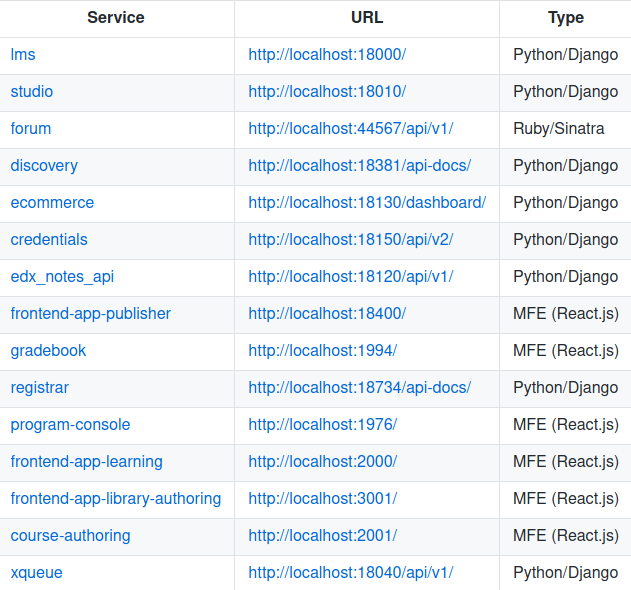
Following the DevStack repository’s README results in a working copy of Open edX. Curiously, it creates the repositories not in the DevStack directory, but the one above it:
    fox@masamune[~/projects/openedx/devstack] (master)$ ll ../
    total 0
    drwxr-xr-x  19 fox   admin   608 Oct 24 13:33 ./
    drwxrwxr-x  28 root  admin   896 Oct 24 13:29 ../
    drwxr-xr-x  44 fox   admin  1408 Oct 24 13:30 course-discovery/
    drwxr-xr-x  40 fox   admin  1280 Oct 24 13:30 credentials/
    drwxr-xr-x  30 fox   admin   960 Oct 24 13:30 cs_comments_service/
    drwxr-xr-x  69 fox   admin  2208 Oct 24 13:30 devstack/
    drwxr-xr-x  36 fox   admin  1152 Oct 24 13:30 ecommerce/
    drwxr-xr-x  26 fox   admin   832 Oct 24 13:33 edx-analytics-pipeline/
    drwxr-xr-x  25 fox   admin   800 Oct 24 13:30 edx-e2e-tests/
    drwxr-xr-x  26 fox   admin   832 Oct 24 13:31 edx-notes-api/
    drwxr-xr-x  61 fox   admin  1952 Oct 24 13:33 edx-platform/
    drwxr-xr-x  25 fox   admin   800 Oct 24 13:33 frontend-app-course-authoring/
    drwxr-xr-x  23 fox   admin   736 Oct 24 13:33 frontend-app-gradebook/
    drwxr-xr-x  25 fox   admin   800 Oct 24 13:33 frontend-app-learning/
    drwxr-xr-x  25 fox   admin   800 Oct 24 13:33 frontend-app-library-authoring/
    drwxr-xr-x  27 fox   admin   864 Oct 24 13:33 frontend-app-program-console/
    drwxr-xr-x  27 fox   admin   864 Oct 24 13:33 frontend-app-publisher/
    drwxr-xr-x  29 fox   admin   928 Oct 24 13:33 registrar/
    drwxr-xr-x  22 fox   admin   704 Oct 24 13:33 xqueue/
This allows the DevStack to act as one repository among the whole group. However, this may cause a problem if you weren’t expecting to create directories in your parent directory. So we recommend you create a project directory and then clone the DevStack there, so that you can keep your work area clean.

Each of the directories contains its own project. For example, edx-platform is the Studio and the Learning Management System (LMS). They share a lot of code and so work as one project together. In another example, cs_comments_service is the forum backend - it handles the course discussions. There is one directory, other than devstack which is a bit special, and that's edx-theme. This directory is where you'd place any themes you wish to install.
Each project runs in its own Docker container, orchestrated by Docker Compose. Docker Compose puts all of the DevStack containers together on a virtual network, with ports exposed to your machine. For instance, you can visit Studio by opening your browser and going to http://localhost:18010, or to http://localhost:18000 for the LMS. Note that the LMS takes considerably longer to start up, and may not be running for up to a minute after you start the Open edX DevStack.
One quirk here is that the LMS and the Studio each have their own docker container, but they both load their code from the edx-platform repository. Don't forget updating that Studio's code also updates the LMS.
For most of this article, we will focus on the LMS and Studio, as they are the most commonly worked on projects in the DevStack.
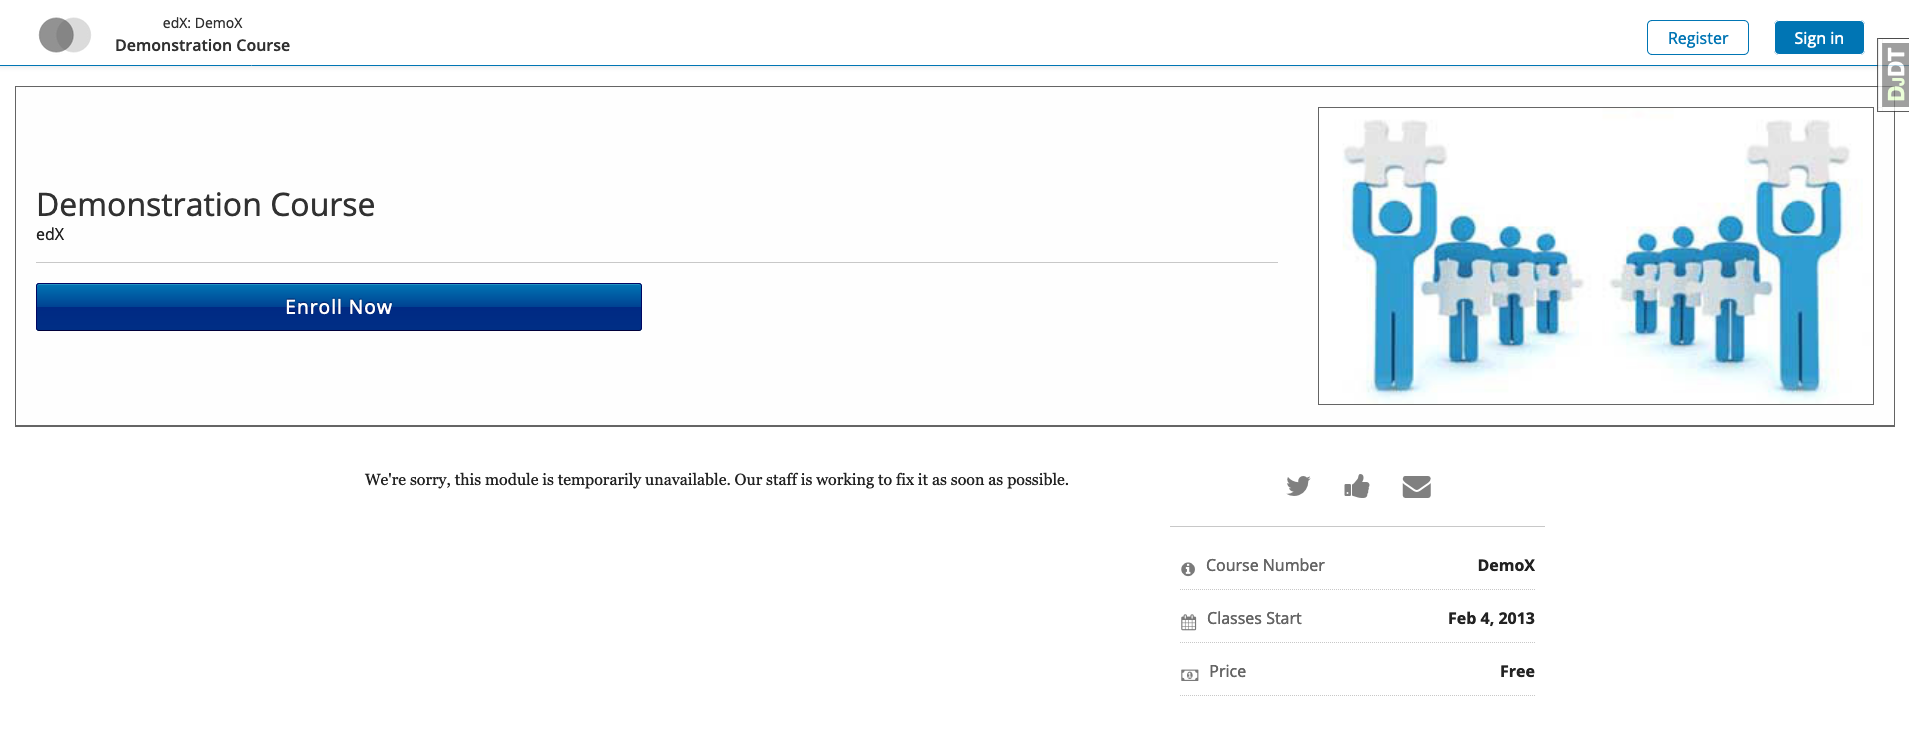
The majority of the work done on the DevStack involves edx-platform in some way - and thus the LMS and Studio containers are involved. If you switch branches, you must update your Python requirements and your database.
Let’s say you want to pull the latest changes from master. You go into the edx-platform repository and then pull:
    $ git pull
    From github.com:edx/edx-platform
     * branch                  master     -> FETCH_HEAD
    Updating 6f69fd7dc2..8cef028429
    Fast-forward
    …
The updated code likely has changed the dependencies. Switch back to the devstack repository:
cd ../devstack
Then, enter the LMS.
make lms-shell
Once inside, we want to run:
paver install_prereqs
This will download and install all of the Python and Javascript libraries needed to run the LMS. After installing the dependencies, update the database:
paver update_db
Once the database is updated, start the process over again with Studio. Exit the shell with ctrl+D or:
exit
And then enter the Studio shell with:
make studio-shell
You can then run the same paver commands as before. Your LMS and Studio should now be ready!
By default, Studio and LMS will automatically reload and handle any changes you make to their Python files within a few seconds. However, it does not automatically update Javascript and other frontend assets. Thankfully, there is a way to watch and automatically update those files just like the Python ones. We’ll use the LMS as the example. From the devstack directory:
make lms-shell
Once inside, run:
paver watch_assets

The frontend files will then be built and will watch for any changes, automatically rebuilding when they are found.
Any changes you make to the platform’s logic should always be verified with new tests. Likewise, you should run existing tests to verify you’ve not broken anything with your updates. To run unit tests, once more enter the shell of the system you wish to test from the devstack repository:
make lms-shell
To run every test imaginable (we don’t recommend this unless you have a lot of time on your hands):
paver test
If you wish to run all Python unit tests:
paver test_python
To run all Javascript tests:
paver test_js
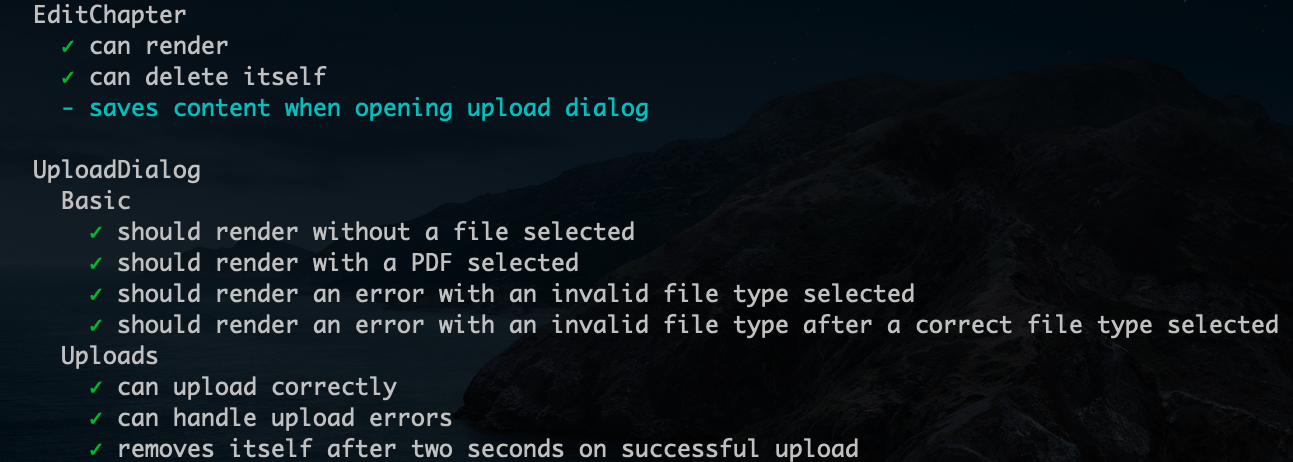
To run specific Python unit tests:
paver test_system -s lms -t path/to/file
...where path/to/file is a path to a file or directory that contains tests you want to run. Note that you should use -s cms instead of -s lms for studio unit tests. Code that's in common between the two projects should be able to use either flag.

You may have noticed that the paver command is used to perform several actions. Well, we’ve only scratched the surface of what it can do. Most of the commands that we haven’t covered won’t be useful to the average developer, but may come in handy from time to time. You can get a full listing of all commands paver supports by running:
paver --help
One thing that paver does NOT do is run the Django shell for you. You are likely aware that the LMS and Studio are very complex Django projects. Django comes with a REPL that allows you to run code directly. This makes it easy to look up database information without using SQL, for instance. You can perform any number of tasks with the full power of a contextualized Python shell.
To run the LMS Django shell, from within the LMS container, run:
./manage.py lms shell
Keen eyes will notice that this is almost the normal Django shell command. However, for all management commands in edx-platform, you must specify either lms or cms, since they both initialize different environments.
In fact, many other Django management commands are available. Most of the useful ones are invoked by paver as required, but you can list them directly like so:
./manage.py lms
This will list all commands, which you can then investigate further. For instance, to get help for the migrate command, run:
./manage.py lms migrate --help
Getting oriented around the Open edX DevStack can be overwhelming at times, but with a handful of commands you can make your way around the project and contribute your own code to the Open edX platform.
Of course, if you like, you can always call upon us to assist you with Open edX projects. Come drop us a line and let us know what you’re interested in doing. We’ll let you know how we can help!
This article was written by Jeff Miller, a member of the OpenCraft marketing team.
So, you’ve been looking for a learning management system (LMS) and have decided that the open source Open edX platform makes the most sense. You’re not alone! It’s the most widely used LMS platform in the world, with 45 million people using it in 34 different languages. It’s open source, so you don’t have to take a vendor’s word, alone, for anything, but it’s proven itself to be a resilient, effective learning tool that can scale to support thousands of simultaneous learners.
The official documentation for Open edX is excellent, but we know that setting it up and hosting it on your own can still be daunting. OpenCraft is here to help.
We sat down with OpenCraft’s very own product specialist Gabriel D’Amours to talk about how OpenCraft handles hosting and address some of the common technical questions that clients ask about Open edX.
So, for starters, how can OpenCraft help organizations customize, deploy, and maintain an Open edX installation?
We can help at every step of the way, from designing a custom Open edX instance, developing the code, and hosting and maintaining it. We can even provide training on how to build courses.
OK, so let’s say I want to get started and begin working with you all to design an Open edX instance. What version of Open edX do you use?
All good questions. As for the platform, we always use the current version when building a new instance, and we upgrade all of our hosted instances within a few weeks of a new release. That’s included in the subscription fee for all our hosting plans, so clients don’t need to worry about getting charged to ensure they’re up to date. It’s important, because not only do new releases provide new features and better performance, but they also ensure and enhance security.
What if I need to incorporate functions not yet supported in Open edX, like video conferencing? Can you add that?
When clients want features or integrations that aren’t already supported by the Open edX platform, we’ll do what’s necessary to develop it. Frankly, that’s what we love doing most.
For instance, the LabXChange team wanted users to be able to quickly incorporate and reuse content to create new learning pathways on the fly. At the time, Open edX didn’t support that capability, so we wrote a completely new storage architecture called Blockstore that’s now the standard storage architecture for the project.
It’s true that Open edX doesn’t support video conferencing out of the box, but OpenCraft can integrate apps like Zoom, and many others, into instances and courses using the LTI protocol.
How about hosting? Do you host clients’ instances? If so, what does that entail and what do you provide?
We frequently host our clients’ Open edX instances on OpenStack servers which are based in Europe, though if your needs are different, we’re happy to discuss it. In a nutshell, we have two plans.
Our Pro & Teacher is designed for clients looking for a full-featured, dedicated Open edX instance at a reasonable price. It includes the Open edX LMS and the Studio authoring tool for developing courses. Pricing is based on the number of monthly users, up to 1,000, and support is provided via email.
Our Institutional Plan is intended for clients who need significant customization and advanced functionality such as e-commerce, single sign-on, edX Insights analytics and dedicated mobile apps. With this plan, themes are completely customizable, there is no limit to the number of users and OpenCraft provides priority support with one of our senior developers.
For full details on the different plans we offer, click here.
Do clients need to use the OpenCraft domain if you host the instance or can they use a custom URL?
We provide custom domains for clients on both plans, though the Pro & Teacher option does require an additional monthly fee to enable this (it’s included in the Institutional plan). We can point your instance to any valid custom domain.
What examples can you provide of the work you’ve done?
We’re doing a lot of work directly for edX, which is pure platform development for Open edX. From our early days we've done work such as developing much of the platform's single sign-on capabilities, Drag and Drop XBlock (where the learner drags items to zones on a target image) and the Content Libraries feature. We're currently working on multiple projects with edX to update and improve many areas of the platform such as discussion tools, open response assessment, LTI exercises, Common Cartridge compatibility, content libraries and taxonomies, theming & branding, and more obscure backend stuff! We have many more projects to come in Q3 and Q4 2020.
We also work with many high-profile academic institutions. We currently provide Open edX services to universities such as MIT, multiple Harvard schools, Arizona State University, Notre Dame University, and have worked with many others.
We’ve worked with the French Ministry of Higher Education to develop the French national platform for promoting the use of massive open online courses, and currently work on a similar project with the Government of Israel on a national platform called Campus-IL. We also work with private firms. For example, we provide deployment, hosting and maintenance of Cloudera OnDemand, the California technology company’s learning platform.
Safe to say, if you need a learning platform, OpenCraft can deliver it.
Need support for the Open edX platform? Book a free 1hr consultation and we will help you out.
Photo by Angelina Litvin on Unsplash
A technical tutorial brought to you by OpenCraft : )
This article was written by team member Alan Evangelista.
This tutorial targets Ubuntu 19.10 and supports older versions down to Ubuntu 16.
Your Linux user password prevents unauthorized logins to your Linux installation, but it does not prevent unauthorized access to your hard disk data. For instance, a thief that steals your computer could easily avoid the Linux user password entirely by using a Live CD or moving your hard disk to another computer. Encrypting a hard disk adds a security layer, making much less likely that an attacker that has physical access to your hard drive will be able to recover any data at all. For this reason, this is a requirement for all employees in some tech companies working with Linux such as Opencraft. The downsides are a small performance penalty when accessing the disk and having to remember and type an extra password on every boot.
Linux has multiple disk encryption solutions. Two of the most popular ones nowadays are dm-crypt with LUKS and eCryptfs. dm-crypt provides "block" level encryption. With it, the Linux kernel creates an entire encrypted block device, which can then be used like any other block device in the system. LUKS (Linux Unified Key Setup) is a disk encryption specification which is widely used in Linux together with dm-crypt. On the other hand, eCryptfs provides "per-file" encryption. It stores encryption metadata in the header of each file and there is no need to keep track of any additional information aside from that. Since eCryptfs has to process keys and metadata on a per-file basis, usually dm-crypt is faster than ecryptfs.
Ubuntu 18.04 and above offers to encrypt your hard disk in automated fashion during its installation using dm-crypt and LUKS [1]. However, this option forces you to wipe your entire disk, which is not an option if you already have another operating system installed, such as Windows. This tutorial describes in detail how to encrypt your existing root partition in Ubuntu preserving all disk data. Most commands are Linux distribution-agnostic and should work well in other Linux distributions.
In short, the scenario covered in this tutorial is:
- Your computer has UEFI (Unified Extensible Firmware Interface)
- Your existing Ubuntu installation has a EFI system partition mounted at /boot/efi and a partition mounted at / (root partition)
- You want to encrypt your root partition preserving all the existing data in the hard disk
- Your root filesystem type is EXT3/EXT4.
Most recent motherboards and operating systems support UEFI. You can make sure your computer supports it by booting and checking its firmware. You can check disk partitions using the “fdisk -l” command in a terminal in Linux.
[1] The automated "full-disk" encryption replaces the automated /home encryption available in the installers of Ubuntu 17 and older versions.
First, it is recommended to perform a full-disk image backup of the entire hard disk. If anything goes wrong during the encryption, you risk losing all the data in it, so it is better to be safe than sorry.
Second, there is no way to encrypt a mounted partition in Linux and you cannot unmount the root partition from which you have booted, so you will have to boot from a live USB. Take the following steps:
- Download the latest Ubuntu ISO at https://ubuntu.com/download/desktop. I have used Ubuntu 19.10 for this tutorial and therefore the instructions presented here focus on it. If you are using another version, maybe you will have to tweak some commands.
- Build a live USB with the ISO. In Ubuntu 19.10, you can install the usb-creator-gtk package and use the Startup Disk Creator graphic application; simply use the "Other" button to select an ISO file and the "Make Startup Disk" button to create a live USB with it.
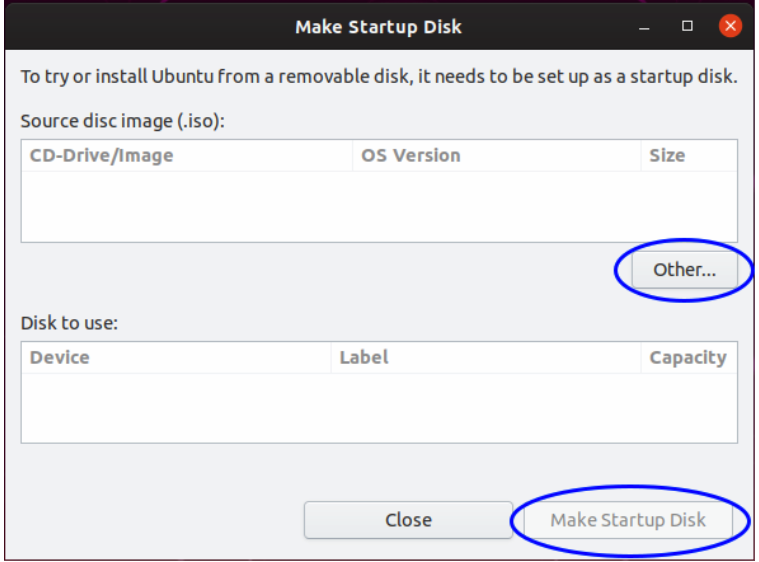
- Reboot your workstation, enter your UEFI firmware, set the USB device to boot before the hard disk, save your changes, leave the firmware and boot in the live USB selecting the “Try Ubuntu without installing” in the GRUB menu, as shown in the following image.

Once the Live Desktop Ubuntu environment has started, open a terminal by pressing Ctrl+Alt+T, run "fdisk -l" and look for the partition with the type "EFI system" and approximately 260 MB. That is the EFI system partition. Write down its number. Also look for a partition with the type "Linux filesystem" and write down its number. If you have more than one of these, you can use “mount”, “df”, “lsblk” or “findmnt” to see the mount points of all Linux partitions and pick the one mounted at the root directory.
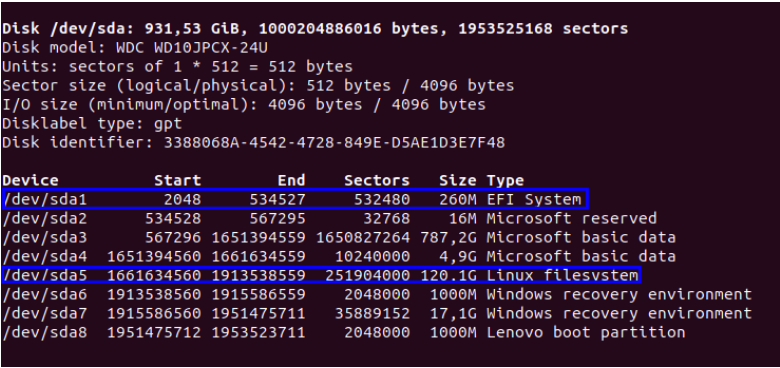
Notice: most computer nowadays use SATA hard disk drives and Linux names the main SATA hard disk as sda and the partitions in it as sda1, sda2, etc. However, hard disk drives which use other technologies such as PATA or NVM Express will get other device names. I’ll assume that the main hard disk’s Linux device name is sda from now on and you must adjust the commands accordingly if that name is different in your computer.
Get the root partition UUID using the following command, replacing X with the root partition number:
$ blkid -s UUID -o value /dev/sdaX
Write this UUID down.
During encryption, a LUKS encryption header is added at the beginning of the partition. Since an existing filesystem will usually use the entire partition, you must shrink it to make space for the LUKS header. Furthermore, resize2fs, the tool used to resize EXT2/EXT3/EXT4 filesystems, requires the filesystem to be checked before it can be resized. Execute the following commands, replacing X with the root partition number:
$ e2fsck -f /dev/sdaX
$ resize2fs -M /dev/sdaX
Encrypt your unencrypted root partition using LUKS1. You can use luksipc or cryptsetup-reencrypt (available in Ubuntu 19 and above) to achieve that. In Ubuntu 19 and above, I recommend the latter because it is more actively supported and therefore that is the one I will use in this tutorial. Make sure you have shrunk the filesystem as explained above before running this or you will lose all the existing data in the root partition. Execute the following command, replacing X with the root partition number:
$ cryptsetup-reencrypt /dev/sdaX --new --reduce-device-size 16M --type=luks1
The default LUKS format used by the cryptsetup tool changed to version 2 in Ubuntu 18.04. GRUB only supports version 1 so make sure you set the LUKS version to 1 as done above or else GRUB will not be able to install to or unlock the encrypted device.
You will be asked to enter a passphrase twice. Make sure you remember it easily because you will need to provide it on every system boot.
Enter new passphrase:
Verify passphrase:
Finished, time (...)
Open the encrypted root partition using cryptsetup (available in Ubuntu 19 and above), replacing X with the root partition number:
$ cryptsetup open /dev/sdaX rootfs
Extend the filesystem of the now encrypted root partition to take up all available space in the partition:
$ resize2fs /dev/mapper/rootfs
Although the first-stage GRUB boot loader is in the unencrypted /boot/efi partition, the second-stage GRUB boot loader and the initial ram disk are in /boot and therefore in the encrypted root partition. Due to this, you must make adjustments in GRUB so that it can access those.
Create a change-root environment in the root partition. Execute the following commands, replacing Y with the number of the EFI system partition:
$ mount /dev/mapper/rootfs /mnt
$ mount /dev/sdaY /mnt/boot/efi
$ mount --bind /dev /mnt/dev
$ mount --bind /dev/pts /mnt/dev/pts
$ mount --bind /sys /mnt/sys
$ mount --bind /proc /mnt/proc
$ chroot /mnt
With the current setup, the system would ask the encryption passphrase twice: once to access the second-stage GRUB boot loader and once again for the Linux kernel to access the encrypted root partition when it boots. In order not to require typing the encryption passphrase the second time, a keyfile must be created, added to LUKS and set up in /etc/crypttab, which describes the encrypted block devices that are set up during system boot.
Execute the following commands:
$ mkdir /etc/luks
$ dd if=/dev/urandom of=/etc/luks/boot_os.keyfile bs=4096 count=1
$ chmod u=rx,go-rwx /etc/luks
$ chmod u=r,go-rwx /etc/luks/boot_os.keyfile
$ cryptsetup luksAddKey /dev/sdaX /etc/luks/boot_os.keyfile
Add the following line to /etc/crypttab (replace <encrypted_rootfs_uuid> with the root partition UUID):
rootfs UUID=<encrypted_rootfs_uuid> /etc/luks/boot_os.keyfile luks,discard
Example:

Remove the existing root partition line from /etc/fstab and add the following line:
/dev/mapper/rootfs / ext4 errors=remount-ro 0 1
Example:
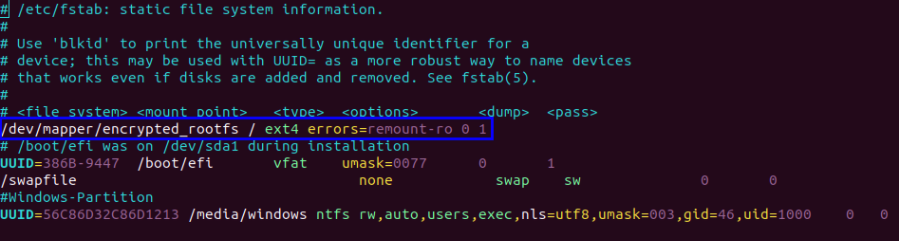
In /etc/default/grub, remove the existing reference to the root partition from GRUB_CMDLINE_LINUX and add the following line:
GRUB_ENABLE_CRYPTODISK=y
This line makes grub-install generate additional commands needed to access the encrypted root partition during boot.
Example:
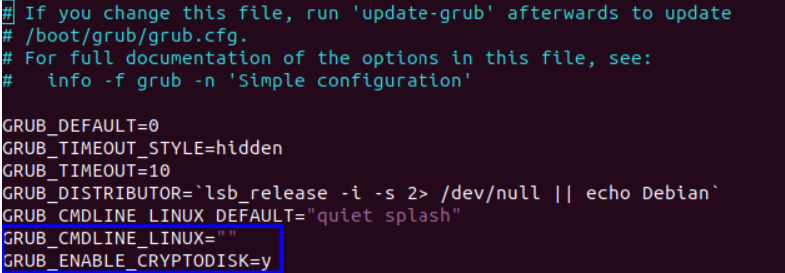
Update GRUB binary and configuration files:
$ grub-install
$ update-grub
Make sure that the GRUB configuration file at /boot/grub/grub.cfg was updated correctly by update-grub. There must be at least a Ubuntu menu entry which loads the luks and cryptodisk kernel modules and mounts the encrypted partition using cryptomount.
Example (click on image for bigger version):
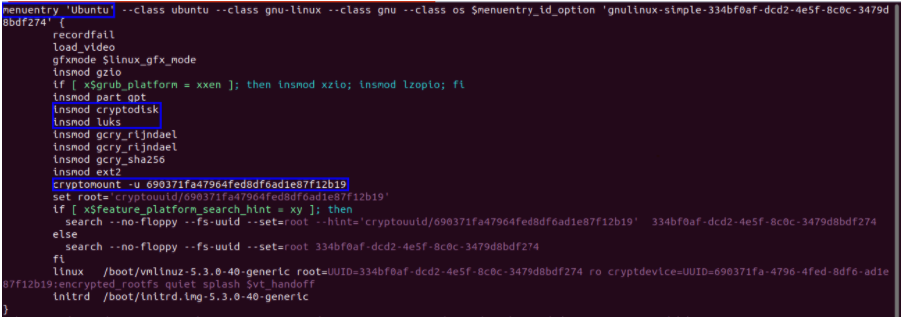
Update the initial RAM disk:
$ update-initramfs -k all -c
Leave the change-root environment:
$ exit
Unmount all mounted filesystems:
$ umount -a
Reboot and remove the USB drive so that the computer boots from the hard disk. You will be prompted to type the encrypted root partition passphrase.

Type the passphrase and Ubuntu will boot. That’s it!
If you have any suggestions or comments about this tutorial, feel free to add them in comments : )
The move to using Docker for the Open edX® devstack brought many improvements to our workflow, but it isn't obvious how to use a key developer tool with the Docker-based devstack: a python debugger.
With recent changes to Visual Studio Code, it’s now possible for VS Code users to get Intellisense and debugging working with your containerized devstack LMS. This will give you as-you-type auto-completion of most python code, near-real-time pylint linting using edX®'s linting rules, and the ability to step through edxapp's execution and pause and inspect variables while it runs.
Make sure VS Code is up to date (the beta/insiders build is not required anymore, but you do need the latest release)
The first step is to install the Remote - Containers VS Code extension (or the Remote Development Pack if you also want the SSH remote extension) and start up your Open edX devstack (make dev.up) if it’s not already running.
Then we need to install the debugger package into the edxapp venv:
    $ make lms-shell
    $ pip install ptvsd
Alternatively, you can add ptvsd to edx-platform/requirements/edx/private.in and run pip-compile private.in, before provisioning your devstack. This will ensure it always gets installed during provisioning.
Now we'll create a specific workspace to save our settings. In your edx-platform repository, create a .vscode folder, which will be ignored by git. Put the following into edx-platform/.vscode/edxapp-remote.code-workspace:
    {
        "folders": [
            {
                "path": "/edx/app/edxapp/edx-platform"
            }
        ],
        "settings": {
            "python.pythonPath": "/edx/app/edxapp/venvs/edxapp/bin/python",
            "python.linting.pylintEnabled": true
        }
    }
Next, we must create a Launch Configuration to enable debugging, by putting the following into edx-platform/.vscode/launch.json:
{
    "version": "0.2.0",
    "configurations": [
        {
            "name": "Python: Remote Attach to LMS Container",
            "type": "python",
            "request": "attach",
            "port": 5678,
            "host": "localhost",
            "justMyCode": false,
            "pathMappings": [
                {
                    "localRoot": "/edx/app/edxapp/edx-platform",
                    "remoteRoot": "/edx/app/edxapp/edx-platform"
                }
            ]
        }
    ]
}
Finally, we need to make sure the LMS enables debugging via ptvsd. Add the following to edx-platform/lms/envs/private.py:
    import os
    import ptvsd
    if os.environ.get('RUN_MAIN') or os.environ.get('WERKZEUG_RUN_MAIN'):
        ptvsd.enable_attach(address=('0.0.0.0', 5678), redirect_output=True)
Now Press F1 to open the Command Palette, and choose Remote-Containers: Attach to Running Container…
Select the edx.devstack.lms container.
This will open a new Visual Studio Code window, this time running inside the LMS container. Now we will be working on this VSCode window.
Open the workspace created earlier by choosing File > Open Workspace and open /edx/app/edxapp/edx-platform/.vscode/edxapp-remote.code-workspace
We'll also need to install the Python extension inside the container. Click on the Extensions tab of VS Code on the left of the window. Note that most of your extensions are not available yet. Find the Python Extension in the “Local - Installed” panel, and click “Install on Attached Container”
And you are now ready to start developing and debugging. You will now have python Intellisense, linting, and debugging with breakpoints and local variables working! (At least for the LMS; for Studio, repeat as needed).
To attach the debugger to the LMS process that’s always running in the container, just hit Debug > Start Debugging or press F5. Note that if you make any changes to the code, Django will restart and that will disconnect the debugger, so you’ll have to reconnect.
You can visit the official discussion forum for questions or reach out to us if you need any support. Happy debugging!
This article was written by team member Tim Krones
H5P is a tool that allows course authors to create rich HTML5 content for their courses, including games such as Find the Words and personality quizzes, multimedia apps such as audio recorders and interactive videos, as well as a variety of common and not-so-common question types. It is external to the Open edX platform and integrates with the platform via LTI, which is a protocol that allows Learning Management Systems (LMS) or platforms to integrate remote tools and content in a standard way. This is great because it means that any exercises you create with H5P will be usable both in the Open edX platform and in any other LMS that supports LTI.

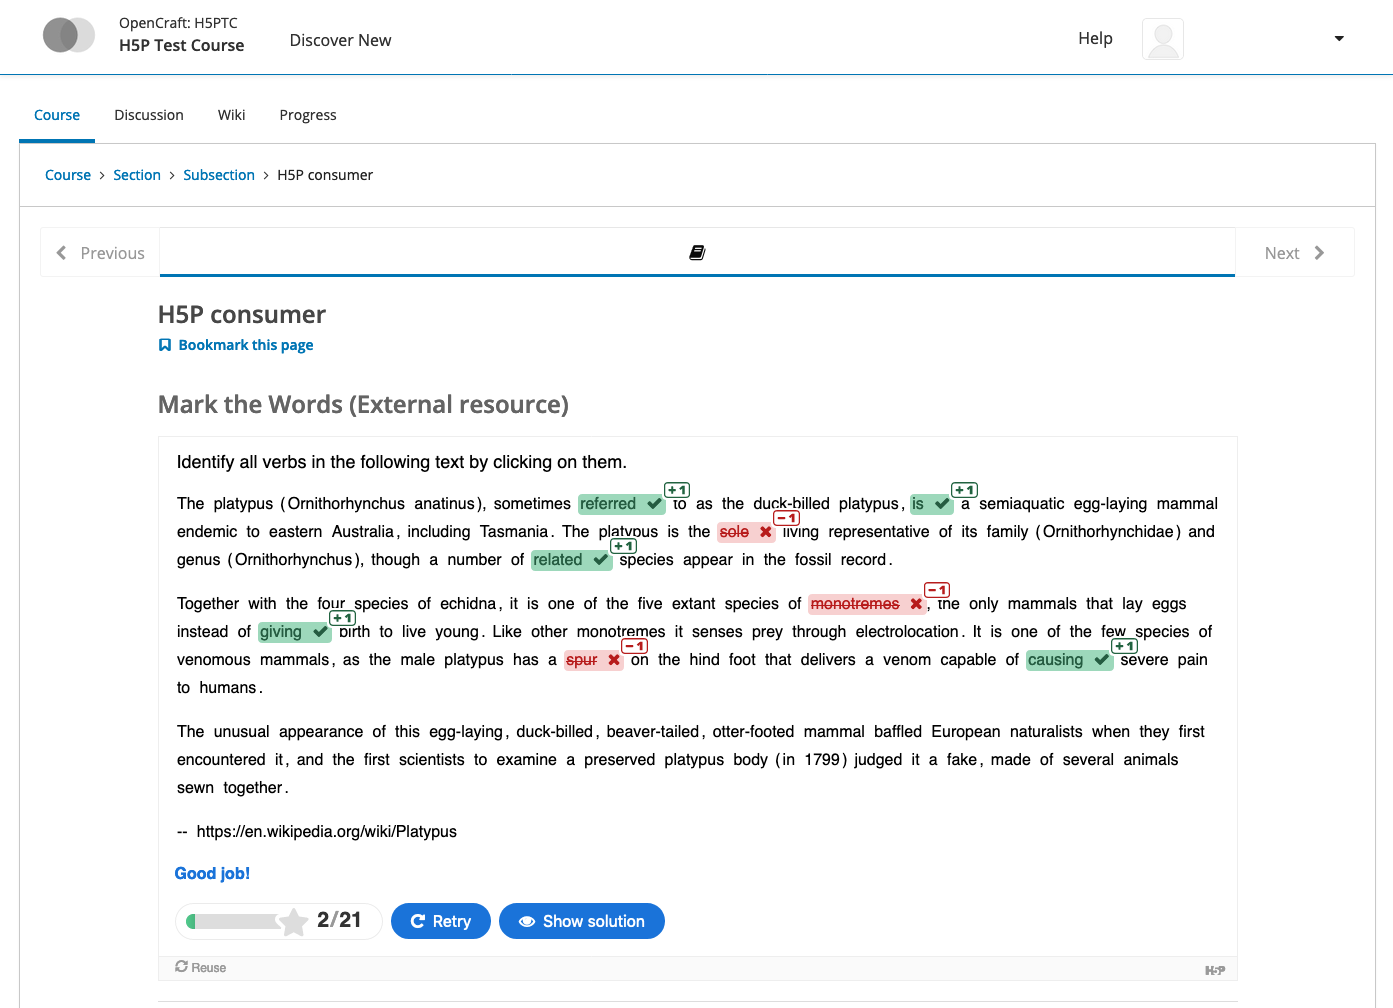
The process of integrating H5P content into your course consists of two steps:
We’ll cover both of these steps in more detail below.
Before you can get started creating content with H5P, you’ll need to set up an account with them here. (It is also possible to self-host H5P but for the purpose of this article we’ll assume that you are using H5P as a service.)
Once you’re done with that, log in to your H5P account and follow these steps to create a first exercise to embed into your Open edX platform course:
You can repeat these steps as many times as you like to create additional content items. If you get stuck or need additional information on a given content type, click the “Tutorial” button (if available) or use the “Example” button to bring up an interactive demo of the content type.
To allow your Open edX instance to identify itself when talking to H5P you’ll need to create an LTI consumer representing your Open edX instance in H5P. The process for this is straightforward and only requires a few clicks: Starting from the content page, navigate to “Manage Organization” > “Setup LTI”, enter a label for the new consumer in the form that comes up (such as “Open edX consumer), and click “Create”.
You’ll only need to perform this step once.
To prepare your Open edX platform course for integrating content via LTI you’ll first need to create an LTI passport and add it to your course configuration in Studio. LTI passports look like this:
<lti_id>:<client_key>:<client_secret>
Once you’ve put together the key, go to “Settings” > “Advanced Settings” > “LTI Passports” and add it there. The result should look like this:

Secondly, you’ll need to add “lti_consumer” to the list of advanced modules for your course. Go to “Settings” > “Advanced Settings” > “Advanced Module List” and edit the field to look something like this:

You’ll only need to perform these steps once for a course. So when you’re done with them you can go back to focusing on creating and integrating content into your Open edX platform course.
To integrate the H5P content that you created earlier into a unit of your Open edX platform course, follow these steps:
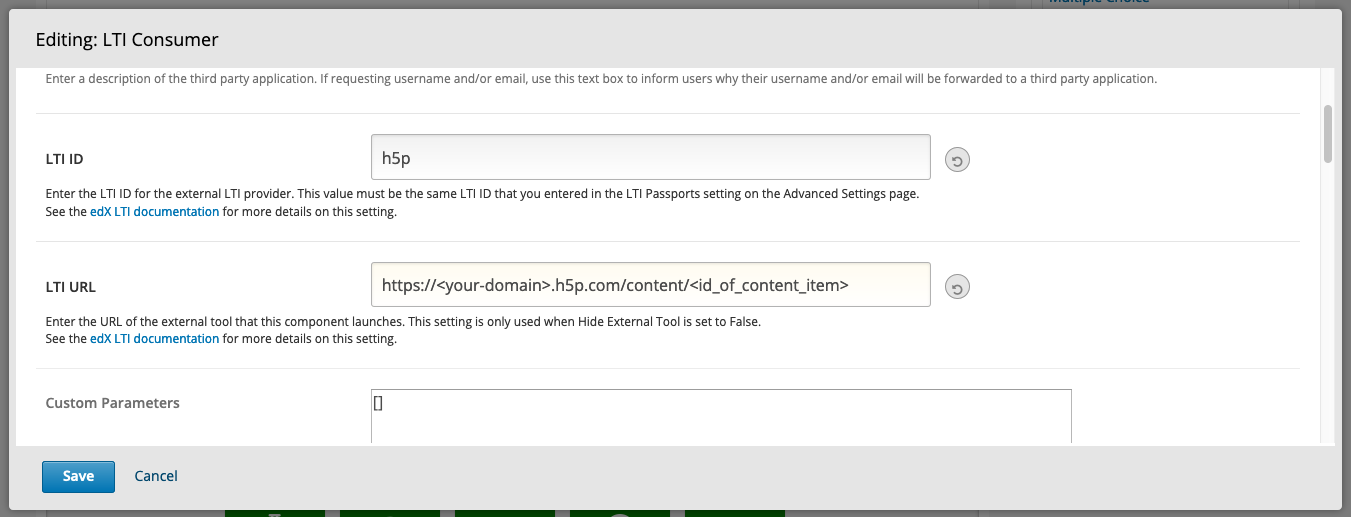
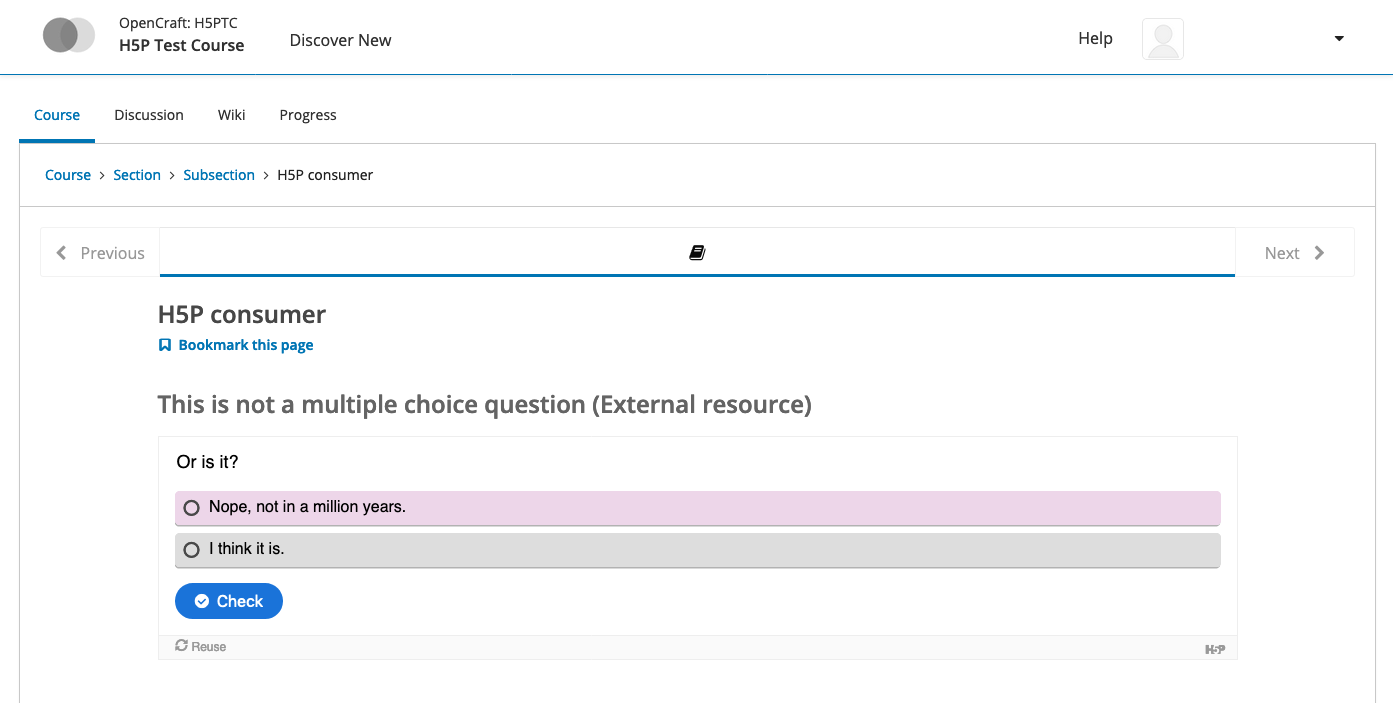
If you created more than one content item on H5P.com earlier, you can repeat the steps above to integrate those into your course as well.
Congratulations! You now know how to integrate H5P content into your Open edX platform courses, which means you’ve unlocked a plethora of additional options for designing learner experiences for your courses.
Today’s your lucky day 🙂 OpenCraft is hosting an Open edX instance for testing H5P from a learner’s perspective. All you need to do is create an account and enroll in the H5P Test Course. If you’d like to test the authoring experience as well and don’t have an Open edX instance that you can use for this purpose, we suggest that you sign up for OpenCraft’s free 30-day hosting trial. This will give you your very own Open edX instance to create courses on and test built-in features of the Open edX platform as well as external tools such as H5P.
H5P provides support for both basic LTI and Deep Linking. The latter is a new-ish addition to the LTI standard and makes it possible for course authors to create and select content from within the LMS that is embedding the content. This means that with Deep Linking, there is no longer a need to switch to a separate platform (such as H5P.com) to author LTI content. At the time of this writing, the Open edX platform does not yet support Deep Linking, so course authors can’t benefit from in-situ content creation when using H5P with the Open edX platform.
OpenCraft would love to help improve support for new LTI features such as Deep Linking in the Open edX platform. If this sounds interesting to you as well, don’t hesitate to let us know! You’re welcome to reach out via contact@opencraft.com, or (better yet) join the community on edXchange or the official Open edX forum and post your ideas and/or questions there.
We'd like to thank the fine folks at H5P for their help and for providing a test account : )