This technical tutorial targets Ubuntu 19.10 and supports older versions down to Ubuntu 16.
Introduction
Your Linux user password prevents unauthorized logins to your Linux installation, but it does not prevent unauthorized access to your hard disk data. For instance, a thief that steals your computer could easily avoid the Linux user password entirely by using a Live CD or moving your hard disk to another computer. Encrypting a hard disk adds a security layer, making much less likely that an attacker that has physical access to your hard drive will be able to recover any data at all. For this reason, this is a requirement for all employees in some tech companies working with Linux such as Opencraft. The downsides are a small performance penalty when accessing the disk and having to remember and type an extra password on every boot.
Linux has multiple disk encryption solutions. Two of the most popular ones nowadays are dm-crypt with LUKS and eCryptfs. dm-crypt provides "block" level encryption. With it, the Linux kernel creates an entire encrypted block device, which can then be used like any other block device in the system. LUKS (Linux Unified Key Setup) is a disk encryption specification which is widely used in Linux together with dm-crypt. On the other hand, eCryptfs provides "per-file" encryption. It stores encryption metadata in the header of each file and there is no need to keep track of any additional information aside from that. Since eCryptfs has to process keys and metadata on a per-file basis, usually dm-crypt is faster than ecryptfs.
Ubuntu 18.04 and above offers to encrypt your hard disk in automated fashion during its installation using dm-crypt and LUKS [1]. However, this option forces you to wipe your entire disk, which is not an option if you already have another operating system installed, such as Windows. This tutorial describes in detail how to encrypt your existing root partition in Ubuntu preserving all disk data. Most commands are Linux distribution-agnostic and should work well in other Linux distributions.
In short, the scenario covered in this tutorial is:
- Your computer has UEFI (Unified Extensible Firmware Interface)
- Your existing Ubuntu installation has a EFI system partition mounted at /boot/efi and a partition mounted at / (root partition)
- You want to encrypt your root partition preserving all the existing data in the hard disk
- Your root filesystem type is EXT3/EXT4.
Most recent motherboards and operating systems support UEFI. You can make sure your computer supports it by booting and checking its firmware. You can check disk partitions using the “fdisk -l” command in a terminal in Linux.
[1] The automated "full-disk" encryption replaces the automated /home encryption available in the installers of Ubuntu 17 and older versions.
Preparation
First, it is recommended to perform a full-disk image backup of the entire hard disk. If anything goes wrong during the encryption, you risk losing all the data in it, so it is better to be safe than sorry.
Second, there is no way to encrypt a mounted partition in Linux and you cannot unmount the root partition from which you have booted, so you will have to boot from a live USB. Take the following steps:
- Download the latest Ubuntu ISO at https://ubuntu.com/download/desktop. I have used Ubuntu 19.10 for this tutorial and therefore the instructions presented here focus on it. If you are using another version, maybe you will have to tweak some commands.
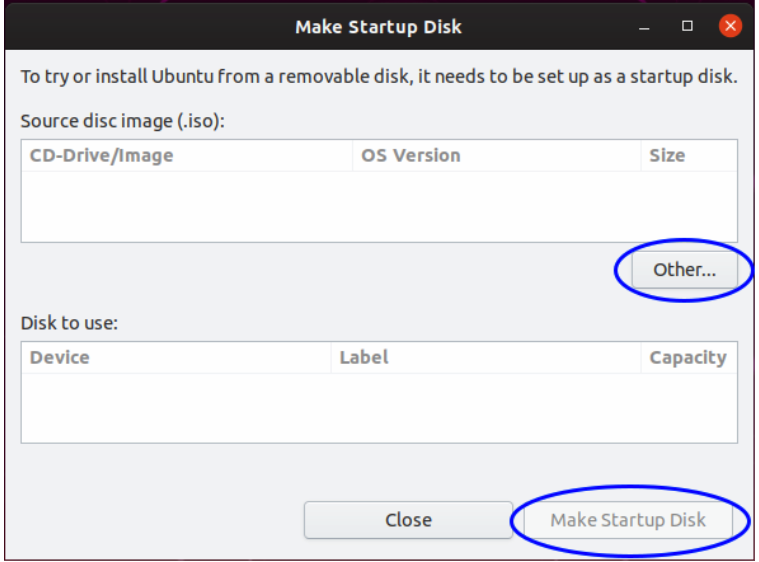
- Build a live USB with the ISO. In Ubuntu 19.10, you can install the usb-creator-gtk package and use the Startup Disk Creator graphic application; simply use the "Other" button to select an ISO file and the "Make Startup Disk" button to create a live USB with it.
- Reboot your workstation, enter your UEFI firmware, set the USB device to boot before the hard disk, save your changes, leave the firmware and boot in the live USB selecting the “Try Ubuntu without installing” in the GRUB menu, as shown in the following image.
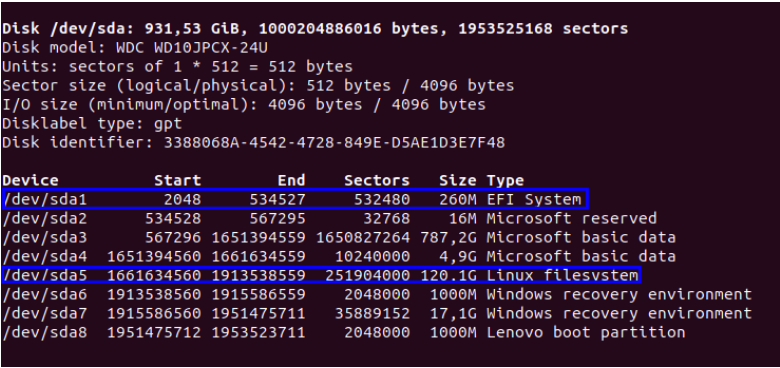
Once the Live Desktop Ubuntu environment has started, open a terminal by pressing Ctrl+Alt+T, run "fdisk -l" and look for the partition with the type "EFI system" and approximately 260 MB. That is the EFI system partition. Write down its number. Also look for a partition with the type "Linux filesystem" and write down its number. If you have more than one of these, you can use “mount”, “df”, “lsblk” or “findmnt” to see the mount points of all Linux partitions and pick the one mounted at the root directory.
Notice: most computer nowadays use SATA hard disk drives and Linux names the main SATA hard disk as sda and the partitions in it as sda1, sda2, etc. However, hard disk drives which use other technologies such as PATA or NVM Express will get other device names. I’ll assume that the main hard disk’s Linux device name is sda from now on and you must adjust the commands accordingly if that name is different in your computer.
Get the root partition UUID using the following command, replacing X with the root partition number:
$ blkid -s UUID -o value /dev/sdaX
Write this UUID down.
Encryption
During encryption, a LUKS encryption header is added at the beginning of the partition. Since an existing filesystem will usually use the entire partition, you must shrink it to make space for the LUKS header. Furthermore, resize2fs, the tool used to resize EXT2/EXT3/EXT4 filesystems, requires the filesystem to be checked before it can be resized. Execute the following commands, replacing X with the root partition number:
Encrypt your unencrypted root partition using LUKS1. You can use luksipc or cryptsetup-reencrypt (available in Ubuntu 19 and above) to achieve that. In Ubuntu 19 and above, I recommend the latter because it is more actively supported and therefore that is the one I will use in this tutorial. Make sure you have shrunk the filesystem as explained above before running this or you will lose all the existing data in the root partition. Execute the following command, replacing X with the root partition number:
$ cryptsetup-reencrypt /dev/sdaX --new --reduce-device-size 16M --type=luks1
The default LUKS format used by the cryptsetup tool changed to version 2 in Ubuntu 18.04. GRUB only supports version 1 so make sure you set the LUKS version to 1 as done above or else GRUB will not be able to install to or unlock the encrypted device.
You will be asked to enter a passphrase twice. Make sure you remember it easily because you will need to provide it on every system boot.
Open the encrypted root partition using cryptsetup (available in Ubuntu 19 and above), replacing X with the root partition number:
$ cryptsetup open /dev/sdaX rootfs
Extend the filesystem of the now encrypted root partition to take up all available space in the partition:
$ resize2fs /dev/mapper/rootfs
Post-encryption: boot adjustments
Although the first-stage GRUB boot loader is in the unencrypted /boot/efi partition, the second-stage GRUB boot loader and the initial ram disk are in /boot and therefore in the encrypted root partition. Due to this, you must make adjustments in GRUB so that it can access those.
Create a change-root environment in the root partition. Execute the following commands, replacing Y with the number of the EFI system partition:
$ mount /dev/mapper/rootfs /mnt
$ mount /dev/sdaY /mnt/boot/efi
$ mount --bind /dev /mnt/dev
$ mount --bind /dev/pts /mnt/dev/pts
$ mount --bind /sys /mnt/sys
$ mount --bind /proc /mnt/proc
With the current setup, the system would ask the encryption passphrase twice: once to access the second-stage GRUB boot loader and once again for the Linux kernel to access the encrypted root partition when it boots. In order not to require typing the encryption passphrase the second time, a keyfile must be created, added to LUKS and set up in /etc/crypttab, which describes the encrypted block devices that are set up during system boot.
Execute the following commands:
$ dd if=/dev/urandom of=/etc/luks/boot_os.keyfile bs=4096 count=1
$ chmod u=rx,go-rwx /etc/luks
$ chmod u=r,go-rwx /etc/luks/boot_os.keyfile
$ cryptsetup luksAddKey /dev/sdaX /etc/luks/boot_os.keyfile
Add the following line to /etc/crypttab (replace <encrypted_rootfs_uuid> with the root partition UUID):
rootfs UUID=<encrypted_rootfs_uuid> /etc/luks/boot_os.keyfile luks,discard
Example:
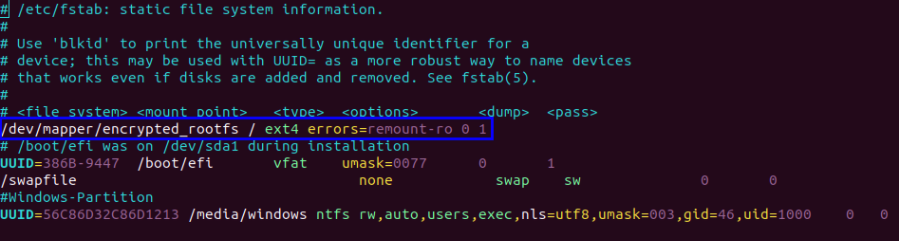
Remove the existing root partition line from /etc/fstab and add the following line:
/dev/mapper/rootfs / ext4 errors=remount-ro 0 1
Example:
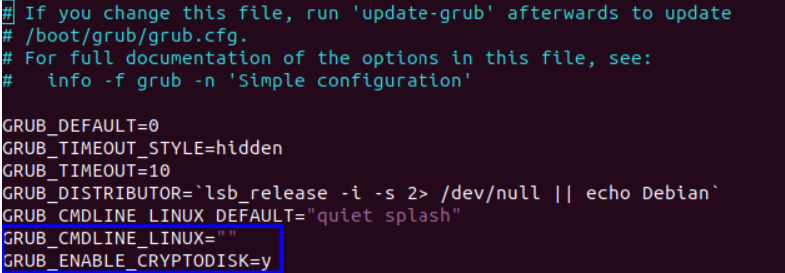
In /etc/default/grub, remove the existing reference to the root partition from GRUB_CMDLINE_LINUX and add the following line:
This line makes grub-install generate additional commands needed to access the encrypted root partition during boot.
Example:
Update GRUB binary and configuration files:
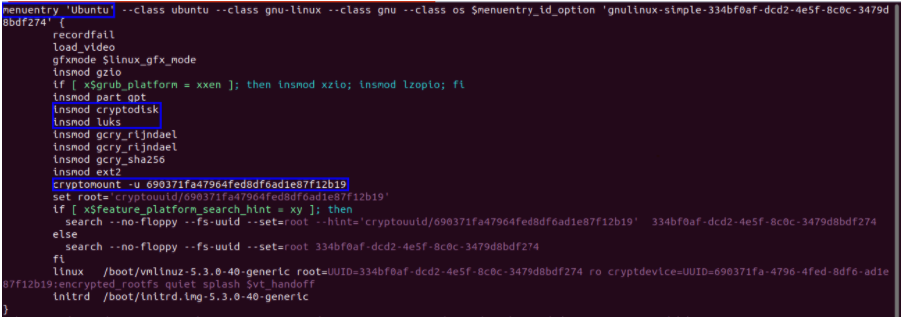
Make sure that the GRUB configuration file at /boot/grub/grub.cfg was updated correctly by update-grub. There must be at least a Ubuntu menu entry which loads the luks and cryptodisk kernel modules and mounts the encrypted partition using cryptomount.
Example (click on image for bigger version):
Update the initial RAM disk:
$ update-initramfs -k all -c
Leave the change-root environment:
Unmount all mounted filesystems:
Reboot and remove the USB drive so that the computer boots from the hard disk. You will be prompted to type the encrypted root partition passphrase.
Type the passphrase and Ubuntu will boot. That’s it!
If you have any suggestions or comments about this tutorial, feel free to add them in comments : )